
How-to
Empowering engineers with everything they need to build, monitor, and scale real-time data pipelines with confidence.

Heading 1
Heading 2
Heading 3
Heading 4
Heading 5
Heading 6
Lorem ipsum dolor sit amet, consectetur adipiscing elit, sed do eiusmod tempor incididunt ut labore et dolore magna aliqua. Ut enim ad minim veniam, quis nostrud exercitation ullamco laboris nisi ut aliquip ex ea commodo consequat. Duis aute irure dolor in reprehenderit in voluptate velit esse cillum dolore eu fugiat nulla pariatur.
Block quote
Ordered list
- Item 1
- Item 2
- Item 3
Unordered list
- Item A
- Item B
- Item C
Bold text
Emphasis
Superscript
Subscript
%20(1).webp)
Integrate Kpow with Google Managed Schema Registry
Kpow 94.3 now integrates with Google Cloud's managed Schema Registry, enabling native OAuth authentication. This guide walks through the complete process of configuring authentication and using Kpow to create, manage, and inspect data validated against Avro schemas.
Overview
Google Cloud has enhanced its platform with the launch of a managed Schema Registry for Apache Kafka, a critical service for ensuring data quality and schema evolution in streaming architectures. Kpow 94.3 expands its support for Google Managed Service for Apache Kafka by integrating the managed schema registry. This allows users to manage Kafka clusters, topics, consumer groups, and schemas from a single interface.
Building on our earlier setup guide, this post details how to configure the new schema registry integration and demonstrates how to leverage the Kpow UI for working effectively with Avro schemas.
About Factor House
Factor House is a leader in real-time data tooling, empowering engineers with innovative solutions for Apache Kafka® and Apache Flink®.
Our flagship product, Kpow for Apache Kafka, is the market-leading enterprise solution for Kafka management and monitoring.
Explore our live multi-cluster demo environment or grab a free Community license and dive into streaming tech on your laptop with Factor House Local.

Prerequisites
In this tutorial, we will use the Community Edition of Kpow, where the default user has all the necessary permissions to complete the tasks. For those using the Kpow Enterprise Edition with user authorization enabled, the logged-in user must have the SCHEMA_CREATE permission for Role-Based Access Control or have ALLOW_SCHEMA_CREATE=true set for Simple Access Control. More information can be found in the Kpow User Authorization documentation.
We also assume that a Managed Kafka cluster has already been created, as detailed in the earlier setup guide. This cluster will serve as the foundation for the configurations and operations covered in this tutorial.
Create a Google Managed Schema Registry
We can create a schema registry using the gcloud beta managed-kafka schema-registries create command as shown below.
gcloud compute instances create kafka-test-instance \
--scopes=https://www.googleapis.com/auth/cloud-platform \
--tags=http-server \
--subnet=projects/$PROJECT_ID/regions/$REGION/subnetworks/default \
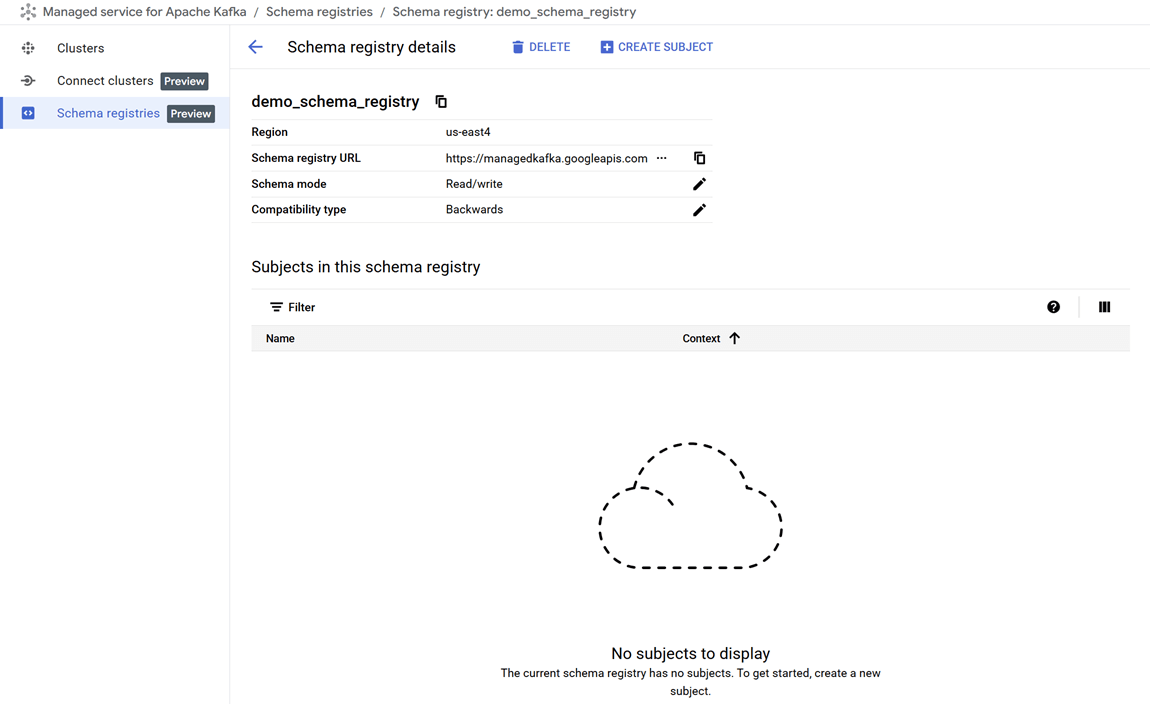
--zone=$REGION-aOnce the command completes, we can verify that the new registry, demo_schema_registry, is visible in the GCP Console under the Kafka services.
Set up a client VM
The default service account used by the client VM is granted the following roles. While these roles provide Kpow with administrative access, user-level permissions can still be controlled using User Authorization - an enterprise-only feature:
- Managed Kafka Admin: Grants full access to manage Kafka topics, configurations, and access controls in GCP’s managed Kafka environment.
- Schema Registry Admin: Allows registering, evolving, and managing schemas and compatibility settings in the Schema Registry.
To connect to the Kafka cluster, Kpow must run on a machine with network access to it. In this setup, we use a Google Cloud Compute Engine VM that must be in the same region, VPC, and subnet as the Kafka cluster. We also attach the http-server tag to allow HTTP traffic, enabling browser access to Kpow’s UI.
We can create the client VM using the following command:
gcloud compute instances create kafka-test-instance \ --scopes=https://www.googleapis.com/auth/cloud-platform \ --tags=http-server \ --subnet=projects/$PROJECT_ID/regions/$REGION/subnetworks/default \ --zone=$REGION-a
Launch a Kpow Instance
Once our client VM is up and running, we'll connect to it using the SSH-in-browser tool provided by Google Cloud. After establishing the connection, the first step is to install Docker Engine, as Kpow will be launched using Docker. Refer to the official installation and post-installation guides for detailed instructions.
Preparing Kpow Configuration
To get Kpow running with a Google Cloud managed Kafka cluster and its schema registry, we prepare a configuration file (gcp-trial.env) that defines all necessary connection and authentication settings, as well as the Kpow license details.
The configuration is divided into three main parts: Kafka cluster connection, schema registry integration, and license activation.
## Kafka Cluster Configuration
ENVIRONMENT_NAME=GCP Kafka Cluster
BOOTSTRAP=bootstrap.<cluster-id>.<gcp-region>.managedkafka.<gcp-project-id>.cloud.goog:9092
SECURITY_PROTOCOL=SASL_SSL
SASL_MECHANISM=OAUTHBEARER
SASL_LOGIN_CALLBACK_HANDLER_CLASS=com.google.cloud.hosted.kafka.auth.GcpLoginCallbackHandler
SASL_JAAS_CONFIG=org.apache.kafka.common.security.oauthbearer.OAuthBearerLoginModule required;

## Schema Registry Configuration
SCHEMA_REGISTRY_NAME=GCP Schema Registry
SCHEMA_REGISTRY_URL=https://managedkafka.googleapis.com/v1/projects/<gcp-project-id>/locations/<gcp-region>/schemaRegistries/<registry-id>
SCHEMA_REGISTRY_BEARER_AUTH_CUSTOM_PROVIDER_CLASS=com.google.cloud.hosted.kafka.auth.GcpBearerAuthCredentialProvider
SCHEMA_REGISTRY_BEARER_AUTH_CREDENTIALS_SOURCE=CUSTOM

## Your License Details
LICENSE_ID=<license-id>
LICENSE_CODE=<license-code>
LICENSEE=<licensee>
LICENSE_EXPIRY=<license-expiry>
LICENSE_SIGNATURE=<license-signature>
In the Kafka Cluster Configuration section, the ENVIRONMENT_NAME variable sets a friendly label visible in the Kpow user interface. The BOOTSTRAP variable specifies the Kafka bootstrap server address, incorporating the cluster ID, Google Cloud region, and project ID.
Authentication and secure communication are handled via SASL over SSL using OAuth tokens. The SASL_MECHANISM is set to OAUTHBEARER, enabling OAuth-based authentication. The class GcpLoginCallbackHandler automatically manages OAuth tokens using the VM's service account or a specified credentials file, simplifying token management and securing Kafka connections.
The Schema Registry Configuration section integrates Kpow with Google Cloud's managed Schema Registry service. The SCHEMA_REGISTRY_NAME is a descriptive label for the registry in Kpow. The SCHEMA_REGISTRY_URL points to the REST API endpoint for the schema registry; placeholders must be replaced with the actual project ID, region, and registry ID.
For authentication, Kpow uses Google's GcpBearerAuthCredentialProvider to acquire OAuth2 tokens when accessing the schema registry API. Setting SCHEMA_REGISTRY_BEARER_AUTH_CREDENTIALS_SOURCE to CUSTOM tells Kpow to use this provider, allowing seamless and secure schema fetch and management with Google Cloud's identity controls.
Finally, the License Details section contains essential license parameters required to activate and run Kpow.
Launching Kpow
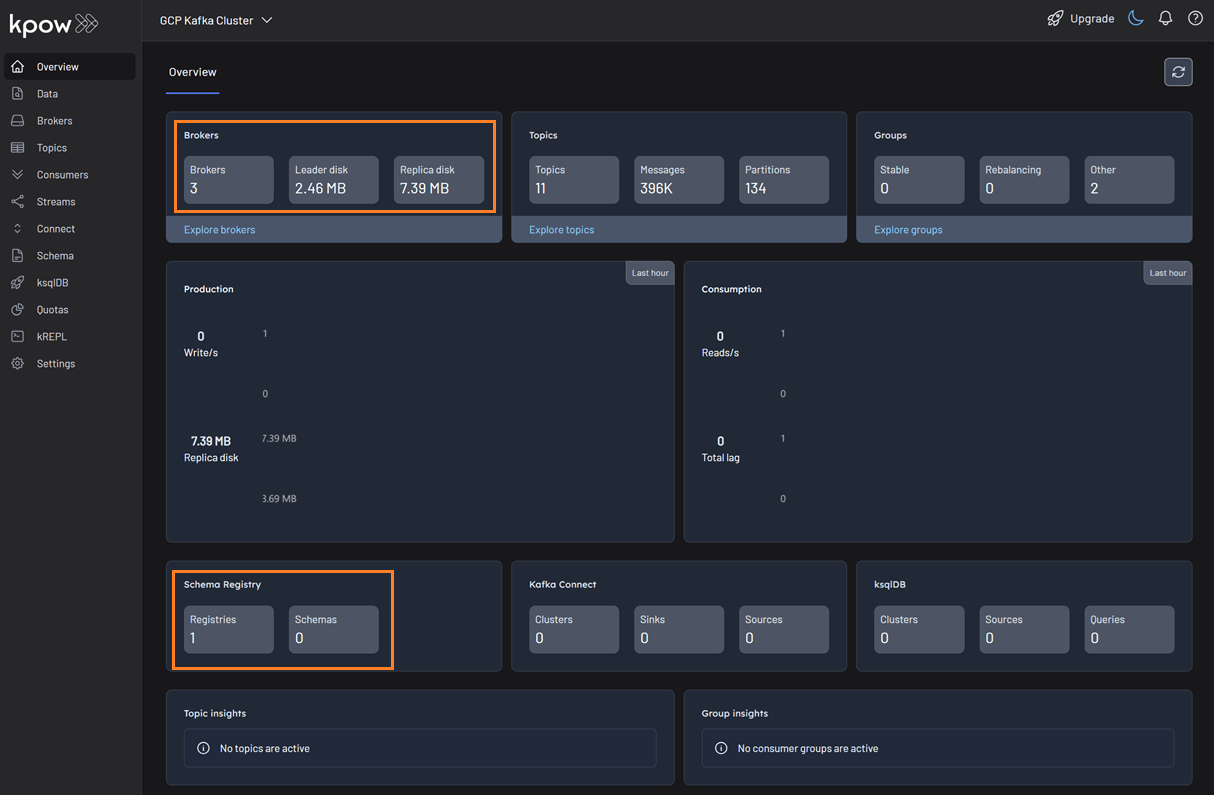
Once the gcp-trial.env file is ready, we can launch Kpow using Docker. The command below pulls the latest Community Edition image, loads the environment config, and binds port 3000 (Kpow UI) to port 80 on the host VM. This allows us to access the Kpow UI directly in the browser at http://<vm-external-ip>:
docker run --pull=always -p 80:3000 --name kpow \
  --env-file gcp-trial.env -d factorhouse/kpow-ce:latest
Schema Management
With our environment up and running, we can use Kpow to create a new schema subject in the GCP Schema Registry.
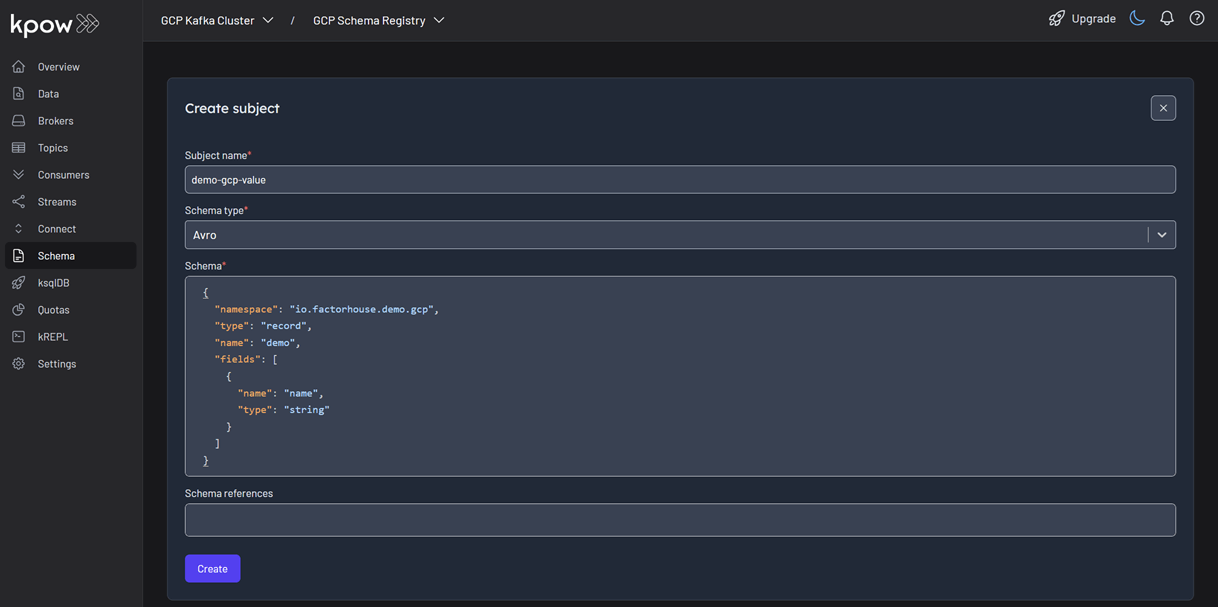
- In the Schema menu, click Create subject.
- Since we only have one registry configured, the GCP Schema Registry is selected by default.
- Enter a subject name (e.g.,
demo-gcp-value), chooseAVROas the type, and provide a schema definition. Click Create.
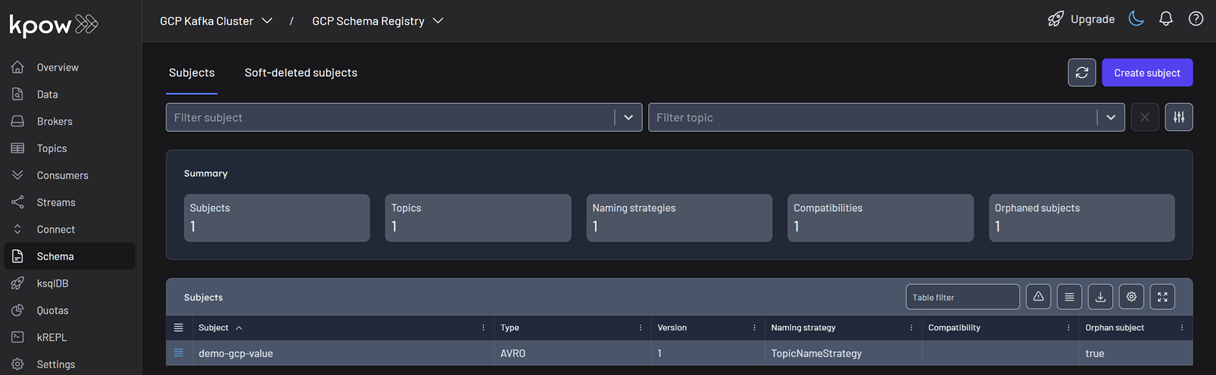
Once created, the new subject appears in the Schema menu within Kpow. This allows us to easily view, manage, and interact with the schema.
Working with Avro Data
Next, we'll produce and inspect an Avro record that is validated against the schema we just created.
First, create a new topic named demo-gcp from the Kpow UI.
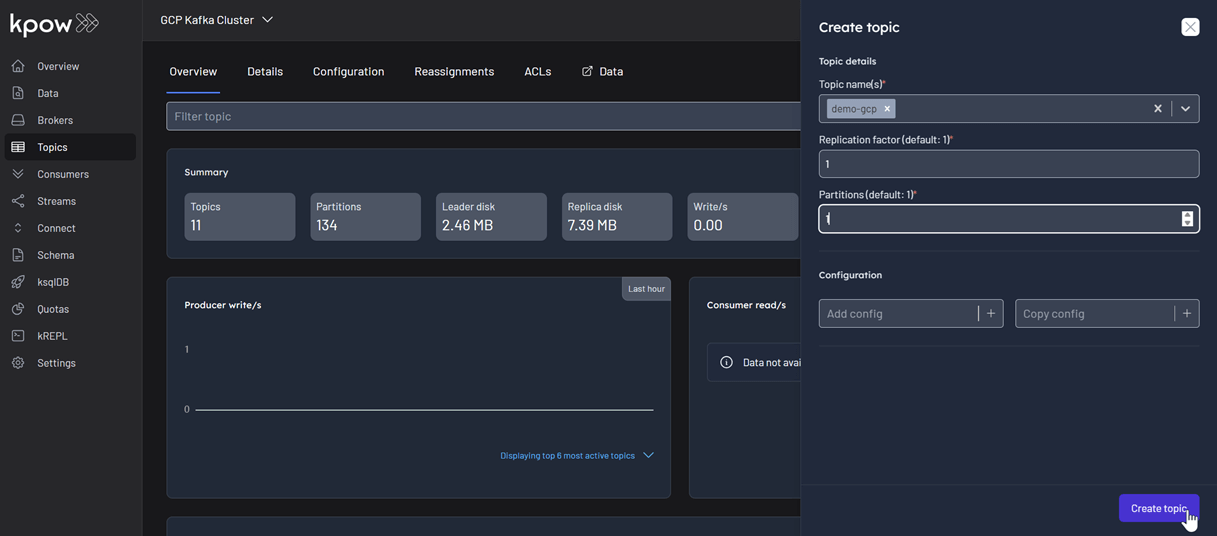
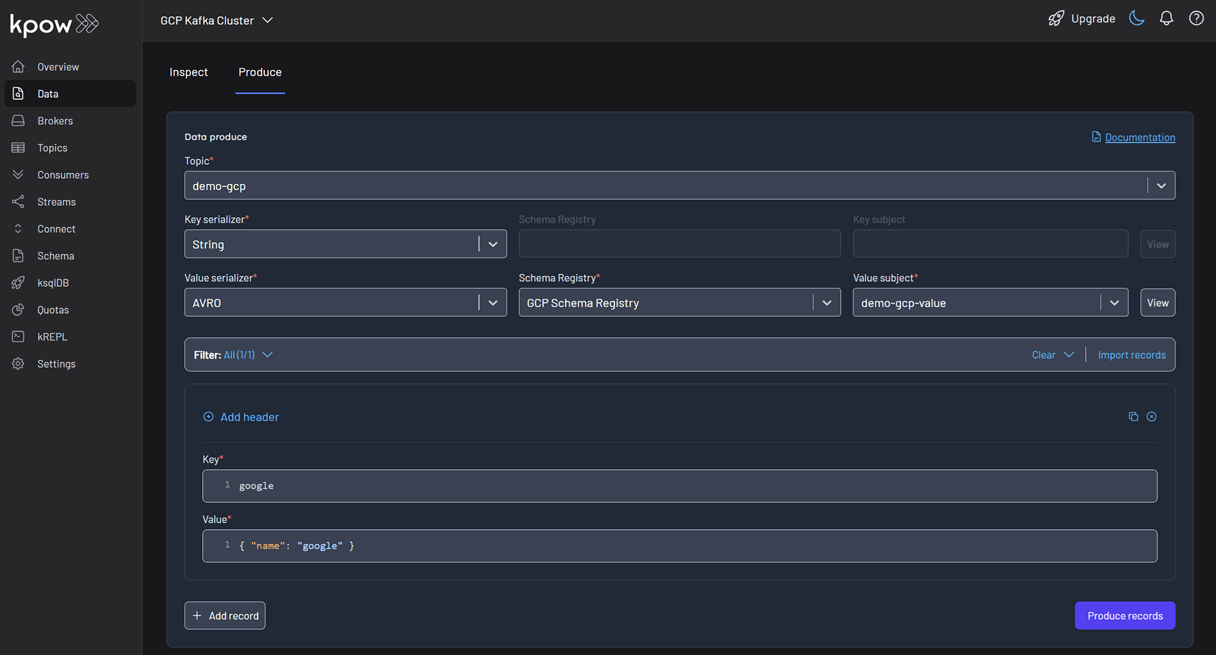
Now, to produce a record to the demo-gcp topic:
- Go to the Data menu, select the topic, and open the Produce tab.
- Select
Stringas the Key Serializer - Set the Value Serializer to
AVRO. - Choose GCP Schema Registry as the Schema Registry.
- Select the
demo-gco-valuesubject. - Enter key/value data and click Produce.
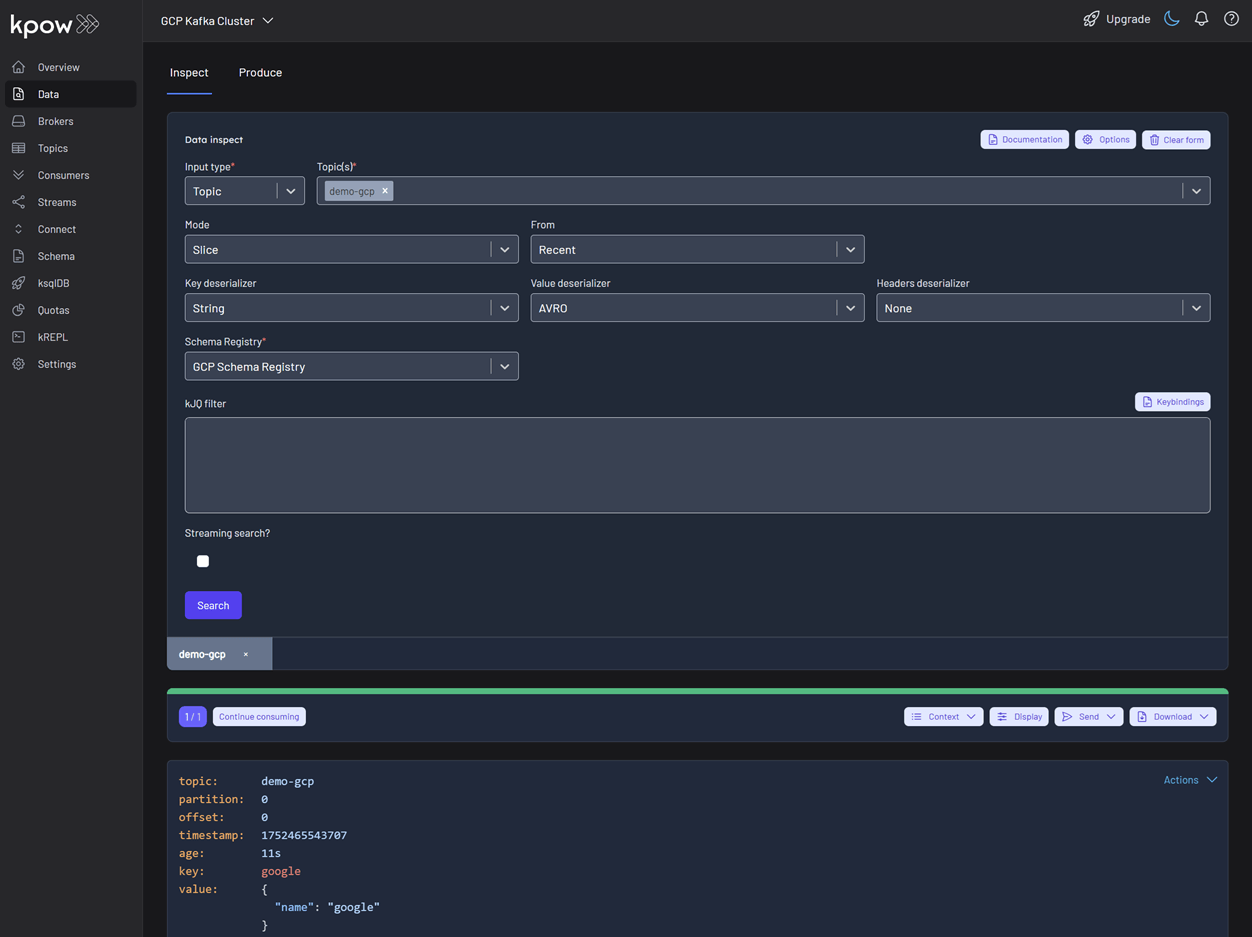
To see the result, navigate back to the Inspect tab and select the demo-gcp topic. In the deserializer options, choose String as the Key deserializer and AVRO as the Value deserializer, then select GCP Schema Registry. Kpow automatically fetches the correct schema version, deserializes the binary Avro message, and presents the data as easy-to-read JSON.
Tip: Kpow 94.3 introduces automatic deserialization of keys and values. For users unfamiliar with a topic's data format, selecting Auto lets Kpow attempt to infer and deserialize the records automatically as they are consumed.
Conclusion
Integrating Kpow with Google Cloud's Managed Schema Registry consolidates our entire Kafka management workflow into a single, powerful platform. By following this guide, we have seen how to configure Kpow to securely connect to both GCP Managed Kafka and the Schema Registry using native OAuth authentication, completely removing the need for manual token handling.
The result is a seamless, end-to-end experience where we can create and manage schemas, produce and consume schema-validated data, and inspect the records—all from the Kpow UI. This powerful combination streamlines development, enhances data governance, and empowers engineering teams to fully leverage Google Cloud's managed Kafka services.
Heading 1
Heading 2
Heading 3
Heading 4
Heading 5
Heading 6
Lorem ipsum dolor sit amet, consectetur adipiscing elit, sed do eiusmod tempor incididunt ut labore et dolore magna aliqua. Ut enim ad minim veniam, quis nostrud exercitation ullamco laboris nisi ut aliquip ex ea commodo consequat. Duis aute irure dolor in reprehenderit in voluptate velit esse cillum dolore eu fugiat nulla pariatur.
Block quote
Ordered list
- Item 1
- Item 2
- Item 3
Unordered list
- Item A
- Item B
- Item C
Bold text
Emphasis
Superscript
Subscript
.webp)
Integrate Kpow with Bufstream
Learn how to integrate Bufstream—a Kafka-compatible streaming platform—with Kpow to enable streamlined, schema-aware development for Kafka-compatible streaming platforms.
Overview
Kpow supports a wide range of Apache Kafka and Kafka API–compatible platforms, providing robust tools to manage, monitor, and secure data streaming workloads. In this guide, we'll walkthrough how to integrate Bufstream - a cloud-native, Kafka-compatible streaming solution - with Kpow, enabling seamless use of Bufstream's advanced schema management alongside Kpow's comprehensive Kafka management capabilities for an optimized streaming experience.
💡 Visit our earlier posts to learn how to set up Kpow with leading platforms such as Confluent Cloud, Amazon MSK, and Google Cloud Managed Service for Apache Kafka, as well as emerging solutions like Redpanda.
About Factor House
Factor House is a leader in real-time data tooling, empowering engineers with innovative solutions for Apache Kafka® and Apache Flink®.
Our flagship product, Kpow for Apache Kafka, is the market-leading enterprise solution for Kafka management and monitoring.
Explore our live multi-cluster demo environment or grab a free Community license and dive into streaming tech on your laptop with Factor House Local.
Prerequisites
This tutorial uses the Community Edition of Kpow, where the default user has all the necessary permissions for the tasks we will perform.
For users of Kpow Enterprise Edition with user authorization enabled, performing these actions would require the logged-in user to have the SCHEMA_CREATE permission for Role-Based Access Control (RBAC) or have ALLOW_SCHEMA_CREATE=true set for Simple Access Control. You can learn more in the Kpow User Authorization documentation.
Launch Bufstream and Kpow
We begin by creating a dedicated Docker network named factorhouse, which establishes a private communication channel for the Bufstream and Kpow containers. We then launch a single Bufstream broker and Kpow instance in dedicated containers.
Here's an overview of the containers:
- Bufstream (
bufstream)- Image:
bufbuild/bufstream:latest - Host Ports:
9092: Exposes the Kafka API to the host machine.
- Configuration:
- Mode: Runs in
inmemorymode, creating a temporary, single-node broker where all data is lost on shutdown. - Kafka API: Listens for connections internally on port
9092and is also mapped to9092on the host. It advertises itself asbufstream:9092within the Docker network.
- Mode: Runs in
- Network: Attached to the
factorhousenetwork, making it reachable by other containers at the hostnamebufstream.
- Image:
- Kpow (
kpow)- Image:
factorhouse/kpow-ce:latest - Host Ports:
3000: Exposes the Kpow web UI to the host machine, accessible athttp://localhost:3000.
- Configuration:
- ENVIRONMENT_NAME: UI friendly label for this cluster and resources.
- BOOTSTRAP: Configured to connect to the Bufstream broker at
bufstream:9092, using the internal Docker network for communication. - SCHEMA_REGISTRY_NAME: UI friendly label for a schema registry.
- SCHEMA_REGISTRY_URL: Configured to connect to the Confluent-compatible API endpoint of Buf's public demo registry (
https://demo.buf.dev/integrations/confluent/bufstream-demo). For details on connecting to a custom Confluent Schema Registry instance, see the official documentation. - Licensing: The configuration is loaded from an environment file specified by the
$KPOW_LICENSE_FILEshell variable, which is required to run the container.
- Network: Attached to the
factorhousenetwork, which allows it to resolve and connect tobufstream:9092.
- Image:
## Create a docker network to be shared
docker network create factorhouse

## Start a Bufstream broker
docker run -d -p 9092:9092 --name bufstream --network factorhouse \
  -e BUFSTREAM_KAFKA_HOST="0.0.0.0" \
  -e BUFSTREAM_KAFKA_PUBLIC_HOST="bufstream" \
  -e BUFSTREAM_KAFKA_PUBLIC_PORT="9092" \
  bufbuild/bufstream:latest serve --inmemory

## Start a Kpow instance
docker run -d -p 3000:3000 --name kpow --network factorhouse \
  -e ENVIRONMENT_NAME="Bufstream" \
  -e BOOTSTRAP="bufstream:9092" \
  -e SCHEMA_REGISTRY_NAME="Buf Registry" \
  -e SCHEMA_REGISTRY_URL="https://demo.buf.dev/integrations/confluent/bufstream-demo" \
  --env-file=$KPOW_LICENSE_FILE \
  factorhouse/kpow-ce:latest
Once the containers are running, navigate to http://localhost:3000 to access the Kpow UI. We will see that Kpow has automatically discovered and connected to the single Bufstream broker and Buf's public demo registry.
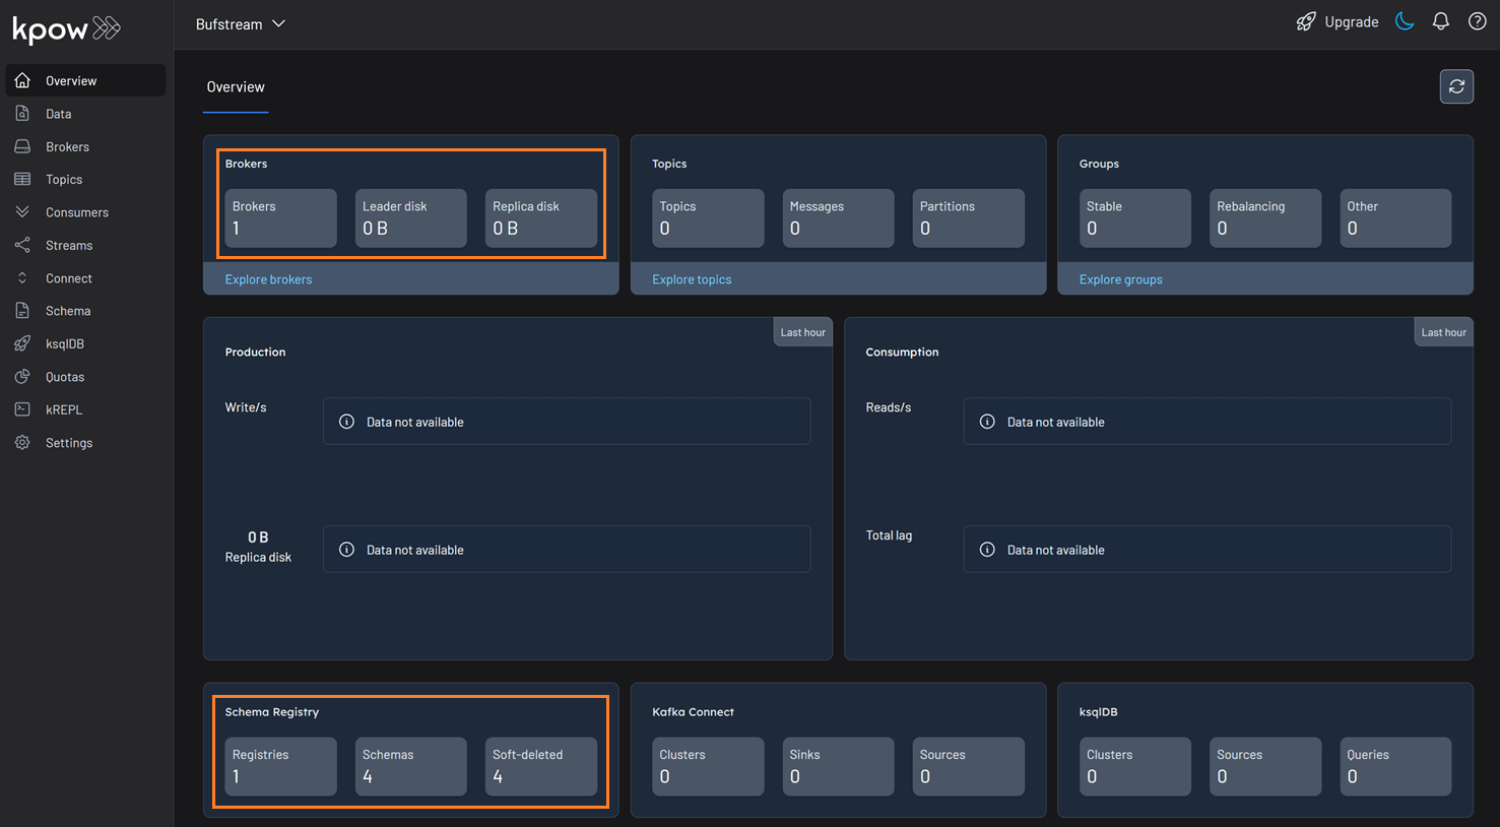
Schema Overview
In the Schema menu, we can see that there are four subjects in Buf's demo repository. All of them use the Protobuf format, and for this guide, we will focus on the workflow-dataset-nyc-taxis-value subject.
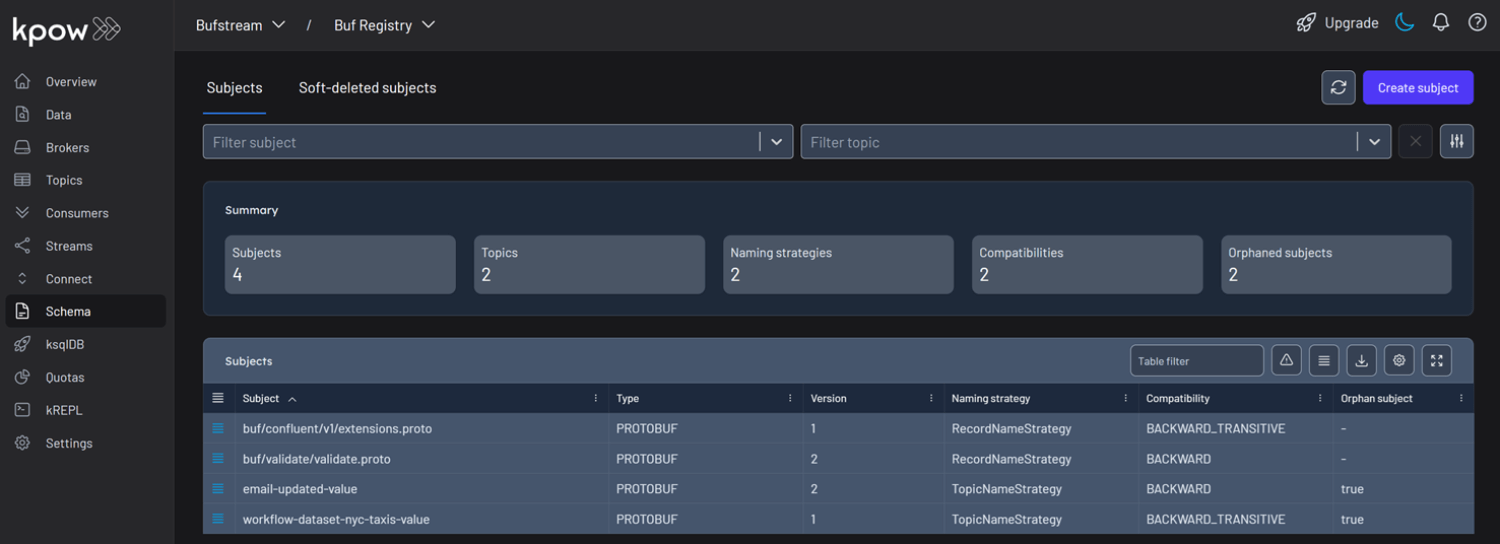
Clicking the menu next to a subject reveals options to view or edit the subject. By selecting View subject, we can examine the subject's schema definition.
The schema uses modern proto3 syntax and defines a detailed structure for a single New York City taxi ride via the main Ride message. It captures a comprehensive range of data, including nested fields for pickup and drop-off events, trip characteristics such as passenger count and distance, and a detailed breakdown of payment components-covering base fare, taxes, tolls, and tips.
// Copyright 2023-2025 Buf Technologies, Inc.
//
// All rights reserved.

syntax = "proto3";

package buf.bufstream.priv.dataset.nyctaxi.v1alpha1;

import "buf/confluent/v1/extensions.proto";
import "google/protobuf/timestamp.proto";

// Ride represents a single tax ride in New York City.
message Ride {
  option (buf.confluent.v1.subject) = {
    instance_name: "bufstream-demo"
    name: "workflow-dataset-nyc-taxis-value"
  };

  // ID of the vendor that provided the ride.
  optional int32 vendor_id = 1;
  // Details about the rider's pickup.
  Event pickup = 2;
  // Details about the rider's drop-off.
  Event drop_off = 3;
  // Other details of the trip.
  TripDetails details = 4;
  // Details of the fare and payment.
  Payment payment_info = 5;
  // Unclear what this is; it's in the Parquet schema though...
  optional string store_and_forward = 6;

  // Event includes properties for an event: time and location.
  message Event {
    // The time of the event.
    google.protobuf.Timestamp time = 1;
    // The location of the event.
    optional int32 location_id = 2;
  }

  // TripDetails describes properties of the trip.
  message TripDetails {
    // The number of passengers riding.
    optional int64 passenger_count = 1;
    // The number of miles travelled.
    optional double distance = 2;
    // The rate code for this trip.
    optional int32 rate_code_id = 3;
  }

  // Payment describes details about the payment and the amount charged.
  message Payment {
    // The type of instrument used for payment.
    optional int64 type = 1;
    // The total amount paid.
    optional double total_amount = 2;
    // Details of the amount charged.
    FareDetails details = 3;
  }
  // FareDetails breaks down all of the components of the amount charged.
  message FareDetails {
    // The fare, based on distance and time.
    optional double base_fare = 1;
    // Any extra fee agreed upon before the ride began.
    optional double extra = 2;
    // MTA taxes.
    optional double mta_tax = 3;
    // Optional tip.
    optional double tip = 4;
    // Fees for using toll bridges and roads.
    optional double tolls = 5;
    // Surcharge that vendor charges.
    optional double improvement_surcharge = 6;
    // Surcharge based on time and location/traffic conditions.
    optional double congestion_surcharge = 7;
    // Surcharge for trips to and from an airport.
    optional double airport_fee = 8;
  }
}
Below is an example JSON record that conforms to the schema:
{
  "vendorId": 2,
  "pickup": {
    "time": "2023-01-01T14:25:15Z",
    "locationId": 138
  },
  "dropOff": {
    "time": "2023-01-01T14:40:30Z",
    "locationId": 236
  },
  "details": {
    "passengerCount": 1,
    "distance": 3.45,
    "rateCodeId": 1
  },
  "paymentInfo": {
    "type": 1,
    "totalAmount": 24.8,
    "details": {
      "baseFare": 17.5,
      "extra": 1.25,
      "mtaTax": 0.5,
      "tip": 3.55,
      "tolls": 0,
      "improvementSurcharge": 0.3,
      "congestionSurcharge": 2.5,
      "airportFee": 0
    }
  },
  "storeAndForward": "N"
}
Working with Protobuf Data
With an understanding of the schema, let's use Kpow to interact with it by producing and consuming a Protobuf message. First, create a new topic named workflow-dataset-nyc-taxis from the Kpow UI.
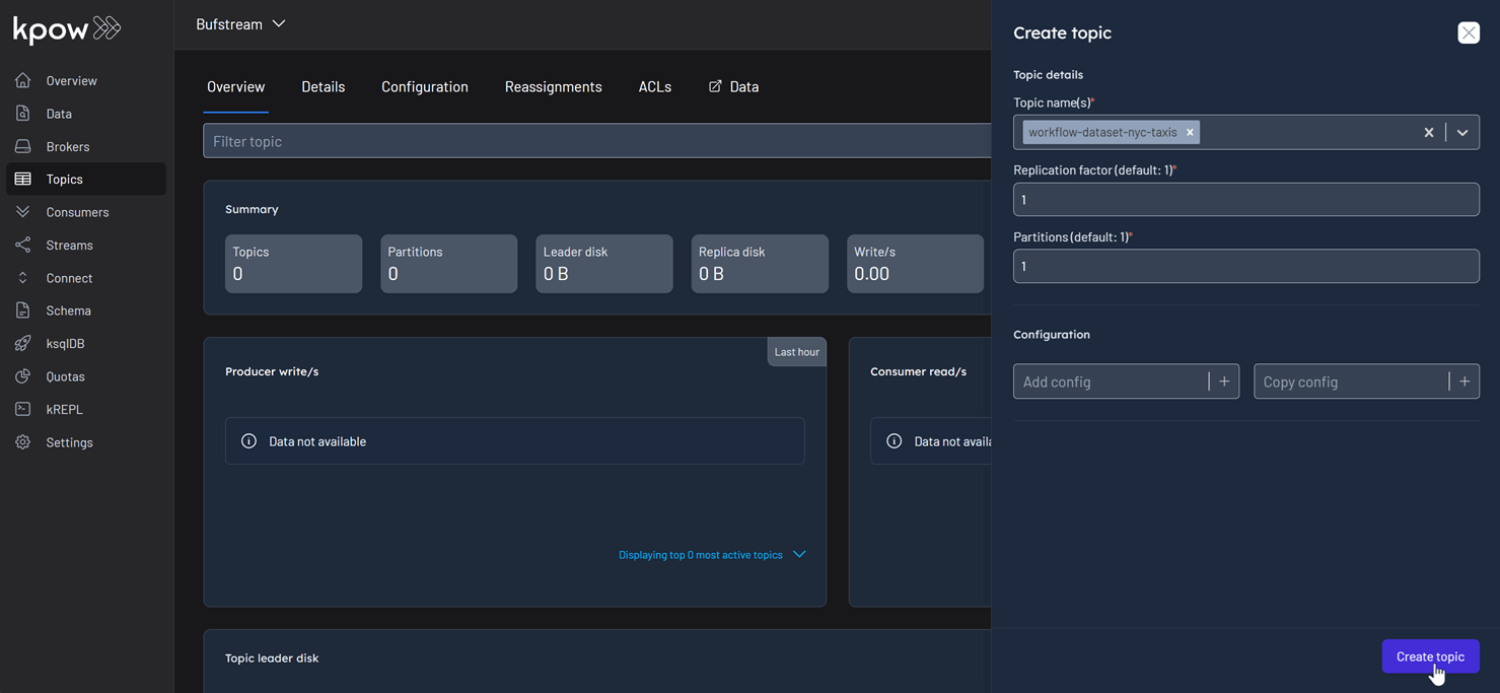
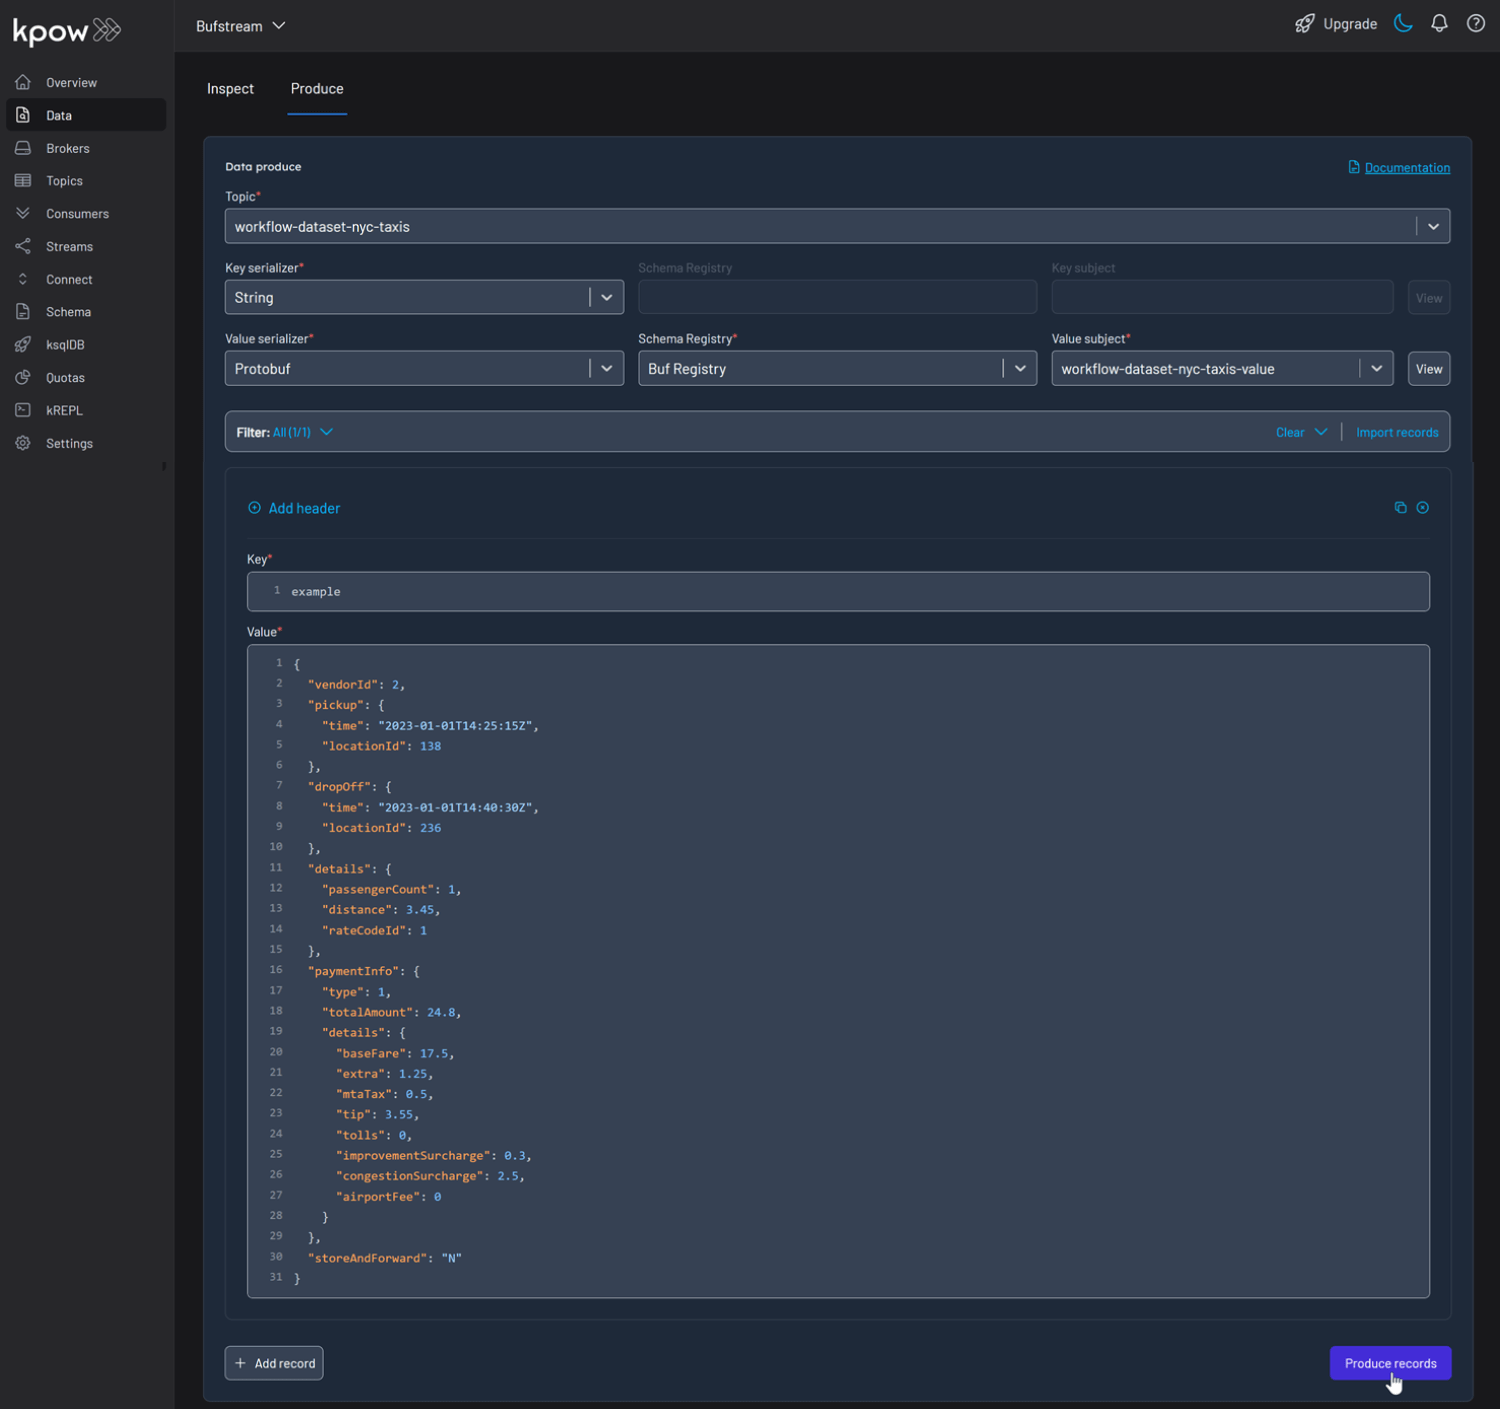
Now, to produce a record to the workflow-dataset-nyc-taxis topic:
- Go to the Data menu, select the topic, and open the Produce tab.
- Set the Key Serializer to
String. - Set the Value Serializer to
Protobuf. - Choose Buf Registry as the Schema Registry.
- Select the
workflow-dataset-nyc-taxis-valuesubject. - Enter your key and a valid JSON value for the message, then click Produce.
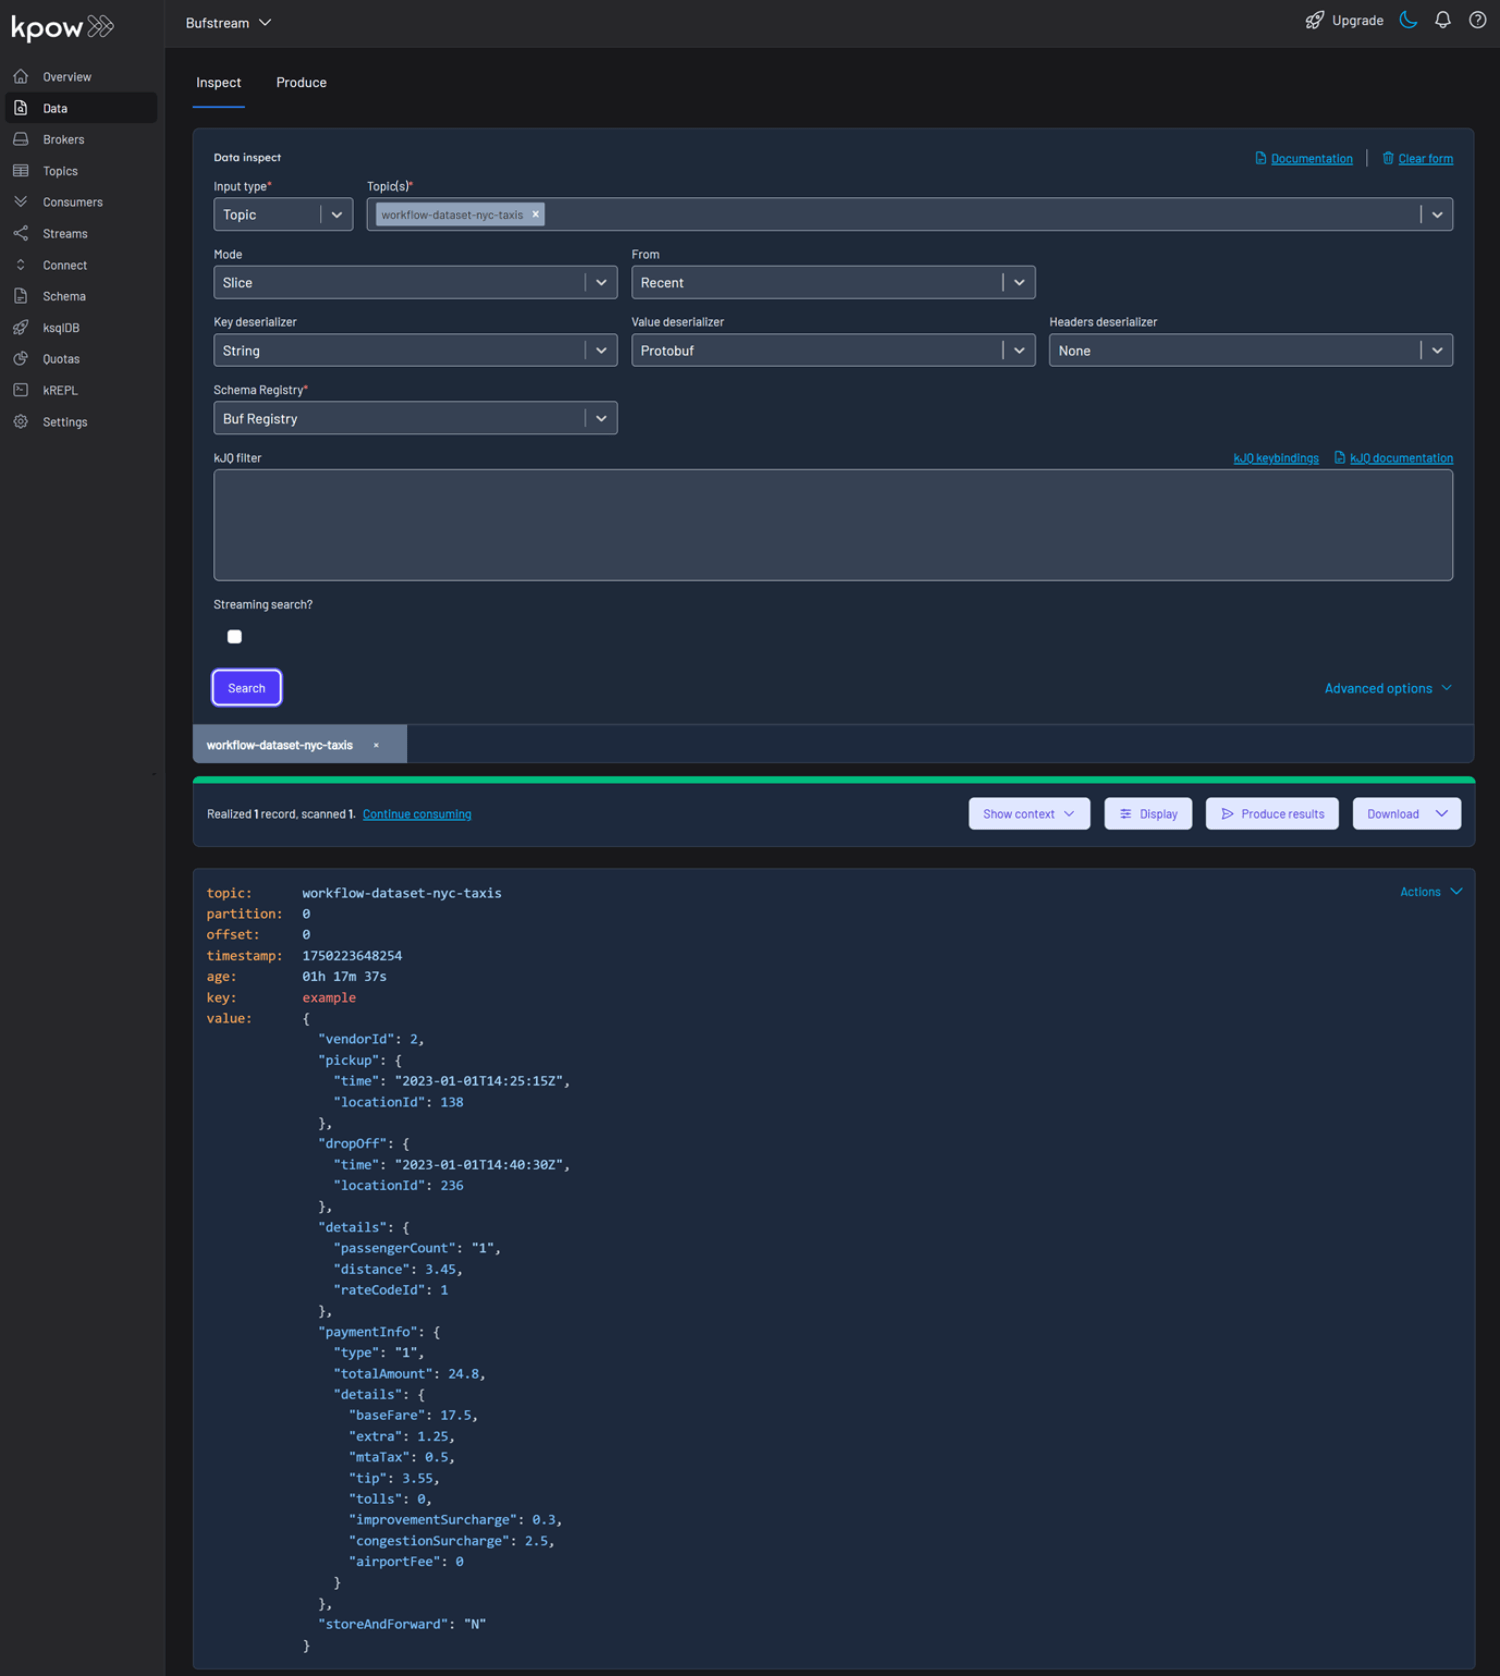
To view the result, navigate to the Data tab and select the workflow-dataset-nyc-taxis topic. In the deserializer options, choose String as the Key deserializer and Protobuf as the Value deserializer, then select Buf Registry. Kpow will automatically fetch the correct schema version, deserialize the Protobuf message, and display the data as readable JSON.
Shutdown Environment
The Docker containers and network can be removed using the commands below.
docker rm -f bufstream kpow
docker network rm factorhouse
Conclusion
In this guide, we demonstrated how to integrate Bufstream with Kpow. We launched the services using Docker, connected Kpow to Buf's public Schema Registry, and explored a real-world Protobuf schema. Most importantly, we demonstrated how Kpow's UI simplifies the process of producing and consuming schema-validated Protobuf messages, providing immediate feedback and making data inspection effortless. This setup provides a powerful and streamlined workflow, significantly improving the development experience for any schema-driven application on Kafka.
Heading 1
Heading 2
Heading 3
Heading 4
Heading 5
Heading 6
Lorem ipsum dolor sit amet, consectetur adipiscing elit, sed do eiusmod tempor incididunt ut labore et dolore magna aliqua. Ut enim ad minim veniam, quis nostrud exercitation ullamco laboris nisi ut aliquip ex ea commodo consequat. Duis aute irure dolor in reprehenderit in voluptate velit esse cillum dolore eu fugiat nulla pariatur.
Block quote
Ordered list
- Item 1
- Item 2
- Item 3
Unordered list
- Item A
- Item B
- Item C
Bold text
Emphasis
Superscript
Subscript
.webp)
Integrate Kpow with the Redpanda Streaming Platform
A comprehensive, step-by-step guide to integrating Kpow with the Redpanda platform, covering the complete configuration needed to monitor the Kafka-compatible broker and manage schemas through its built-in schema registry.
Overview
Redpanda offers a simple, powerful, and Kafka®-compatible streaming data platform. Kpow provides a rich, developer-focused UI to manage and monitor it. Together, they form a robust stack for building and operating real-time data pipelines.
This guide will walk you through the process of setting up Kpow with a local Redpanda cluster using Docker. We will cover launching the environment, using Kpow to create and manage an Avro schema in Redpanda's built-in registry, producing schema-governed data to a topic, and finally, inspecting that data in a human-readable format.
💡 Kpow supports Confluent-compatible schema registries out-of-the-box, which is why it works seamlessly with Redpanda. Learn how to connect other compatible registries by reading our guide on How to Integrate Confluent-compatible Registries with Kpow.
About Factor House
Factor House is a leader in real-time data tooling, empowering engineers with innovative solutions for Apache Kafka® and Apache Flink®.
Our flagship product, Kpow for Apache Kafka, is the market-leading enterprise solution for Kafka management and monitoring.
Explore our live multi-cluster demo environment or grab a free Community license and dive into streaming tech on your laptop with Factor House Local.
Prerequisites
This tutorial uses the Community Edition of Kpow, where the default user has all the necessary permissions for the tasks we will perform.
For users of Kpow Enterprise Edition with user authorization enabled, performing these actions would require the logged-in user to have the SCHEMA_CREATE permission for Role-Based Access Control (RBAC) or have ALLOW_SCHEMA_CREATE=true set for Simple Access Control. You can learn more in the Kpow User Authorization documentation.
Launch Redpanda and Kpow
We begin by creating a dedicated Docker network named factorhouse, which establishes a private communication channel for the Redpanda and Kpow containers. We then launch a single Redpanda broker and Kpow instance in dedicated containers.
Here's an overview of the containers:
- Redpanda (
redpanda)- Image:
redpandadata/redpanda:latest - Host Ports:
19092: Exposes the Kafka API to the host machine.18081: Exposes the Schema Registry API to the host machine.
- Configuration:
- Mode: Runs in
dev-containermode, optimized for a single-node development environment. - Kafka API: Listens for connections internally on port
9092and externally on19092. It advertises itself asredpanda:9092within the Docker network andlocalhost:19092to the host. - Schema Registry: The built-in schema registry is enabled, listening internally on
8081and externally on18081.
- Mode: Runs in
- Network: Attached to the
factorhousenetwork, making it reachable by other containers at the hostnameredpanda.
- Image:
- Kpow (
kpow)- Image:
factorhouse/kpow-ce:latest(Usefactorhouse/kpow:latestfor the enterprise edition) - Host Port:
3000(for accessing the Kpow web UI from a browser athttp://localhost:3000). - Configuration:
- ENVIRONMENT_NAME: UI friendly label for this cluster and resources.
- BOOTSTRAP: Configured to connect to the Redpanda cluster at
redpanda:9092, using the internal Docker network for communication. - SCHEMA_REGISTRY_NAME: UI friendly label for a schema registry.
- SCHEMA_REGISTRY_URL: Configured to connect to Redpanda's integrated schema registry at
http://redpanda:8081. - Licensing: The configuration is loaded from an environment file specified by the
$KPOW_LICENSE_FILEshell variable, which is required to run the container.
- Network: Attached to the
factorhousenetwork, allowing it to resolve and connect to theredpandacontainer.
- Image:
## Create a docker network to be shared
docker network create factorhouse

## Start a Redpanda broker and schema registry
docker run -d -p 19092:19092 -p 18081:18081 --name redpanda --hostname redpanda --network factorhouse \
  redpandadata/redpanda:latest redpanda start \
    --kafka-addr internal://0.0.0.0:9092,external://0.0.0.0:19092 \
    --advertise-kafka-addr internal://redpanda:9092,external://localhost:19092 \
    --schema-registry-addr internal://0.0.0.0:8081,external://0.0.0.0:18081 \
    --rpc-addr redpanda:33145 \
    --advertise-rpc-addr redpanda:33145 \
    --mode dev-container

## Start a Kpow instance
docker run -d -p 3000:3000 --name kpow --network factorhouse \
  -e ENVIRONMENT_NAME="Local Redpanda Cluster" \
  -e BOOTSTRAP="redpanda:9092" \
  -e SCHEMA_REGISTRY_NAME="Local Repanda Registry" \
  -e SCHEMA_REGISTRY_URL="http://redpanda:8081" \
  --env-file=$KPOW_LICENSE_FILE \
  factorhouse/kpow-ce:latest
Once the containers are running, navigate to http://localhost:3000 to access the Kpow UI. We can see that Kpow has automatically discovered and connected to the single Redpanda broker and its schema registry.

Schema Management
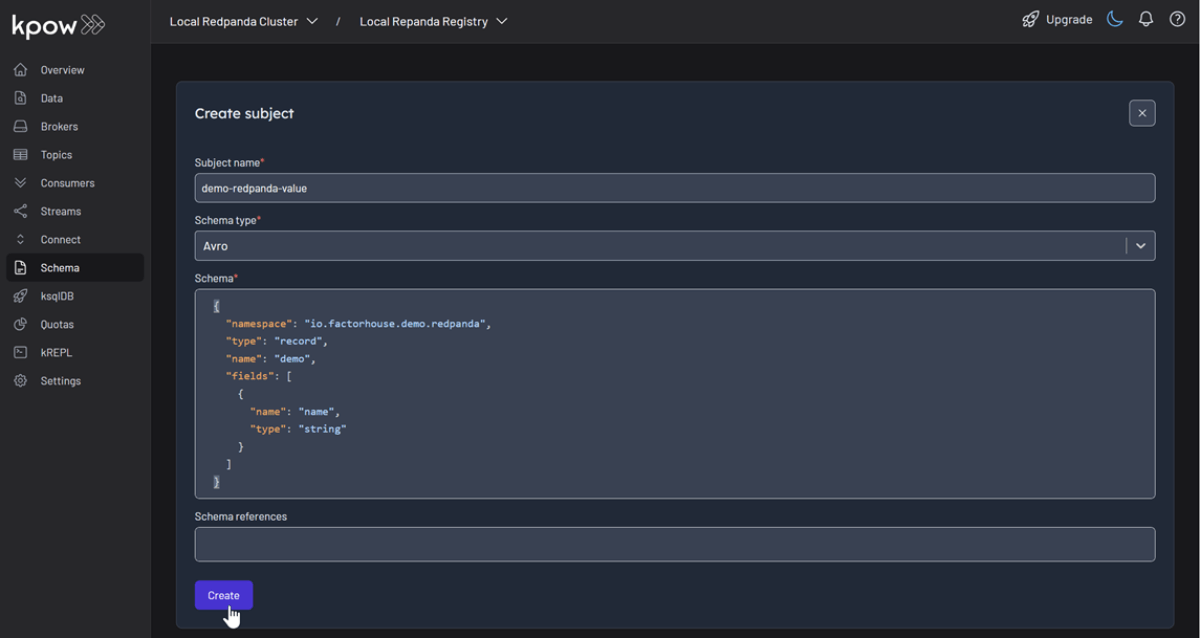
With our environment running, let's use Kpow to create a new schema subject in the Redpanda schema registry.
- In the Schema menu, click Create subject.
- Since we only have one registry configured, the Local Repanda Registry is selected by default.
- Enter a subject name (e.g.,
demo-redpanda-value), chooseAVROas the type, and provide a schema definition. Click Create.
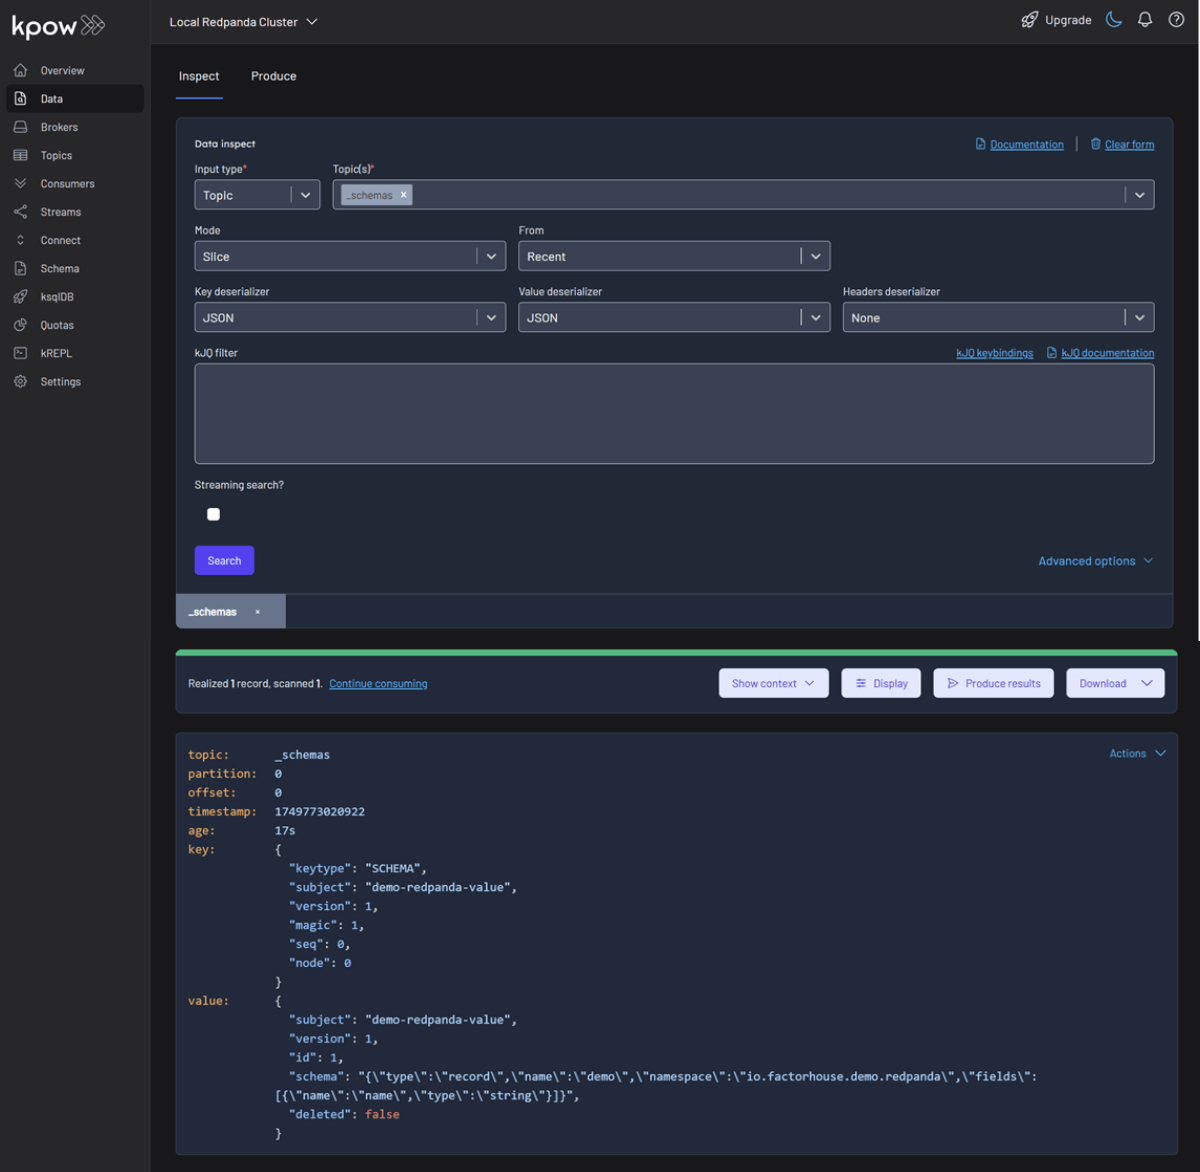
The Redpanda schema registry persists its schemas in an internal Kafka topic named _schemas. We can verify that our schema was created by inspecting the records of this topic directly within Kpow's Data tab.
Working with Avro Data
Finally, we'll produce and inspect an Avro record that is validated against the schema we just created.
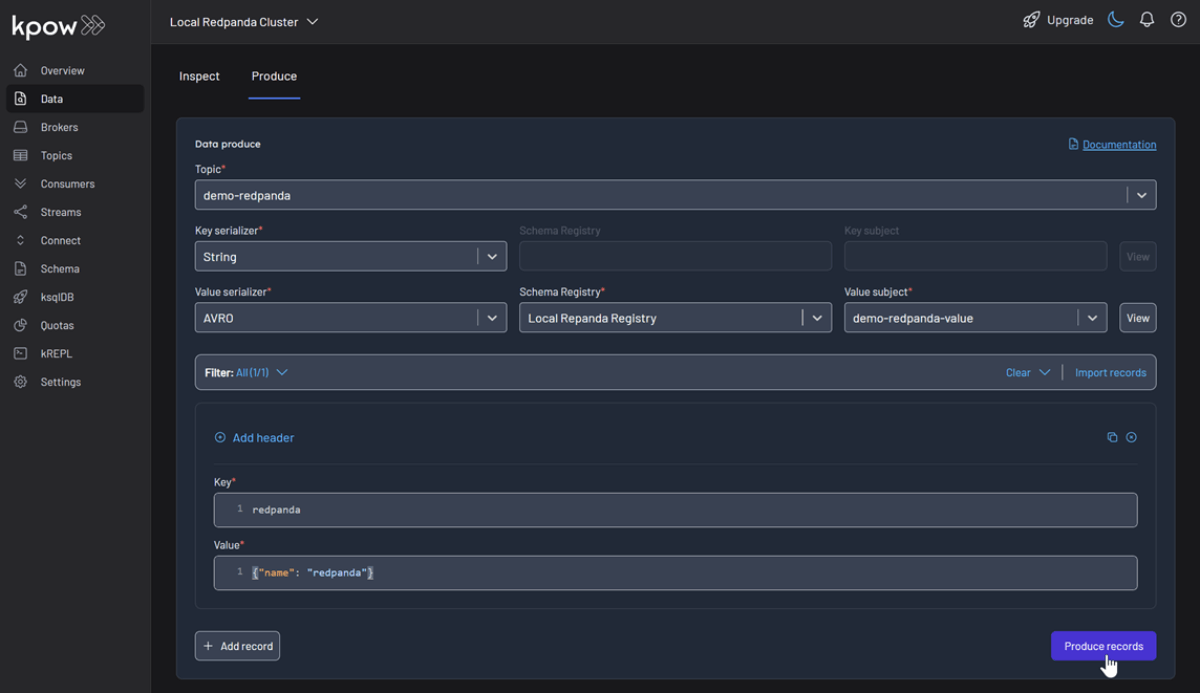
First, create a new topic named demo-redpanda from the Kpow UI.

Now, to produce a record to the demo-redpanda topic:
- Go to the Data menu, select the topic, and open the Produce tab.
- Select
Stringas the Key Serializer - Set the Value Serializer to
AVRO. - Choose Local Repanda Registry as the Schema Registry.
- Select the
demo-redpanda-valuesubject. - Enter key/value data and click Produce.
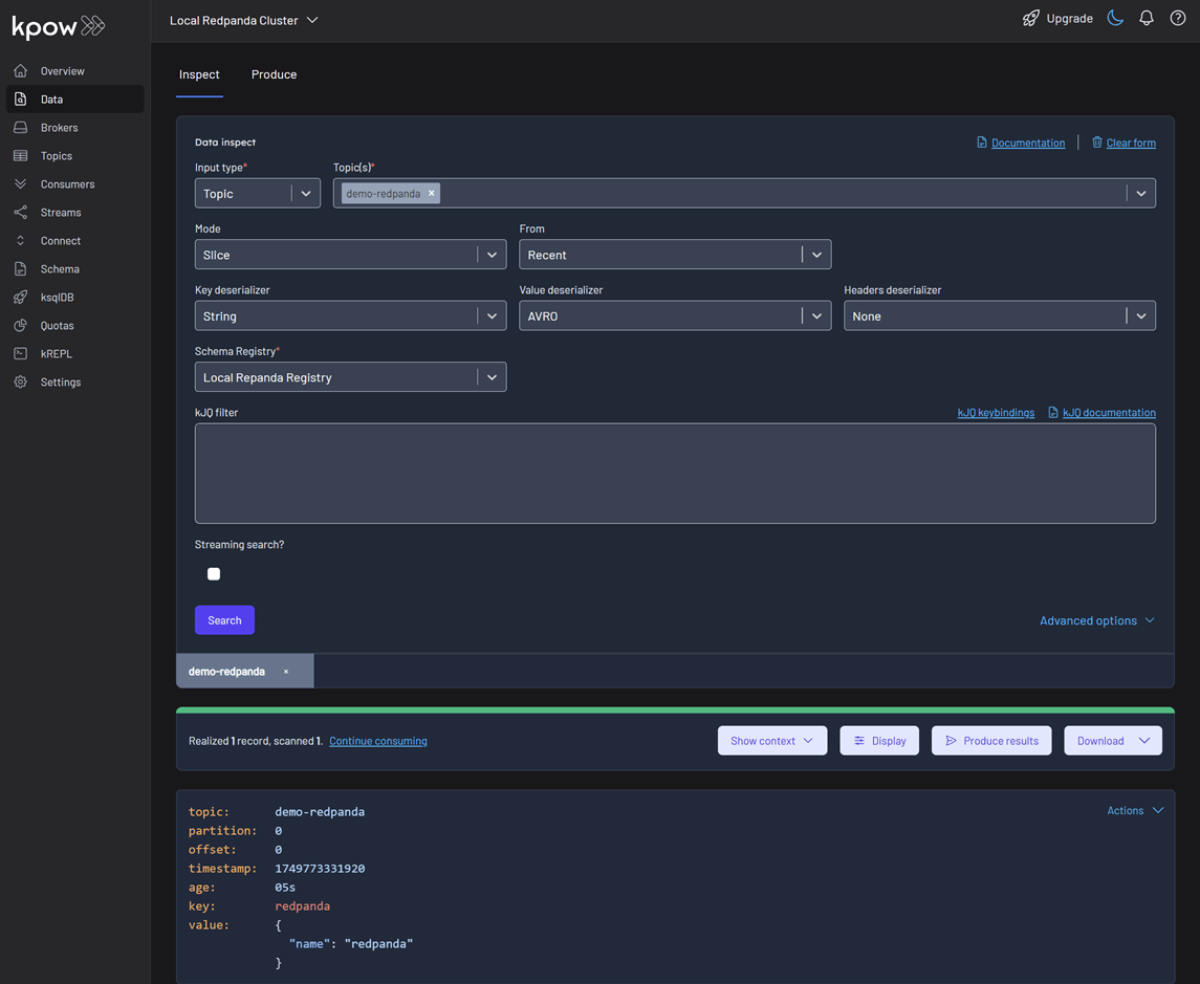
To see the result, navigate back to the Data tab and select the demo-redpanda topic. In the deserializer options, choose String as the Key deserializer and AVRO as the Value deserializer, then select Local Repanda Registry. Kpow automatically fetches the correct schema version, deserializes the binary Avro message, and presents the data as easy-to-read JSON.
Shutdown Environment
The Docker containers and network can be removed using the commands below.
docker rm -f redpanda kpow
docker network rm factorhouse
Conclusion
In just a few minutes, we successfully launched a complete local streaming environment using Redpanda and Kpow. We demonstrated how this powerful combination simplifies the developer workflow by using Kpow's intuitive UI to manage schemas, produce Avro-encoded messages, and inspect topic data without writing any custom code. This setup proves how Redpanda's Kafka compatibility and integrated features, paired with Kpow's comprehensive toolkit, provide an efficient and accessible platform for developers building event-driven applications.
Heading 1
Heading 2
Heading 3
Heading 4
Heading 5
Heading 6
Lorem ipsum dolor sit amet, consectetur adipiscing elit, sed do eiusmod tempor incididunt ut labore et dolore magna aliqua. Ut enim ad minim veniam, quis nostrud exercitation ullamco laboris nisi ut aliquip ex ea commodo consequat. Duis aute irure dolor in reprehenderit in voluptate velit esse cillum dolore eu fugiat nulla pariatur.
Block quote
Ordered list
- Item 1
- Item 2
- Item 3
Unordered list
- Item A
- Item B
- Item C
Bold text
Emphasis
Superscript
Subscript
.webp)
Integrate Confluent-compatible schema registries with Kpow
This guide demonstrates how to address the operational complexity of managing multiple Kafka schema registries. We integrate Confluent-compatible registries—Confluent Schema Registry, Apicurio Registry, and Karapace—and manage them all through a single pane of glass using Kpow.
Overview
In modern data architectures built on Apache Kafka, a Schema Registry is an essential component for enforcing data contracts and supporting strong data governance. While the Confluent Schema Registry set the original standard, the ecosystem has expanded to include powerful Confluent-compatible alternatives such as Red Hat’s Apicurio Registry and Aiven’s Karapace.
Whether driven by a gradual migration, the need to support autonomous teams, or simply technology evaluation, many organizations find themselves running multiple schema registries in parallel. This inevitably leads to operational complexity and a fragmented view of their data governance.
This guide demonstrates how Kpow directly solves this challenge. We will integrate these popular schema registries into a single Kafka environment and show how to manage them all seamlessly through Kpow's single, unified interface.
About Factor House
Factor House is a leader in real-time data tooling, empowering engineers with innovative solutions for Apache Kafka® and Apache Flink®.
Our flagship product, Kpow for Apache Kafka, is the market-leading enterprise solution for Kafka management and monitoring.
Explore our live multi-cluster demo environment or grab a free Community license and dive into streaming tech on your laptop with Factor House Local.
Prerequisites
To create subjects in Kpow, the logged-in user must have the necessary permissions. If Role-Based Access Control (RBAC) is enabled, this requires the SCHEMA_CREATE action. For Simple Access Control, set ALLOW_SCHEMA_CREATE=true. For details, see the Kpow User Authorization docs.
Launch Kafka Environment
To accelerate the setup, we will use the Factor House Local repository, which provides a solid foundation with pre-built configurations for authentication and authorization.
First, clone the repository:
git clone https://github.com/factorhouse/factorhouse-localNext, navigate into the project root and create a Docker Compose file named compose-kpow-multi-registries.yml. This file defines our entire stack: a 3-broker Kafka cluster, our three schema registries, and Kpow.
services:
  schema:
    image: confluentinc/cp-schema-registry:7.8.0
    container_name: schema_registry
    ports:
      - "8081:8081"
    networks:
      - factorhouse
    depends_on:
      - zookeeper
      - kafka-1
      - kafka-2
      - kafka-3
    environment:
      SCHEMA_REGISTRY_HOST_NAME: "schema"
      SCHEMA_REGISTRY_LISTENERS: http://schema:8081,http://${DOCKER_HOST_IP:-127.0.0.1}:8081
      SCHEMA_REGISTRY_KAFKASTORE_BOOTSTRAP_SERVERS: "kafka-1:19092,kafka-2:19093,kafka-3:19094"
      SCHEMA_REGISTRY_AUTHENTICATION_METHOD: BASIC
      SCHEMA_REGISTRY_AUTHENTICATION_REALM: schema
      SCHEMA_REGISTRY_AUTHENTICATION_ROLES: schema-admin
      SCHEMA_REGISTRY_OPTS: -Djava.security.auth.login.config=/etc/schema/schema_jaas.conf
    volumes:
      - ./resources/kpow/schema:/etc/schema

  apicurio:
    image: apicurio/apicurio-registry:3.0.9
    container_name: apicurio
    ports:
      - "8080:8080"
    networks:
      - factorhouse
    environment:
      APICURIO_KAFKASQL_BOOTSTRAP_SERVERS: kafka-1:19092,kafka-2:19093,kafka-3:19094
      APICURIO_STORAGE_KIND: kafkasql
      APICURIO_AUTH_ENABLED: "true"
      APICURIO_AUTH_ROLE_BASED_AUTHORIZATION: "true"
      APICURIO_AUTH_STATIC_USERS: "admin=admin" # Format: user1=pass1,user2=pass2
      APICURIO_AUTH_STATIC_ROLES: "admin:sr-admin" # Format: user:role,user2:role2

  karapace:
    image: ghcr.io/aiven-open/karapace:develop
    container_name: karapace
    entrypoint:
      - python3
      - -m
      - karapace
    ports:
      - "8082:8081"
    networks:
      - factorhouse
    depends_on:
      - zookeeper
      - kafka-1
      - kafka-2
      - kafka-3
    environment:
      KARAPACE_KARAPACE_REGISTRY: true
      KARAPACE_ADVERTISED_HOSTNAME: karapace
      KARAPACE_ADVERTISED_PROTOCOL: http
      KARAPACE_BOOTSTRAP_URI: kafka-1:19092,kafka-2:19093,kafka-3:19094
      KARAPACE_PORT: 8081
      KARAPACE_HOST: 0.0.0.0
      KARAPACE_CLIENT_ID: karapace-0
      KARAPACE_GROUP_ID: karapace
      KARAPACE_MASTER_ELECTION_STRATEGY: highest
      KARAPACE_MASTER_ELIGIBILITY: true
      KARAPACE_TOPIC_NAME: _karapace
      KARAPACE_COMPATIBILITY: "BACKWARD"

  kpow:
    image: factorhouse/kpow:latest
    container_name: kpow-ee
    pull_policy: always
    restart: always
    ports:
      - "3000:3000"
    networks:
      - factorhouse
    depends_on:
      - schema
      - apicurio
      - karapace
    env_file:
      - resources/kpow/config/multi-registry.env
      - ${KPOW_TRIAL_LICENSE:-resources/kpow/config/trial-license.env}
    mem_limit: 2G
    volumes:
      - ./resources/kpow/jaas:/etc/kpow/jaas
      - ./resources/kpow/rbac:/etc/kpow/rbac

  zookeeper:
    image: confluentinc/cp-zookeeper:7.8.0
    container_name: zookeeper
    ports:
      - "2181:2181"
    networks:
      - factorhouse
    environment:
      ZOOKEEPER_CLIENT_PORT: 2181
      ZOOKEEPER_TICK_TIME: 2000

  kafka-1:
    image: confluentinc/cp-kafka:7.8.0
    container_name: kafka-1
    ports:
      - "9092:9092"
    networks:
      - factorhouse
    environment:
      KAFKA_BROKER_ID: 1
      KAFKA_ZOOKEEPER_CONNECT: zookeeper:2181
      KAFKA_ADVERTISED_LISTENERS: LISTENER_DOCKER_INTERNAL://kafka-1:19092,LISTENER_DOCKER_EXTERNAL://${DOCKER_HOST_IP:-127.0.0.1}:9092
      KAFKA_LISTENER_SECURITY_PROTOCOL_MAP: LISTENER_DOCKER_INTERNAL:PLAINTEXT,LISTENER_DOCKER_EXTERNAL:PLAINTEXT
      KAFKA_INTER_BROKER_LISTENER_NAME: LISTENER_DOCKER_INTERNAL
      KAFKA_CONFLUENT_SUPPORT_METRICS_ENABLE: "false"
      KAFKA_LOG4J_ROOT_LOGLEVEL: INFO
      KAFKA_NUM_PARTITIONS: "3"
      KAFKA_DEFAULT_REPLICATION_FACTOR: "3"
    depends_on:
      - zookeeper

  kafka-2:
    image: confluentinc/cp-kafka:7.8.0
    container_name: kafka-2
    ports:
      - "9093:9093"
    networks:
      - factorhouse
    environment:
      KAFKA_BROKER_ID: 2
      KAFKA_ZOOKEEPER_CONNECT: zookeeper:2181
      KAFKA_ADVERTISED_LISTENERS: LISTENER_DOCKER_INTERNAL://kafka-2:19093,LISTENER_DOCKER_EXTERNAL://${DOCKER_HOST_IP:-127.0.0.1}:9093
      KAFKA_LISTENER_SECURITY_PROTOCOL_MAP: LISTENER_DOCKER_INTERNAL:PLAINTEXT,LISTENER_DOCKER_EXTERNAL:PLAINTEXT
      KAFKA_INTER_BROKER_LISTENER_NAME: LISTENER_DOCKER_INTERNAL
      KAFKA_CONFLUENT_SUPPORT_METRICS_ENABLE: "false"
      KAFKA_LOG4J_ROOT_LOGLEVEL: INFO
      KAFKA_NUM_PARTITIONS: "3"
      KAFKA_DEFAULT_REPLICATION_FACTOR: "3"
    depends_on:
      - zookeeper

  kafka-3:
    image: confluentinc/cp-kafka:7.8.0
    container_name: kafka-3
    ports:
      - "9094:9094"
    networks:
      - factorhouse
    environment:
      KAFKA_BROKER_ID: 3
      KAFKA_ZOOKEEPER_CONNECT: zookeeper:2181
      KAFKA_ADVERTISED_LISTENERS: LISTENER_DOCKER_INTERNAL://kafka-3:19094,LISTENER_DOCKER_EXTERNAL://${DOCKER_HOST_IP:-127.0.0.1}:9094
      KAFKA_LISTENER_SECURITY_PROTOCOL_MAP: LISTENER_DOCKER_INTERNAL:PLAINTEXT,LISTENER_DOCKER_EXTERNAL:PLAINTEXT
      KAFKA_INTER_BROKER_LISTENER_NAME: LISTENER_DOCKER_INTERNAL
      KAFKA_CONFLUENT_SUPPORT_METRICS_ENABLE: "false"
      KAFKA_LOG4J_ROOT_LOGLEVEL: INFO
      KAFKA_NUM_PARTITIONS: "3"
      KAFKA_DEFAULT_REPLICATION_FACTOR: "3"
    depends_on:
      - zookeeper

networks:
  factorhouse:
    name: factorhouse
Here's an overview of the three schema registries and Kpow:
- Confluent Schema Registry (
schema)- Image:
confluentinc/cp-schema-registry:7.8.0 - Storage: It uses the connected Kafka cluster for durable storage, persisting schemas in an internal topic (named
_schemasby default). - Security: This service is secured using
BASICHTTP authentication. Access requires a valid username and password, which are defined in theschema_jaas.conffile mounted via thevolumesdirective.
- Image:
- Apicurio Registry (
apicurio)- Image:
apicurio/apicurio-registry:3.0.9 - Storage: It's configured to use the
kafkasqlstorage backend, and schemas are stored in a Kafka topic (kafkasql-journal). - Security: Authentication is enabled and managed directly through environment variables. This setup creates a static user (
adminwith passwordadmin) and grants it administrative privileges. - API Endpoint: To align with the Kafka environment, we'll use
/apis/ccompat/v7as the Confluent Compatibility API endpoint.
- Image:
- Karapace Registry (
karapace)- Image:
ghcr.io/aiven-open/karapace:develop - Storage: Like the others, it uses a Kafka topic (
_karapace) to store its schema data. - Security: For simplicity, authentication is not configured, leaving the API openly accessible on the network. However, the logged-in Kpow user must still have the appropriate permissions to manage schema resources—highlighting one of the key access control benefits Kpow offers in enterprise environments.
- Image:
- Kpow (
kpow)- Image:
factorhouse/kpow:latest - Host Port: 3000
- Configuration:
env_file: Its primary configuration is loaded from external files. Themulti-registry.envfile is crucial, as it contains the connection details for the Kafka cluster and all three schema registries.- Licensing: The configuration also loads a license file. It uses a local
trial-license.envby default, but this can be overridden by setting theKPOW_TRIAL_LICENSEenvironment variable to a different file path.
- Volumes:
./resources/kpow/jaas: This mounts authentication configuration (JAAS file) into Kpow../resources/kpow/rbac: This mounts Role-Based Access Control (RBAC) file.
- Image:
We also need to create the Kpow configuration file (resources/kpow/config/multi-registry.env). The environment variables in this file configures Kpow's own user security, the connection to the Kafka cluster, and the integration with all three schema registries.
## AauthN + AuthZ
JAVA_TOOL_OPTIONS="-Djava.awt.headless=true -Djava.security.auth.login.config=/etc/kpow/jaas/hash-jaas.conf"
AUTH_PROVIDER_TYPE=jetty
RBAC_CONFIGURATION_FILE=/etc/kpow/rbac/hash-rbac.yml

## Kafka environments
ENVIRONMENT_NAME=Multi-registry Integration
BOOTSTRAP=kafka-1:19092,kafka-2:19093,kafka-3:19094

SCHEMA_REGISTRY_RESOURCE_IDS=CONFLUENT,APICURIO,KARAPACE

CONFLUENT_SCHEMA_REGISTRY_URL=http://schema:8081
CONFLUENT_SCHEMA_REGISTRY_AUTH=USER_INFO
CONFLUENT_SCHEMA_REGISTRY_USER=admin
CONFLUENT_SCHEMA_REGISTRY_PASSWORD=admin

APICURIO_SCHEMA_REGISTRY_URL=http://apicurio:8080/apis/ccompat/v7
APICURIO_SCHEMA_REGISTRY_AUTH=USER_INFO
APICURIO_SCHEMA_REGISTRY_USER=admin
APICURIO_SCHEMA_REGISTRY_PASSWORD=admin

KARAPACE_SCHEMA_REGISTRY_URL=http://karapace:8081
We can start all services in the background using the Docker Compose file:
docker compose -f ./compose-kpow-multi-registries.yml up -dOnce the containers are running, navigate to http://localhost:3000 to access the Kpow UI (admin as both username and password). In the left-hand navigation menu under Schema, you will see all three registries - CONFLUENT, APICURIO, and KARAPACE.
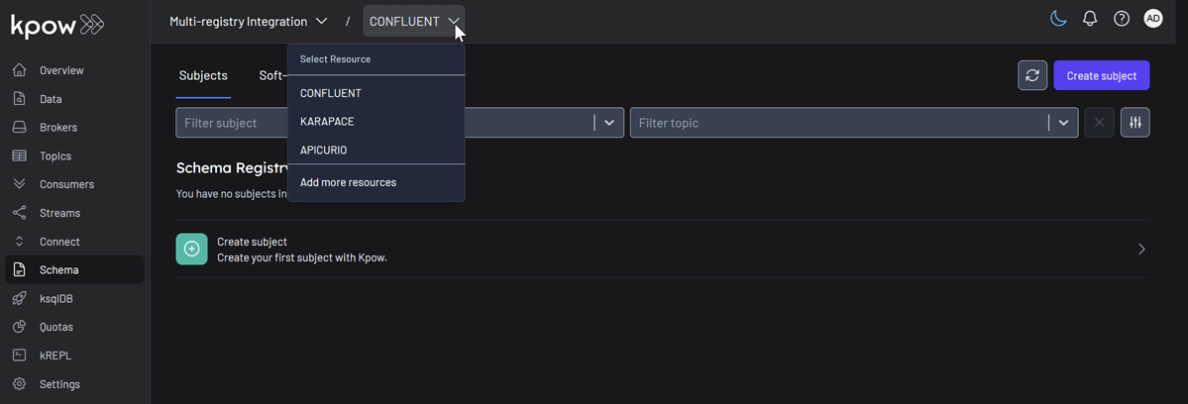
Unified Schema Management
Now, we will create a schema subject in each registry directly from Kpow.
- In the Schema menu, click Create subject.
- Select CONFLUENT from the Registry dropdown.
- Enter a subject name (e.g.,
demo-confluent-value), chooseAVROas the type, and provide a schema definition. Click Create.
Subject: demo-confluent-value

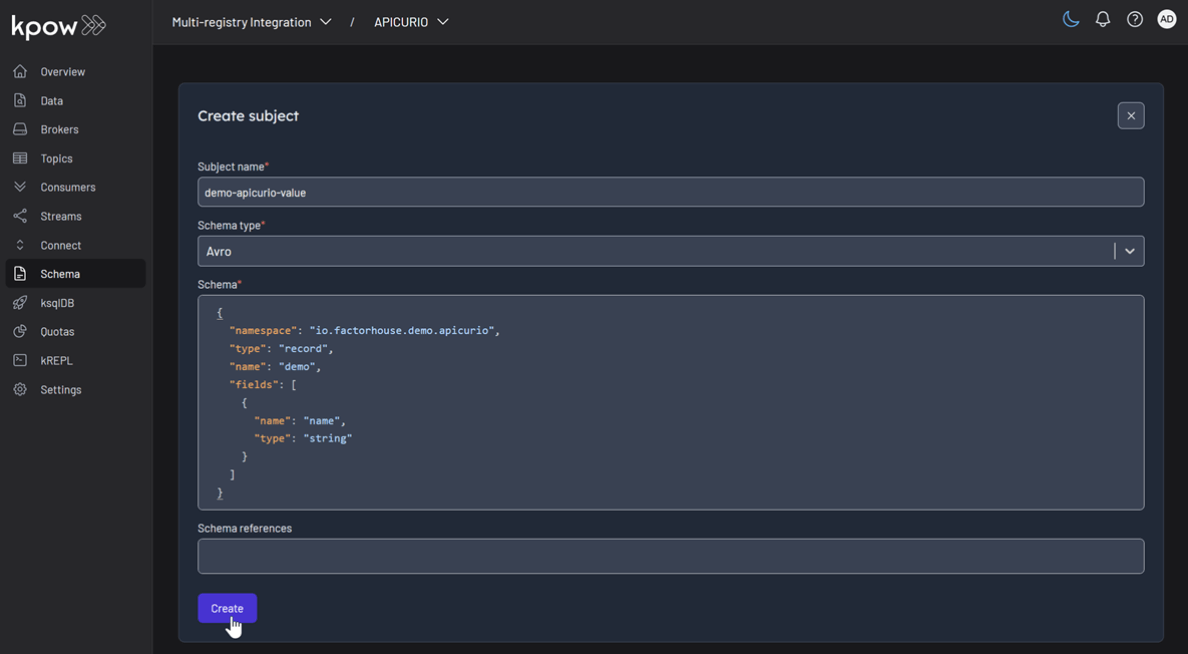
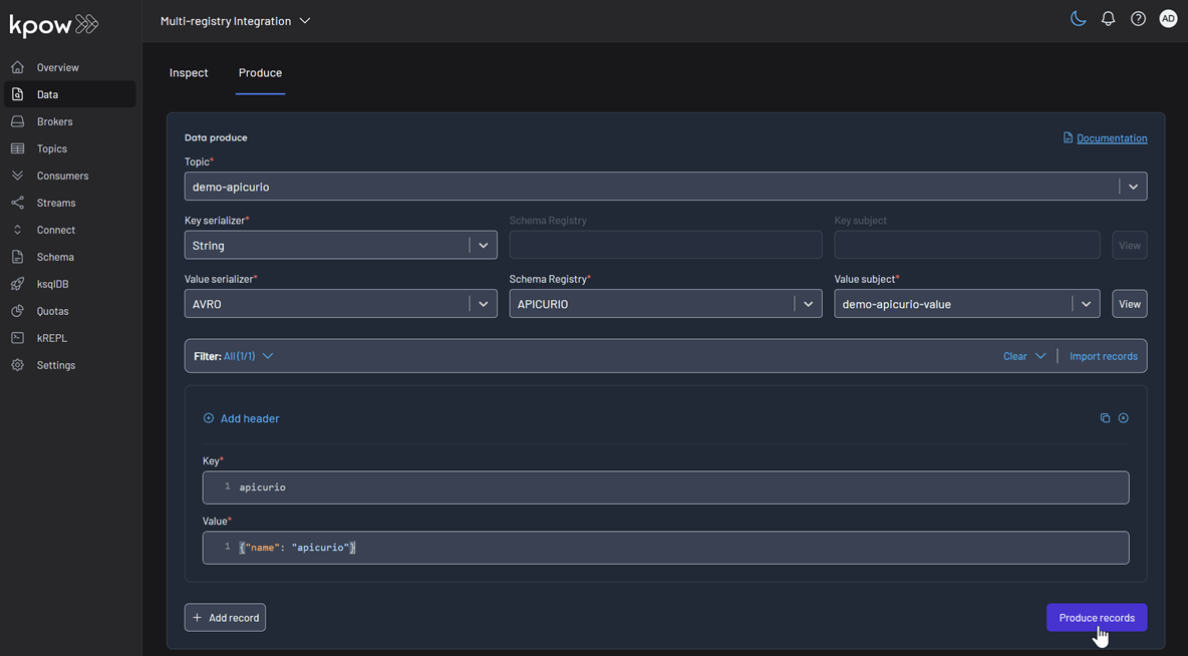
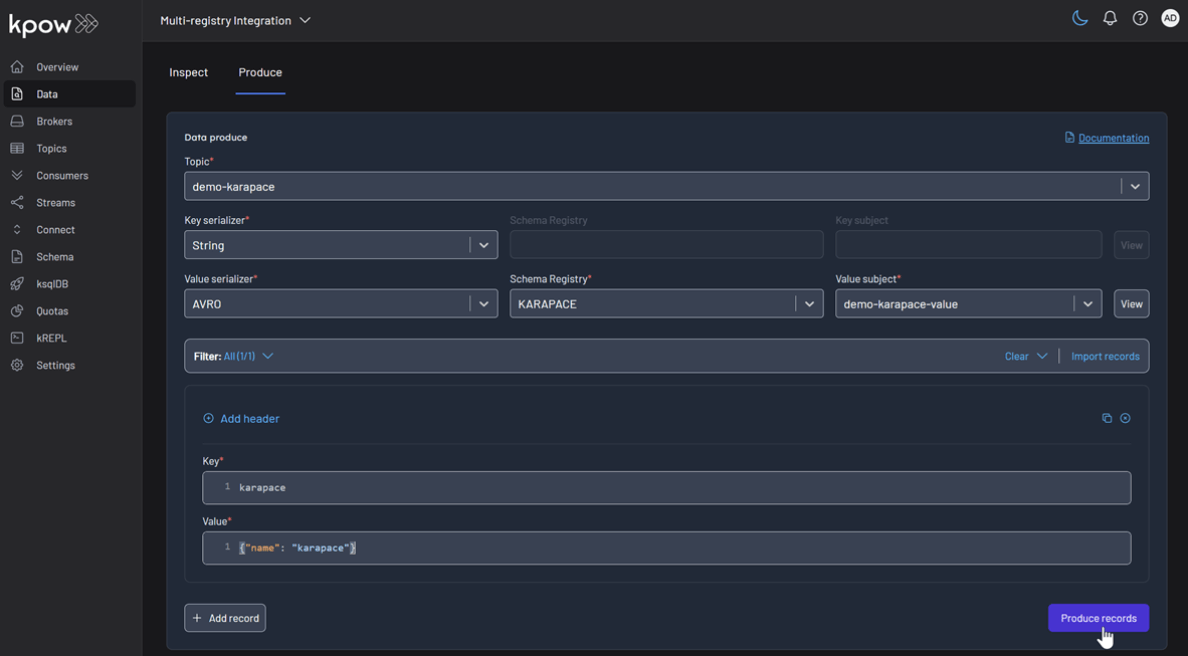
Following the same pattern, create subjects for the other two registries:
- Apicurio: Select
APICURIOand create thedemo-apicurio-valuesubject. - Karapace: Select
KARAPACEand create thedemo-karapace-valuesubject.
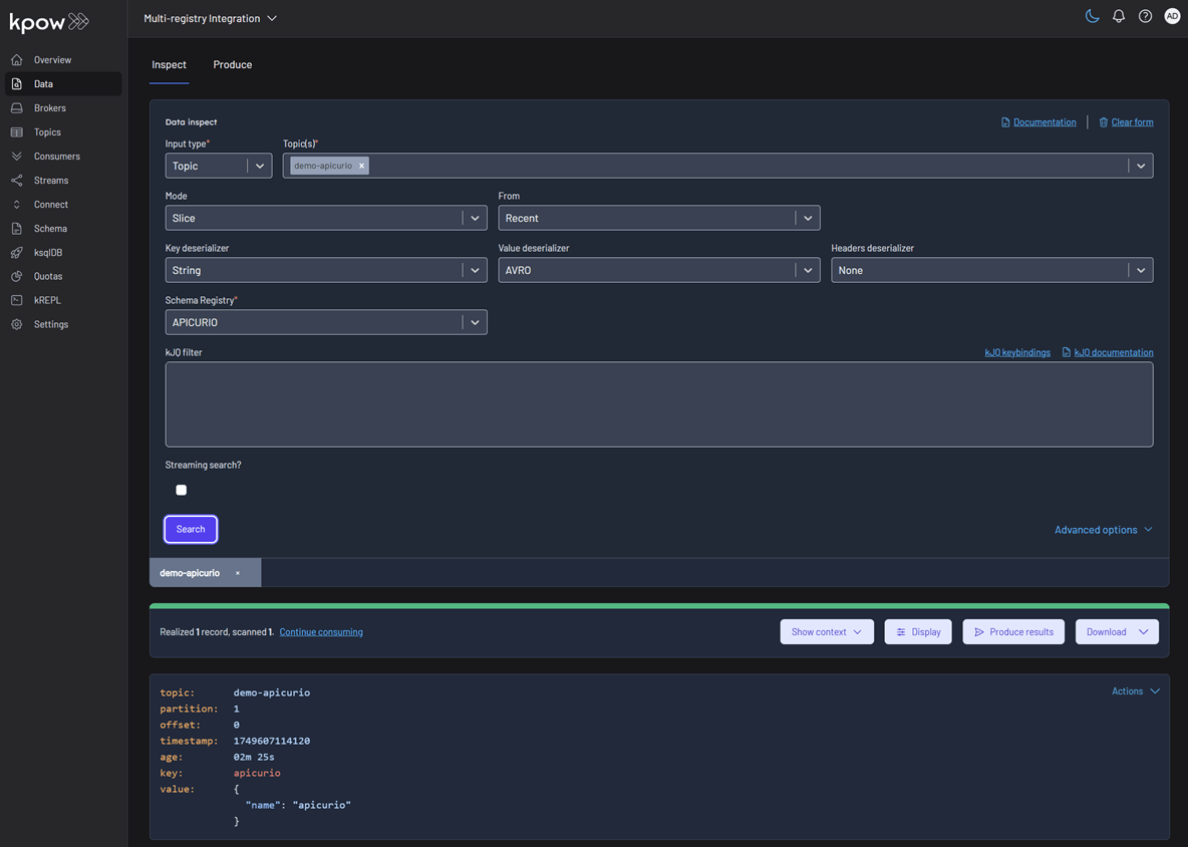
Subject: demo-apicurio-value
Subject: demo-karapace-value

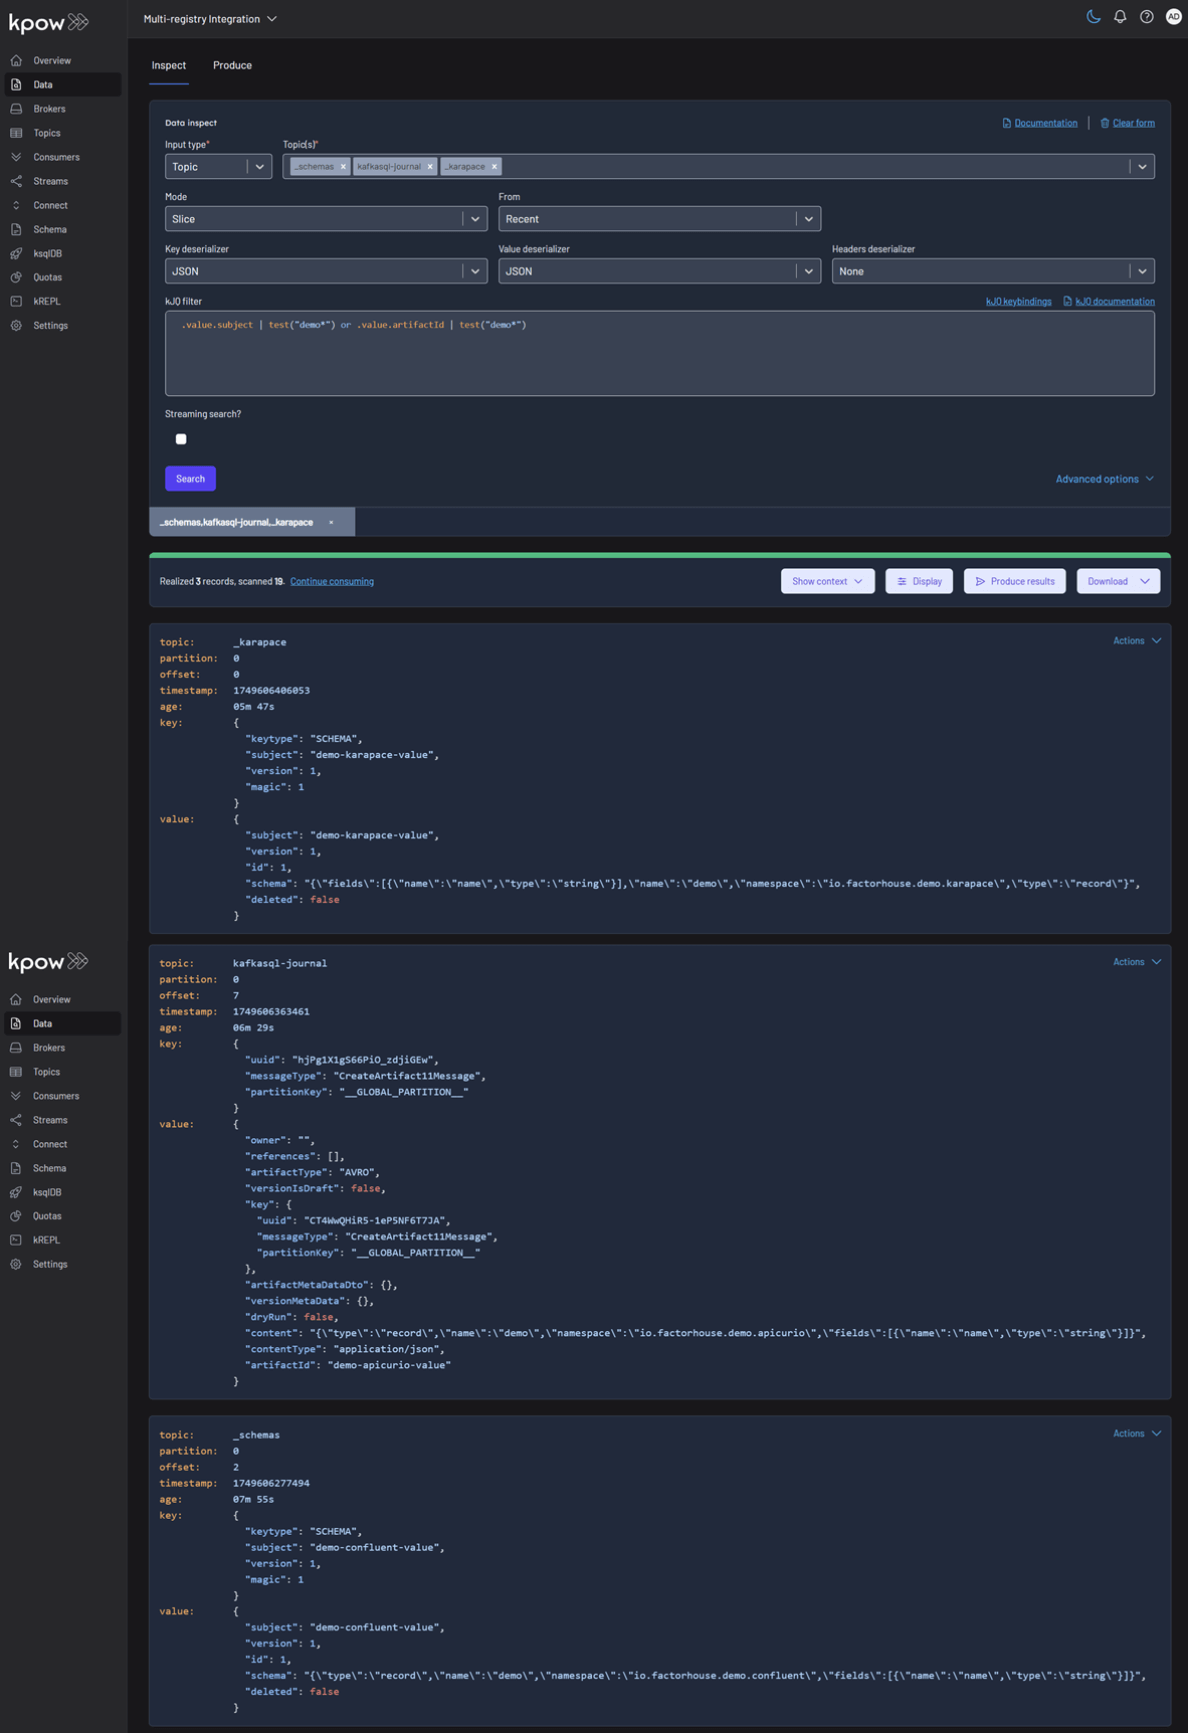
Each registry persists its schemas in an internal Kafka topic. We can verify this in Kpow's Data tab by inspecting the contents of their respective storage topics:
- CONFLUENT:
_schemas - APICURIO:
kafkasql-journal(the default topic for itskafkasqlstorage engine) - KARAPACE:
_karapace
Produce and Inspect Records Across All Registries
Finally, we'll produce and inspect Avro records, leveraging the schemas from each registry.
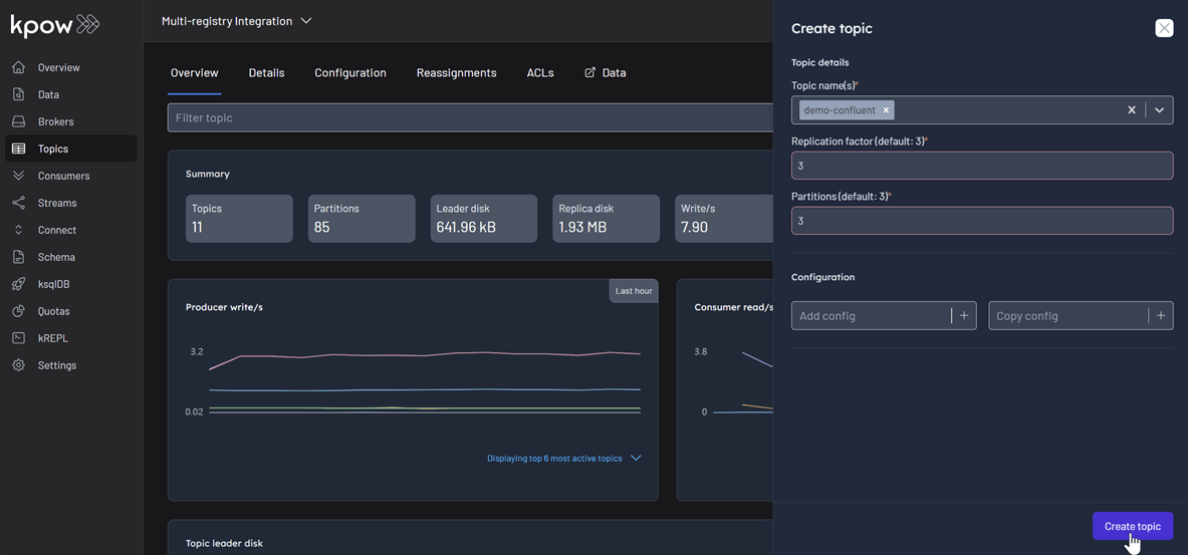
First, create the topics demo-confluent, demo-apicurio, and demo-karapace in Kpow.
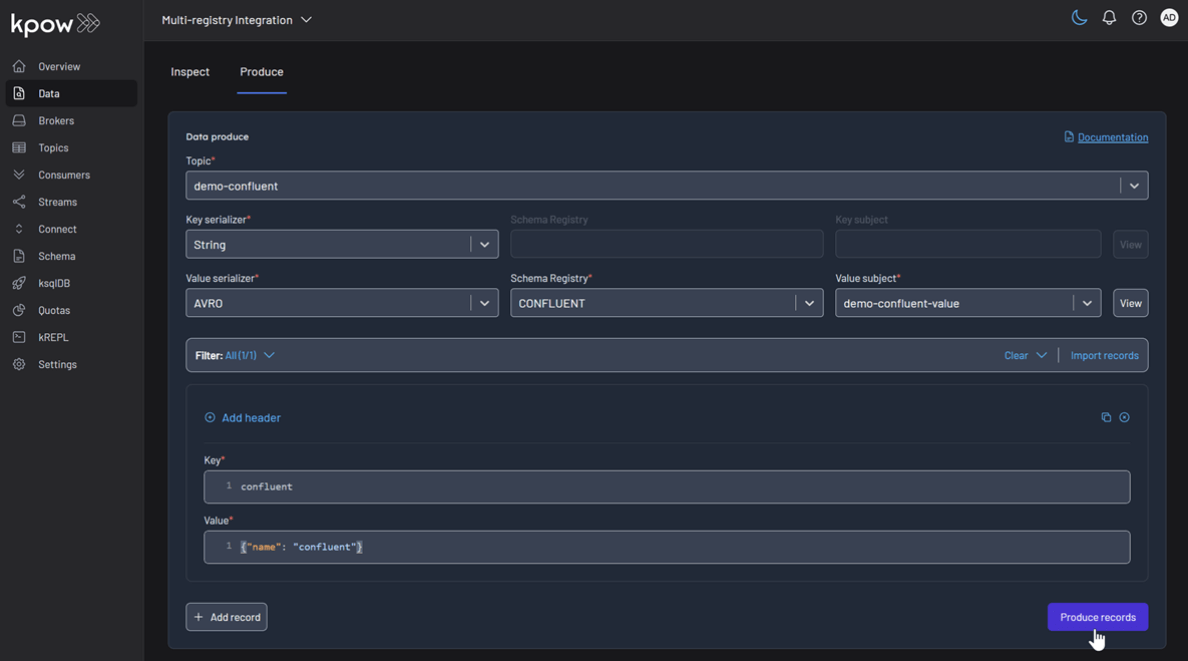
To produce a record for the demo-confluent topic:
- Go to the Data menu, select the topic, and open the Produce tab.
- Select
Stringas the Key Serializer - Set the Value Serializer to
AVRO. - Choose CONFLUENT as the Schema Registry.
- Select the
demo-confluent-valuesubject. - Enter key/value data and click Produce.
Topic: demo-confluent
Repeat this for the other topics, making sure to select the corresponding registry and subject for demo-apicurio and demo-karapace.
Topic: demo-apicurio
Topic: demo-karapace
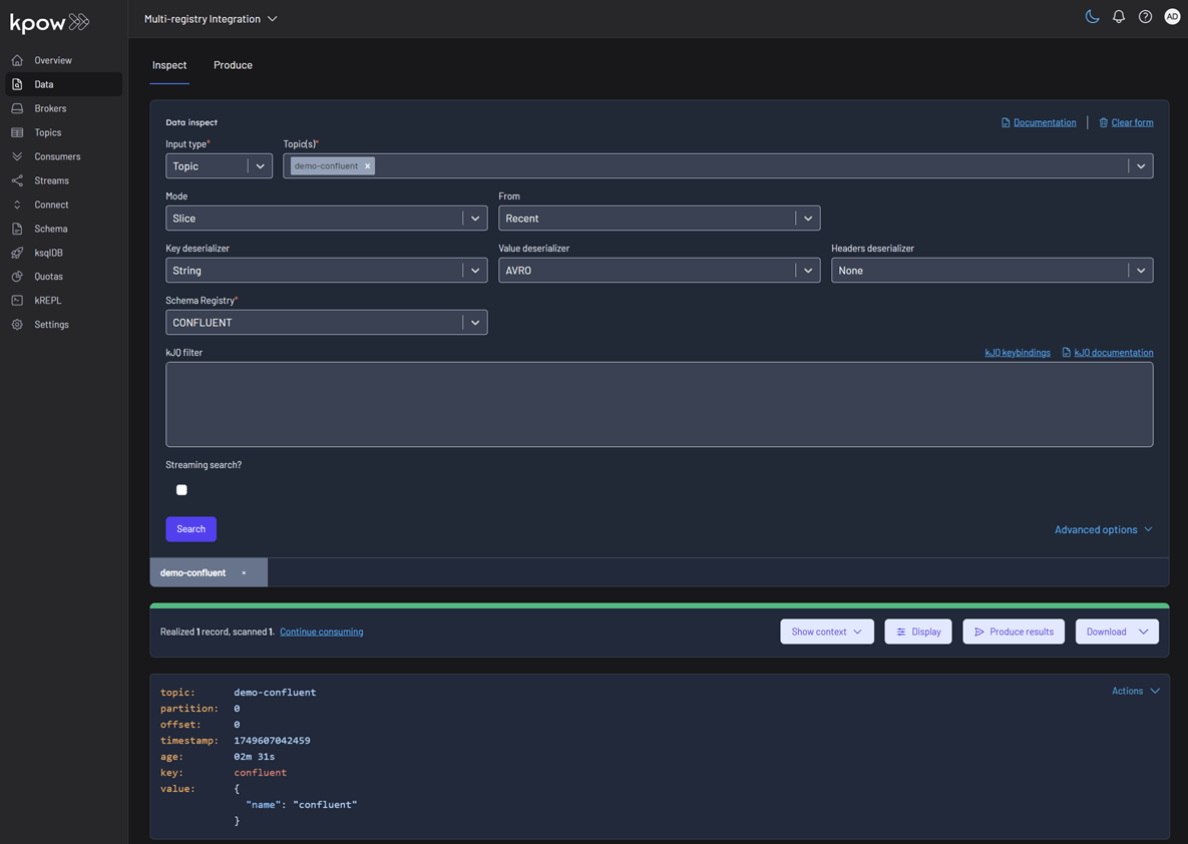
To inspect the records, navigate back to the Data tab for each topic. Select the correct Schema Registry in the deserializer options. Kpow will automatically fetch the correct schema, deserialize the binary Avro data, and present it as human-readable JSON.
Topic: demo-confluent
Topic: demo-apicurio
Topic: demo-karapace

Conclusion
This guide has demonstrated that managing a heterogeneous, multi-registry Kafka environment does not have to be a fragmented or complex task. By leveraging the Confluent-compatible APIs of Apicurio and Karapace, we can successfully integrate them alongside the standard Confluent Schema Registry.
With Kpow providing a single pane of glass, we gain centralized control and visibility over all our schema resources. This unified approach simplifies critical operations like schema management, data production, and inspection, empowering teams to use the best tool for their needs without sacrificing governance or operational efficiency.
Heading 1
Heading 2
Heading 3
Heading 4
Heading 5
Heading 6
Lorem ipsum dolor sit amet, consectetur adipiscing elit, sed do eiusmod tempor incididunt ut labore et dolore magna aliqua. Ut enim ad minim veniam, quis nostrud exercitation ullamco laboris nisi ut aliquip ex ea commodo consequat. Duis aute irure dolor in reprehenderit in voluptate velit esse cillum dolore eu fugiat nulla pariatur.
Block quote
Ordered list
- Item 1
- Item 2
- Item 3
Unordered list
- Item A
- Item B
- Item C
Bold text
Emphasis
Superscript
Subscript
.webp)
Set Up Kpow with Google Cloud Managed Service for Apache Kafka
A practical, step-by-step guide on setting up a Google Cloud Managed Service for Apache Kafka cluster and connecting it from Kpow using the OAUTHBEARER mechanism.
Overview
Apache Kafka is a cornerstone for many real-time data pipelines, but managing its infrastructure can be complex.
Google Cloud Managed Service for Apache Kafka offers a fully managed solution, simplifying deployment and operations, however effective monitoring and management remain crucial for ensuring the health and performance of Kafka clusters.
This article provides a practical, step-by-step guide on setting up a Google Cloud Managed Service for Apache Kafka cluster and connecting it from Kpow using the OAUTHBEARER mechanism. We will walk through creating the necessary GCP resources, configuring a client virtual machine, and deploying a Kpow instance using Docker to demonstrate examples of monitoring and managing Kafka brokers and topics.
About Factor House
Factor House is a leader in real-time data tooling, empowering engineers with innovative solutions for Apache Kafka® and Apache Flink®.
Our flagship product, Kpow for Apache Kafka, is the market-leading enterprise solution for Kafka management and monitoring.
Explore our live multi-cluster demo environment or grab a free Community license and dive into streaming tech on your laptop with Factor House Local.
Create a Managed Kafka Cluster
We create GCP resources using the gcloud CLI. Once it is initialised, we should enable the Managed Kafka, Compute Engine, and Cloud DNS APIs as prerequisites.
gcloud services enable managedkafka.googleapis.com compute.googleapis.com dns.googleapis.comTo create a Managed Service for Apache Kafka cluster, we can use the gcloud managed-kafka clusters create command by specifying the cluster ID, location, number of vCPUs (cpu), RAM (memory), and subnets.
export CLUSTER_ID=<cluster-id>
export PROJECT_ID=<gcp-project-id>
export PROJECT_NUMBER=<gcp-project-number>
export REGION=<gcp-region>

gcloud managed-kafka clusters create $CLUSTER_ID \
  --location=$REGION \
  --cpu=3 \
  --memory=3GiB \
  --subnets=projects/$PROJECT_ID/regions/$REGION/subnetworks/default \
  --async
Set up a client VM
To connect to the Kafka cluster, Kpow must run on a machine with network access to it. In this setup, we use a Google Cloud Compute Engine virtual machine (VM). The VM must be located in the same region as the Kafka cluster and deployed within the same VPC and subnet specified during the cluster's configuration. We can create the client VM using the command shown below. We also attach the http-server tag to the VM, which allows HTTP traffic and enables browser access to the Kpow instance.
gcloud compute instances create kafka-test-instance \
  --scopes=https://www.googleapis.com/auth/cloud-platform \
  --tags=http-server \
  --subnet=projects/$PROJECT_ID/regions/$REGION/subnetworks/default \
  --zone=$REGION-a
Also, we need to update the permissions of the default service account used by the client VM. To ensure that the Kpow instance running on the VM has full access to Managed Service for Apache Kafka resources, bind the predefined admin role (roles/managedkafka.admin) to the service account. This grants Kpow the necessary administrative privileges. For more fine-grained access control within a Kafka cluster, it is recommended to use Kafka ACLs. The Enterprise Edition of Kpow provides robust support for it - see Kpow's ACL management documentation for more details.
gcloud projects add-iam-policy-binding $PROJECT_ID \
  --member="serviceAccount:$PROJECT_NUMBER-compute@developer.gserviceaccount.com" \
  --role=roles/managedkafka.admin
Launch a Kpow Instance
Once our client VM is up and running, we'll connect to it using the SSH-in-browser tool provided by Google Cloud. After establishing the connection, install Docker Engine, as Kpow will be launched using Docker. Refer to the official installation and post-installation guides for detailed instructions.
With Docker ready, we'll then create Kpow's configuration file (e.g., gcp-trial.env). This file defines Kpow's connection settings to the Google managed kafka cluster and include Kpow license details. To get started, confirm that a valid Kpow license is in place, whether we're using the Community or Enterprise edition.
The main section has the following config variables. The ENVIRONMENT_NAME is a display label used within Kpow to identify the Kafka environment, while the BOOTSTRAP value specifies the Kafka bootstrap server address, which Kpow uses to establish a connection. Connection security is managed through SASL over SSL, as indicated by the SECURITY_PROTOCOL value. The SASL_MECHANISM is set to OAUTHBEARER, enabling OAuth-based authentication. To facilitate this, the SASL_LOGIN_CALLBACK_HANDLER_CLASS is configured to use Google's GcpLoginCallbackHandler, which handles OAuth token management for Kafka authentication. Lastly, SASL_JAAS_CONFIG specifies the JAAS login module used for OAuth-based authentication.
As mentioned, this configuration file also contains our Kpow license details and the path to the Google service account key file. These are essential not only for activating and running Kpow but also for enabling its access to the Kafka cluster.
## Managed Service for Apache Kafka Cluster Configuration
ENVIRONMENT_NAME=GCP Kafka Cluster
BOOTSTRAP=bootstrap.<cluster-id>.<gcp-region>.managedkafka.<gcp-project-id>.cloud.goog:9092
SECURITY_PROTOCOL=SASL_SSL
SASL_MECHANISM=OAUTHBEARER
SASL_LOGIN_CALLBACK_HANDLER_CLASS=com.google.cloud.hosted.kafka.auth.GcpLoginCallbackHandler
SASL_JAAS_CONFIG=org.apache.kafka.common.security.oauthbearer.OAuthBearerLoginModule required;

## Your License Details
LICENSE_ID=<license-id>
LICENSE_CODE=<license-code>
LICENSEE=<licensee>
LICENSE_EXPIRY=<license-expiry>
LICENSE_SIGNATURE=<license-signature>
Once the gcp-trial.env file is prepared, we'll launch the Kpow instance using the docker run command below. This command maps port 3000 (Kpow's UI port) to port 80 on the host. As a result, we can access the Kpow UI in the browser simply at http://<vm-external-ip>, with no port number needed.
docker run --pull=always -p 80:3000 --name kpow \
  --env-file gcp-trial.env -d factorhouse/kpow-ce:latest
Monitor and Manage Resources
With Kpow now running, we can use its user-friendly UI to monitor brokers, create a topic, send a message to it, and then watch that message get consumed.
Conclusion
By following the steps outlined in this post, we have successfully established a Google Cloud Managed Service for Apache Kafka cluster and deployed a Kpow instance on a Compute Engine VM. With this setup, we can immediately start exploring and managing Kafka brokers and topics, giving us valuable insights into our Kafka environment and streamlining operations.
Kpow is packed with powerful features, and it also integrates seamlessly with Kafka connectors deployed on Google Cloud Managed Kafka Connect clusters. This opens up a world of possibilities for managing data pipelines with ease. Stay tuned as we continue to roll out more integration examples in the future, enabling us all to unlock even more value from our Kafka and Kpow setups.
Heading 1
Heading 2
Heading 3
Heading 4
Heading 5
Heading 6
Lorem ipsum dolor sit amet, consectetur adipiscing elit, sed do eiusmod tempor incididunt ut labore et dolore magna aliqua. Ut enim ad minim veniam, quis nostrud exercitation ullamco laboris nisi ut aliquip ex ea commodo consequat. Duis aute irure dolor in reprehenderit in voluptate velit esse cillum dolore eu fugiat nulla pariatur.
Block quote
Ordered list
- Item 1
- Item 2
- Item 3
Unordered list
- Item A
- Item B
- Item C
Bold text
Emphasis
Superscript
Subscript
.webp)
Set Up Kpow with Amazon Managed Streaming for Apache Kafka
A comprehensive, step by step guide to provisioning Amazon MSK infrastructure, configuring authentication with the OAUTHBEARER mechanism using AWS IAM, setting up a client EC2 instance within the same VPC, and deploying Kpow.
Overview
Apache Kafka is a cornerstone of modern real-time data pipelines, facilitating high-throughput, low-latency event streaming.
Managing Kafka infrastructure, particularly at scale, presents significant operational challenges. To address this, Amazon Managed Streaming for Apache Kafka (MSK) provides a fully managed service - simplifying the provisioning, configuration, patching, and scaling of Kafka clusters. While MSK handles the infrastructure heavy lifting, effective management and control are still crucial for maintaining cluster health, performance, and reliability.
This article provides a comprehensive walkthrough to setting up an Amazon MSK cluster and integrating it with Kpow for Apache Kafka, a powerful tool for managing and monitoring Kafka environments. It walks through provisioning AWS infrastructure, configuring authentication with the OAUTHBEARER mechanism using AWS IAM, setting up a client EC2 instance within the same VPC, deploying Kpow via Docker, and using Kpow's UI to monitor/manage brokers, topics, and messages.
Whether you manage production Kafka workloads or are evaluating management solutions, this guide provides practical steps for effectively managing and monitoring Kafka clusters on AWS.
About Factor House
Factor House is a leader in real-time data tooling, empowering engineers with innovative solutions for Apache Kafka® and Apache Flink®.
Our flagship product, Kpow for Apache Kafka, is the market-leading enterprise solution for Kafka management and monitoring.
Explore our live multi-cluster demo environment or grab a free Community license and dive into streaming tech on your laptop with Factor House Local.
Set up an EC2 instance
For this post, we're utilizing an Ubuntu-based EC2 instance. Since the MSK cluster will be configured to accept traffic only from within the same VPC, this instance will serve as our primary access point for interacting with the cluster. To ensure connectivity and control, the instance must:
- Be launched in the same VPC as the MSK cluster
- Allow inbound HTTP (port 80) and SSH (port 22) traffic via its security group
We use the AWS Command Line Interface (CLI) to provision and manage AWS resources throughout the demo. If the CLI is not already installed, follow the official AWS CLI user guide for setup and configuration instructions.
As Kpow is designed to manage/monitor Kafka clusters and associated resources, we can give administrative privileges to it. For more fine-grained access control within a Kafka cluster, we can rely on Apache Kafka ACLs, and the Enterprise Edition of Kpow provides robust support for it - see Kpow's ACL management documentation for more details.
Below shows example policies that can be attached.
Option 1: Admin Access to ALL MSK Clusters in the Region/Account
This policy allows listing/describing all clusters and performing any data-plane action (kafka-cluster:*) on any cluster within the specified region and account.
{
    "Version": "2012-10-17",
    "Statement": [
        {
            "Effect": "Allow",
            "Action": "kafka-cluster:*",
            "Resource": "arn:aws:kafka:<REGION>:<ACCOUNT-ID>:cluster/*"
        },
        {
            "Effect": "Allow",
            "Action": [
                "kafka:ListClusters",
                "kafka:DescribeCluster",
                "kafka:GetBootstrapBrokers"
            ],
            "Resource": "*"
        }
    ]
}
Option 2: Admin Access to a Specific LIST of MSK Clusters
This policy allows listing/describing all clusters but restricts the powerful kafka-cluster:* data-plane actions to only the specific clusters listed in the Resource array.
{
    "Version": "2012-10-17",
    "Statement": [
        {
            "Effect": "Allow",
            "Action": "kafka-cluster:*",
            "Resource": [
                "arn:aws:kafka:<REGION>:<ACCOUNT-ID>:cluster/<CLUSTER-NAME-1>/<GUID-1>",
                "arn:aws:kafka:<REGION>:<ACCOUNT-ID>:cluster/<CLUSTER-NAME-2>/<GUID-2>"
                // Add more cluster ARNs here as needed following the same pattern
                // "arn:aws:kafka:<REGION>:<ACCOUNT-ID>:cluster/<CLUSTER-NAME-3>/<GUID-3>"
            ]
        },
        {
            "Effect": "Allow",
            "Action": [
                "kafka:ListClusters",
                "kafka:DescribeCluster",
                "kafka:GetBootstrapBrokers"
            ],
            "Resource": "*"
        }
    ]
}
Create a MSK Cluster
While Kpow supports both provisioned and serverless MSK clusters, we'll use an MSK Serverless cluster in this post.
First, create a security group for the Kafka cluster. This security group allows traffic on Kafka port 9098 from:
- Itself (for intra-cluster communication), and
- The EC2 instance's security group (for Kpow access within the same VPC).
VPC_ID=<vpc-ic>
SUBNET_ID1=<subnet-id-1>
SUBNET_ID2=<subnet-id-2>
SUBNET_ID3=<subnet-id-3>
EC2_SG_ID=<ec2-security-group-id>
CLUSTER_NAME=<cluster-name>
REGION=<aws-region>

SG_ID=$(aws ec2 create-security-group \
  --group-name ${CLUSTER_NAME}-sg \
  --description "Security group for $CLUSTER_NAME" \
  --vpc-id "$VPC_ID" \
  --region "$REGION" \
  --query 'GroupId' --output text)

## Allow traffic from itself
aws ec2 authorize-security-group-ingress \
  --group-id "$SG_ID" \
  --protocol tcp \
  --port 9098 \
  --source-group $SG_ID \
  --region "$REGION"

## Allow traffic from EC2 instance
aws ec2 authorize-security-group-ingress \
  --group-id "$SG_ID" \
  --protocol tcp \
  --port 9098 \
  --source-group $EC2_SG_ID \
  --region "$REGION"
Next, create an MSK serverless cluster. We use the aws kafka create-cluster-v2 command with a JSON configuration that specifies:
- VPC subnet and security group,
- SASL/IAM-based client authentication.
read -r -d '' SERVERLESS_JSON <<EOF
{
    "VpcConfigs": [
        {
          "SubnetIds": ["$SUBNET_ID1", "$SUBNET_ID2", "$SUBNET_ID3"],
          "SecurityGroupIds": ["$SG_ID"]
        }
    ],
    "ClientAuthentication": {
      "Sasl": {
        "Iam": { "Enabled": true }
        }
    }
}
EOF

aws kafka create-cluster-v2 \
    --cluster-name "$CLUSTER_NAME" \
    --serverless "$SERVERLESS_JSON" \
    --region "$REGION"
Launch a Kpow Instance
We'll connect to the EC2 instance via SSH and install Docker Engine, as Kpow relies on Docker for its launch. For detailed instructions, please refer to the official installation and post-installation guides.
With Docker ready, we'll create Kpow's configuration file (e.g., aws-trial.env). This file defines Kpow's core settings for connecting to the MSK cluster and includes Kafka connection details, licensing information, and AWS credentials.
The main section defines how Kpow connects to the MSK cluster:
ENVIRONMENT_NAME: A human-readable name for the Kafka environment shown in the Kpow UI.BOOTSTRAP: The Kafka bootstrap server URL for the MSK Serverless cluster (e.g.,boot-xxxxxxxx.c2.kafka-serverless.<region>.amazonaws.com:9098).KAFKA_VARIANT: Set this toMSK_SERVERLESSto ensure Kpow creates its internal topics with the constrained topic configuration properties and service limitations specific to MSK Serverless.
Secure communication with the cluster is established using SASL over SSL:
SECURITY_PROTOCOL: Set toSASL_SSLto enable encrypted client-server communication.SASL_MECHANISM: Set toAWS_MSK_IAMto use AWS IAM for Kafka client authentication.SASL_JAAS_CONFIG: Specifies the use of theIAMLoginModuleprovided by Amazon for secure authentication.SASL_CLIENT_CALLBACK_HANDLER_CLASS: Points toIAMClientCallbackHandler, which automates the process of retrieving and refreshing temporary credentials via IAM.
Finally, the configuration file includes Kpow license details and AWS credentials. These are essential not only to activate and run Kpow but also for it to access the Kafka cluster.
## Managed Service for Apache Kafka Cluster Configuration
ENVIRONMENT_NAME=MSK Serverless
BOOTSTRAP=boot-<cluster-identifier>.c2.kafka-serverless.<aws-region>.amazonaws.com:9098
KAFKA_VARIANT=MSK_SERVERLESS
SECURITY_PROTOCOL=SASL_SSL
SASL_MECHANISM=AWS_MSK_IAM
SASL_JAAS_CONFIG=software.amazon.msk.auth.iam.IAMLoginModule required;
SASL_CLIENT_CALLBACK_HANDLER_CLASS=software.amazon.msk.auth.iam.IAMClientCallbackHandler

## Your License Details
LICENSE_ID=<license-id>
LICENSE_CODE=<license-code>
LICENSEE=<licensee>
LICENSE_EXPIRY=<license-expiry>
LICENSE_SIGNATURE=<license-signature>

## AWS Credentials
AWS_ACCESS_KEY_ID=<aws-access-key>
AWS_SECRET_ACCESS_KEY=<aws-secret-access-key>
AWS_SESSION_TOKEN=<aws-session-token> # Optional
AWS_REGION=<aws-region>
With the aws-trial.env file created, we'll use the following docker run command to launch Kpow. This command forwards Kpow's internal UI port (3000) to port 80 on the host EC2 instance, enabling us to access the Kpow UI in a browser at http://<ec2-public-ip> without specifying a port.
docker run --pull=always -p 80:3000 --name kpow \
  --env-file aws-trial.env -d factorhouse/kpow-ce:latest
Monitor and Manage Resources
With Kpow launched, we can now step through a typical workflow using its user-friendly UI: from monitoring brokers and creating a topic, to sending a message and observing its journey to consumption.
Conclusion
In summary, this guide walked through setting up a fully managed Kafka environment on AWS using Amazon MSK Serverless and Kpow. By leveraging MSK Serverless for Kafka infrastructure and Kpow for observability and control, we can streamline operations while gaining deep insight into our data pipelines. The process included provisioning AWS resources, configuring a secure cluster with IAM-based authentication, and deploying Kpow via Docker Compose with environment-specific and security-conscious settings.
Once connected, Kpow provides an intuitive interface to monitor brokers, manage topics, produce and consume messages, and track consumer lag in real time. Beyond the basics, it offers advanced features like schema inspection, Kafka Connect monitoring, RBAC enforcement, and audit visibility - helping teams shift from reactive troubleshooting to proactive, insight-driven operations. Together, Amazon Managed Streaming for Apache Kafka (MSK) and Kpow form a robust foundation for building and managing high-performance, secure, real-time streaming applications on AWS.
Join the Factor Community
We’re building more than products, we’re building a community. Whether you're getting started or pushing the limits of what's possible with Kafka and Flink, we invite you to connect, share, and learn with others.


