Read More
This is some text inside of a div block.

Developer
Knowledge Center
Empowering engineers with everything they need to build, monitor, and scale real-time data pipelines with confidence.

How To
xx min read
Integrate Kpow with Oracle Compute Infrastructure (OCI) Streaming with Apache Kafka
Unlock the full potential of your dedicated OCI Streaming with Apache Kafka cluster. This guide shows you how to integrate Kpow with your OCI brokers and self-hosted Kafka Connect and Schema Registry, unifying them into a single, developer-ready toolkit for complete visibility and control over your entire Kafka ecosystem.
Read More
Overview
When working with real-time data on Oracle Cloud Infrastructure (OCI), you have two powerful, Kafka-compatible streaming services to choose from:
- OCI Streaming with Apache Kafka: A dedicated, managed service that gives you full control over your own Apache Kafka cluster.
- OCI Streaming: A serverless, Kafka-compatible platform designed for effortless, scalable data ingestion.
Choosing the dedicated OCI Streaming with Apache Kafka service gives you maximum control and the complete functionality of open-source Kafka. However, this control comes with a trade-off: unlike some other managed platforms, OCI does not provide managed Kafka Connect or Schema Registry services, recommending users provision them on custom instances.
This guide will walk you through integrating Kpow with your OCI Kafka cluster, alongside self-hosted instances of Kafka Connect and Schema Registry. The result is a complete, developer-ready environment that provides full visibility and control over your entire Kafka ecosystem.
❗ Note on the serverless OCI Streaming service: While you can connect Kpow to OCI's serverless offering, its functionality is limited because some Kafka APIs are yet to be implemented. Our OCI provider documentation explains how to connect, and you can review the specific API gaps in the official Oracle documentation.
💡 Explore our setup guides for other leading platforms like Confluent Cloud, Amazon MSK, and Google Cloud Kafka, or emerging solutions like Redpanda, BufStream, and the Instaclustr Platform.
About Factor House
Factor House is a leader in real-time data tooling, empowering engineers with innovative solutions for Apache Kafka® and Apache Flink®.
Our flagship product, Kpow for Apache Kafka, is the market-leading enterprise solution for Kafka management and monitoring.
Explore our live multi-cluster demo environment or grab a free Community license and dive into streaming tech on your laptop with Factor House Local.
.png)
Prerequisites
Before creating a Kafka cluster, you must set up the necessary network infrastructure within your OCI tenancy. The Kafka cluster itself is deployed directly into this network, and this setup is also what ensures that your client applications (like Kpow) can securely connect to the brokers.
As detailed in the official OCI documentation, you will need:
- A Virtual Cloud Network (VCN): The foundational network for your cloud resources.
- A Subnet: A subdivision of your VCN where you will launch the Kafka cluster and client VM.
- Security Rules: Ingress rules configured in a Security List or Network Security Group to allow traffic on the required ports. For this guide, which uses SASL/SCRAM, you must open port 9092. If you were using mTLS, you would open port 9093.
Create a Vault Secret
OCI Kafka leverages the OCI Vault service to securely manage the credentials used for SASL/SCRAM authentication.
First, create a Vault in your desired compartment. Inside that Vault, create a new Secret with the following JSON content, replacing the placeholder values with your desired username and a strong password.
{ "username": "<vault-username>", "password": "<value-password>" }Take note of the following details, as you will need them when creating the Kafka cluster:
- SASL SCRAM - Vault compartment:
<compartment-name> - SASL SCRAM - Vault:
<vault-name> - SASL SCRAM - Secret compartment:
<compartment-name> - SASL SCRAM - Secret:
<value-secret-name>
Create IAM Policies
To allow OCI to manage your Kafka cluster and its associated network resources, you must create several IAM policies. These policies grant permissions to both user groups (for administrative actions) and the Kafka service principal (for operational tasks).
The required policies are detailed in the "Required IAM Policies" section of the OCI Kafka documentation. Apply these policies in your tenancy's root compartment to ensure the Kafka service has the necessary permissions.
Create a Kafka Cluster
With the prerequisites in place, you can now create your Kafka cluster from the OCI console.
- Navigate to Developer Services > Application Integration > OCI Streaming with Apache Kafka.
- Click Create cluster and follow the wizard:
- Cluster settings: Provide a name, select your compartment, and choose a Kafka version (e.g., 3.7).
- Broker settings: Choose the number of brokers, the OCPU count per broker, and the block volume storage per broker.
- Cluster configuration: OCI creates a default configuration for the cluster. You can review and edit its properties here. For this guide, add
auto.create.topics.enable=trueto the default configuration. Note that after creation, the cluster's configuration can only be changed using the OCI CLI or SDK. - Security settings: This section is for configuring Mutual TLS (mTLS). Since this guide uses SASL/SCRAM, leave this section blank. We will configure security after the cluster is created.
- Networking: Choose the VCN and subnet you configured in the prerequisites.
- Review your settings and click Create. OCI will begin provisioning your dedicated Kafka cluster.
- Once the cluster's status becomes Active, select it from the cluster list page to view its details.
- From the details page, select the Actions menu and then select Update SASL SCRAM.
- In the Update SASL SCRAM panel, select the Vault and the Secret that contain your secure credentials.
- Select Update.
- After the update is complete, return to the Cluster Information section and copy the Bootstrap Servers endpoint for SASL-SCRAM. You will need this for the next steps.
Launch a Client VM
We need a virtual machine to host Kpow, Kafka Connect, and Schema Registry. This VM must have network access to the Kafka cluster.
- Create Instance & Save SSH Key: Navigate to Compute > Instances and begin to create a new compute instance.
- Select an Ubuntu image.
- In the "Add SSH keys" section, choose the option to "Generate a key pair for me" and click the "Save Private Key" button. This is your only chance to download this key, which is required for SSH access.
- Configure Networking: During the instance creation, configure the networking as follows:
- Placement: Assign the instance to the same VCN as your Kafka cluster, in a subnet that can reach your Kafka brokers.
- Kpow UI Access: Ensure the subnet's security rules allow inbound TCP traffic on port 3000. This opens the port for the Kpow web interface.
- Internet Access: The instance needs outbound access to pull the Kpow Docker image.
- Simple Setup: For development, place the instance in a public subnet with an Internet Gateway.
- Secure (Production): We recommend using a private subnet with a NAT Gateway. This allows outbound connections without exposing the instance to inbound internet traffic.
- Connect and Install Docker: Once the VM is in the "Running" state, use the private key you saved to SSH into its public or private IP address and install Docker.
Deploying Kpow with Supporting Instances
On your client VM, we will use Docker Compose to launch Kpow, Kafka Connect, and Schema Registry.
First, create a setup script to prepare the environment. This script downloads the MSK Data Generator (a useful source connector for creating sample data) and sets up the JAAS configuration files required for Schema Registry's basic authentication.
Save the following as setup.sh:
#!/usr/bin/env bash

SCRIPT_PATH="$(cd $(dirname "$0"); pwd)"
DEPS_PATH=$SCRIPT_PATH/deps

rm -rf $DEPS_PATH && mkdir $DEPS_PATH

echo "Set-up environment..."

echo "Downloading MSK data generator..."
mkdir -p $DEPS_PATH/connector/msk-datagen
curl --silent -L -o $DEPS_PATH/connector/msk-datagen/msk-data-generator.jar \
  https://github.com/awslabs/amazon-msk-data-generator/releases/download/v0.4.0/msk-data-generator-0.4-jar-with-dependencies.jar


echo "Create Schema Registry configs..."
mkdir -p $DEPS_PATH/schema
cat << 'EOF' > $DEPS_PATH/schema/schema_jaas.conf
schema {
         org.eclipse.jetty.jaas.spi.PropertyFileLoginModule required
         debug="true"
         file="/etc/schema/schema_realm.properties";
     };
EOF

cat << 'EOF' > $DEPS_PATH/schema/schema_realm.properties
admin: CRYPT:adpexzg3FUZAk,schema-admin
EOF

echo "Environment setup completed."
Next, create a `docker-compose.yml` file. This defines our three services. Be sure to replace the placeholder values (<BOOTSTRAP_SERVER_ADDRESS>, <VAULT_USERNAME>, <VAULT_PASSWORD>) with your specific OCI Kafka details.
services:
  kpow:
    image: factorhouse/kpow-ce:latest
    container_name: kpow
    pull_policy: always
    restart: always
    ports:
      - "3000:3000"
    networks:
      - factorhouse
    depends_on:
      connect:
        condition: service_healthy
    environment:
      ENVIRONMENT_NAME: "OCI Kafka Cluster"
      BOOTSTRAP: "<BOOTSTRAP_SERVER_ADDRESS>"
      SECURITY_PROTOCOL: "SASL_SSL"
      SASL_MECHANISM: "SCRAM-SHA-512"
      SASL_JAAS_CONFIG: 'org.apache.kafka.common.security.scram.ScramLoginModule required username="<VAULT_USERNAME>" password="<VAULT_PASSWORD>";'
      CONNECT_NAME: "Local Connect Cluster"
      CONNECT_REST_URL: "http://connect:8083"
      SCHEMA_REGISTRY_NAME: "Local Schema Registry"
      SCHEMA_REGISTRY_URL: "http://schema:8081"
      SCHEMA_REGISTRY_AUTH: "USER_INFO"
      SCHEMA_REGISTRY_USER: "admin"
      SCHEMA_REGISTRY_PASSWORD: "admin"
    env_file:
      - license.env

  schema:
    image: confluentinc/cp-schema-registry:7.8.0
    container_name: schema_registry
    ports:
      - "8081:8081"
    networks:
      - factorhouse
    environment:
      SCHEMA_REGISTRY_HOST_NAME: "schema"
      SCHEMA_REGISTRY_KAFKASTORE_BOOTSTRAP_SERVERS: "<BOOTSTRAP_SERVER_ADDRESS>"
      ## Authentication
      SCHEMA_REGISTRY_KAFKASTORE_SECURITY_PROTOCOL: "SASL_SSL"
      SCHEMA_REGISTRY_KAFKASTORE_SASL_MECHANISM: "SCRAM-SHA-512"
      SCHEMA_REGISTRY_KAFKASTORE_SASL_JAAS_CONFIG: 'org.apache.kafka.common.security.scram.ScramLoginModule required username="<VAULT_USERNAME>" password="<VAULT_PASSWORD>";'
      SCHEMA_REGISTRY_AUTHENTICATION_METHOD: BASIC
      SCHEMA_REGISTRY_AUTHENTICATION_REALM: schema
      SCHEMA_REGISTRY_AUTHENTICATION_ROLES: schema-admin
      SCHEMA_REGISTRY_OPTS: -Djava.security.auth.login.config=/etc/schema/schema_jaas.conf
    volumes:
      - ./deps/schema:/etc/schema

  connect:
    image: confluentinc/cp-kafka-connect:7.8.0
    container_name: connect
    restart: unless-stopped
    ports:
      - 8083:8083
    networks:
      - factorhouse
    environment:
      CONNECT_BOOTSTRAP_SERVERS: "<BOOTSTRAP_SERVER_ADDRESS>"
      CONNECT_REST_PORT: "8083"
      CONNECT_GROUP_ID: "oci-demo-connect"
      CONNECT_CONFIG_STORAGE_TOPIC: "oci-demo-connect-config"
      CONNECT_OFFSET_STORAGE_TOPIC: "oci-demo-connect-offsets"
      CONNECT_STATUS_STORAGE_TOPIC: "oci-demo-connect-status"
      ## Authentication
      CONNECT_SECURITY_PROTOCOL: "SASL_SSL"
      CONNECT_SASL_MECHANISM: "SCRAM-SHA-512"
      CONNECT_SASL_JAAS_CONFIG: 'org.apache.kafka.common.security.scram.ScramLoginModule required username="<VAULT_USERNAME>" password="<VAULT_PASSWORD>";'
      # Propagate auth settings to internal clients
      CONNECT_PRODUCER_SECURITY_PROTOCOL: "SASL_SSL"
      CONNECT_PRODUCER_SASL_MECHANISM: "SCRAM-SHA-512"
      CONNECT_PRODUCER_SASL_JAAS_CONFIG: 'org.apache.kafka.common.security.scram.ScramLoginModule required username="<VAULT_USERNAME>" password="<VAULT_PASSWORD>";'
      CONNECT_CONSUMER_SECURITY_PROTOCOL: "SASL_SSL"
      CONNECT_CONSUMER_SASL_MECHANISM: "SCRAM-SHA-512"
      CONNECT_CONSUMER_SASL_JAAS_CONFIG: 'org.apache.kafka.common.security.scram.ScramLoginModule required username="<VAULT_USERNAME>" password="<VAULT_PASSWORD>";'
      CONNECT_KEY_CONVERTER: "org.apache.kafka.connect.json.JsonConverter"
      CONNECT_VALUE_CONVERTER: "org.apache.kafka.connect.json.JsonConverter"
      CONNECT_INTERNAL_KEY_CONVERTER: "org.apache.kafka.connect.json.JsonConverter"
      CONNECT_INTERNAL_VALUE_CONVERTER: "org.apache.kafka.connect.json.JsonConverter"
      CONNECT_REST_ADVERTISED_HOST_NAME: "localhost"
      CONNECT_LOG4J_ROOT_LOGLEVEL: "INFO"
      CONNECT_PLUGIN_PATH: /usr/share/java/,/etc/kafka-connect/jars
    volumes:
      - ./deps/connector:/etc/kafka-connect/jars
    healthcheck:
      test: ["CMD-SHELL", "curl -f http://localhost:8083/ || exit 1"]
      interval: 5s
      timeout: 3s
      retries: 10
      start_period: 20s

networks:
  factorhouse:
    name: factorhouse
Finally, create a license.env file with your Kpow license details. Then, run the setup script and launch the services:
chmod +x setup.sh
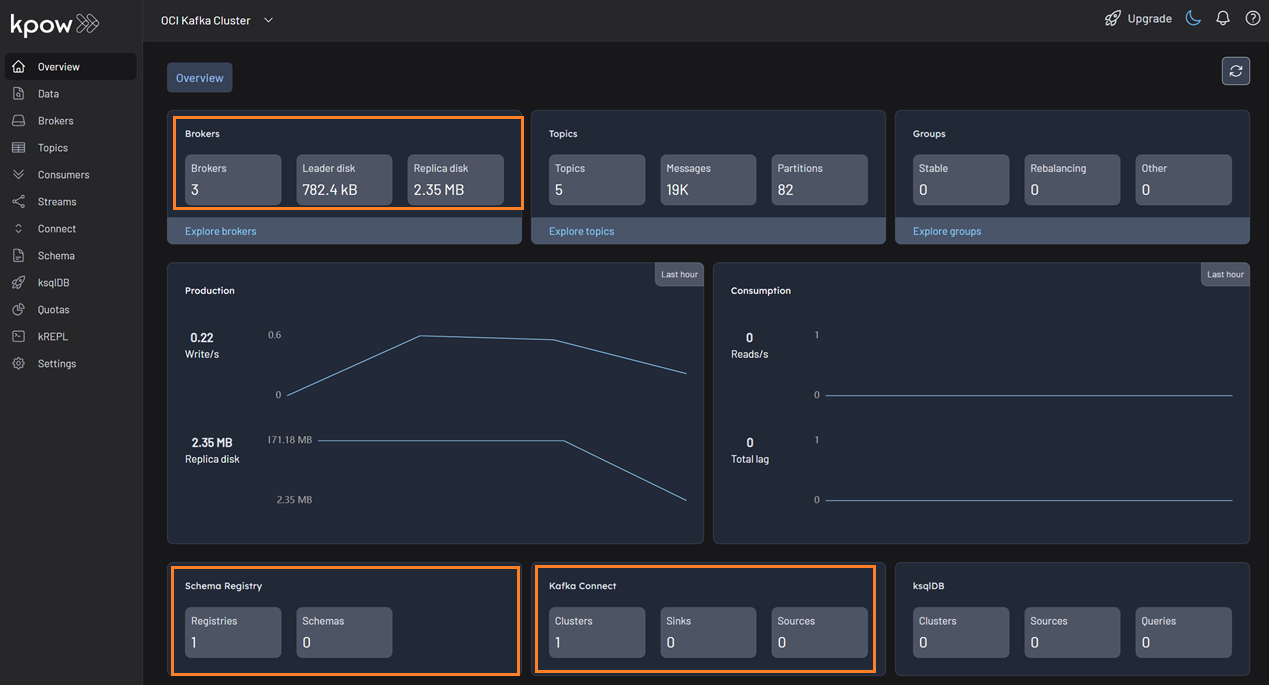
bash setup.sh && docker-compose up -dKpow will now be accessible at http://<vm-ip-address>:3000. You will see an overview of your OCI Kafka cluster, including your self-hosted Kafka Connect and Schema Registry instances.
Deploy Kafka Connector
Now let's deploy a connector to generate some data.
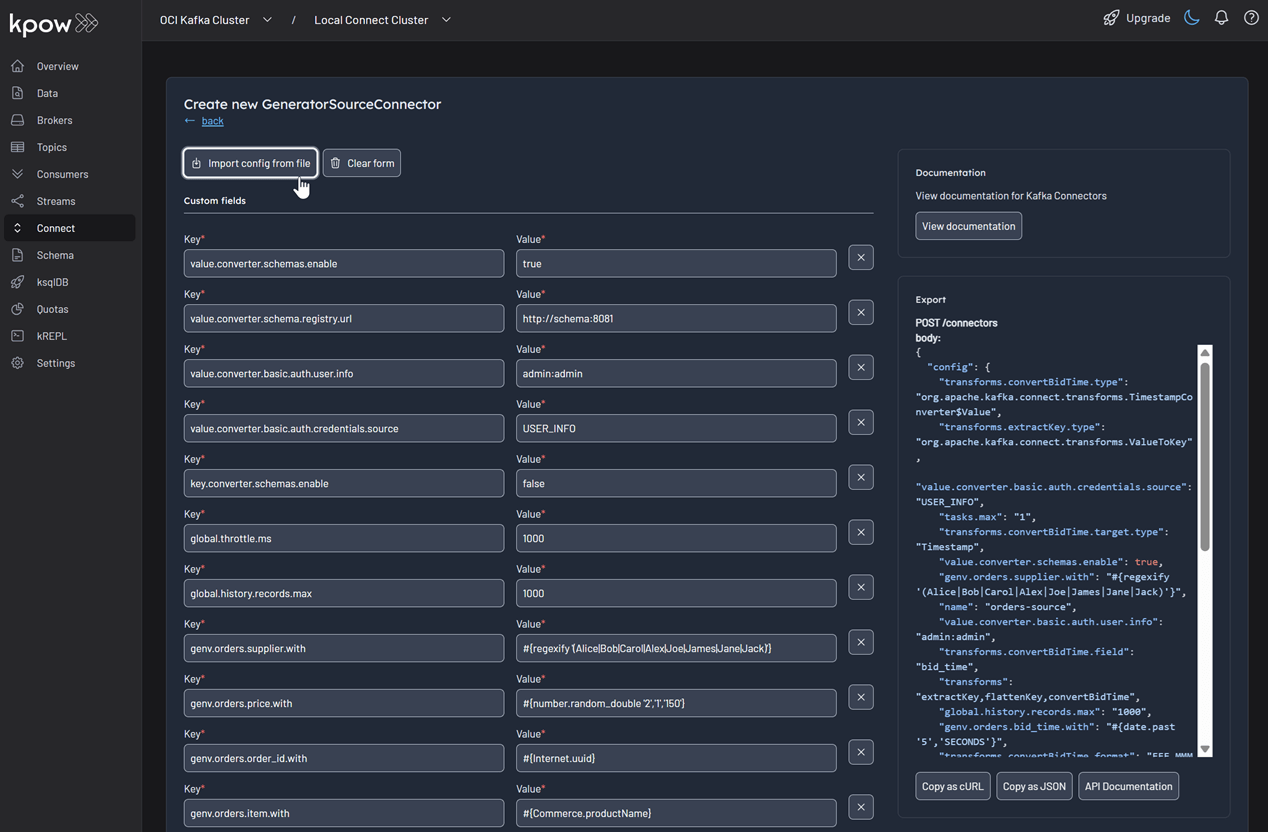
In the Connect menu of the Kpow UI, click the Create connector button.
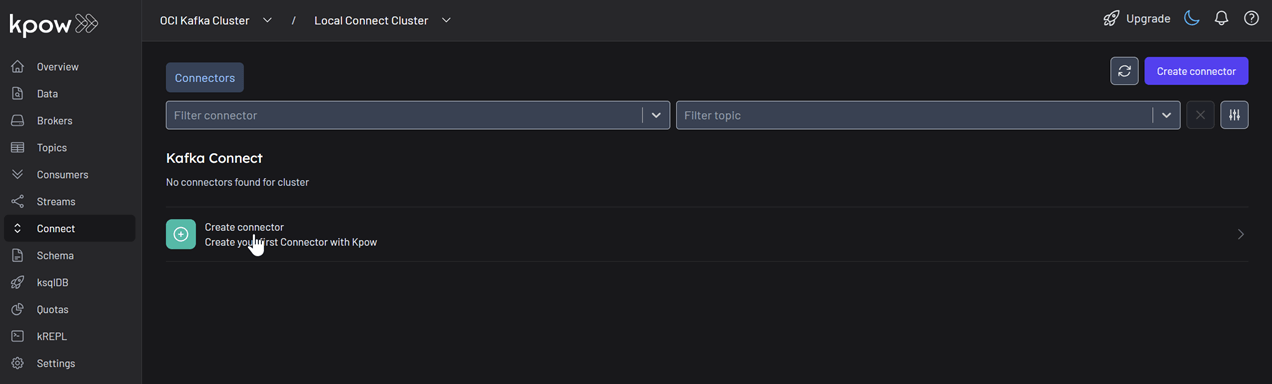
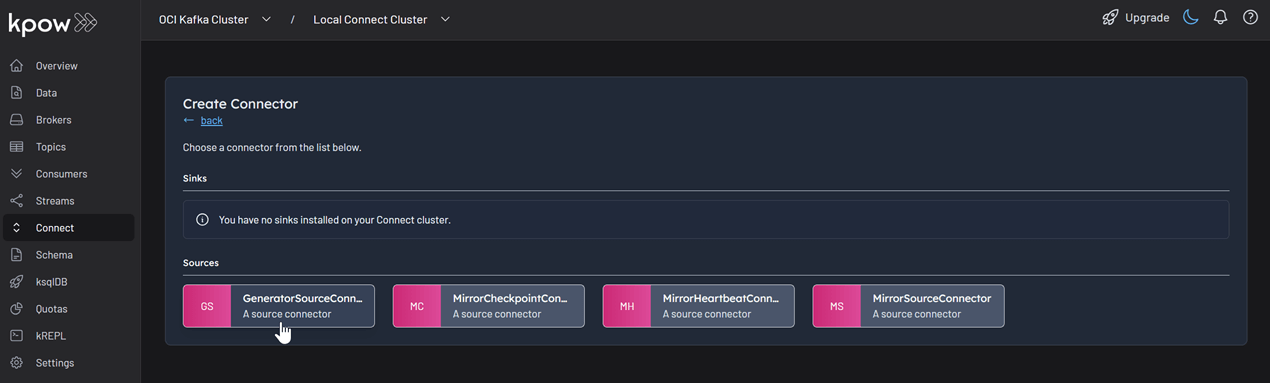
Among the available connectors, select GenerateSourceConnector, which is the source connector that generates fake order records.
Save the following configuration to a Json file, then import it and click Create. This configuration tells the connector to generate order data, use Avro for the value, and apply several Single Message Transforms (SMTs) to shape the final message.
{
  "name": "orders-source",
  "config": {
    "connector.class": "com.amazonaws.mskdatagen.GeneratorSourceConnector",
    "tasks.max": "1",

    "key.converter": "org.apache.kafka.connect.storage.StringConverter",
    "key.converter.schemas.enable": false,
    "value.converter": "io.confluent.connect.avro.AvroConverter",
    "value.converter.schemas.enable": true,
    "value.converter.schema.registry.url": "http://schema:8081",
    "value.converter.basic.auth.credentials.source": "USER_INFO",
    "value.converter.basic.auth.user.info": "admin:admin",

    "genv.orders.order_id.with": "#{Internet.uuid}",
    "genv.orders.bid_time.with": "#{date.past '5','SECONDS'}",
    "genv.orders.price.with": "#{number.random_double '2','1','150'}",
    "genv.orders.item.with": "#{Commerce.productName}",
    "genv.orders.supplier.with": "#{regexify '(Alice|Bob|Carol|Alex|Joe|James|Jane|Jack)'}",

    "transforms": "extractKey,flattenKey,convertBidTime",
    "transforms.extractKey.type": "org.apache.kafka.connect.transforms.ValueToKey",
    "transforms.extractKey.fields": "order_id",
    "transforms.flattenKey.type": "org.apache.kafka.connect.transforms.ExtractField$Key",
    "transforms.flattenKey.field": "order_id",
    "transforms.convertBidTime.type": "org.apache.kafka.connect.transforms.TimestampConverter$Value",
    "transforms.convertBidTime.field": "bid_time",
    "transforms.convertBidTime.target.type": "Timestamp",
    "transforms.convertBidTime.format": "EEE MMM dd HH:mm:ss zzz yyyy",

    "global.throttle.ms": "1000",
    "global.history.records.max": "1000"
  }
}
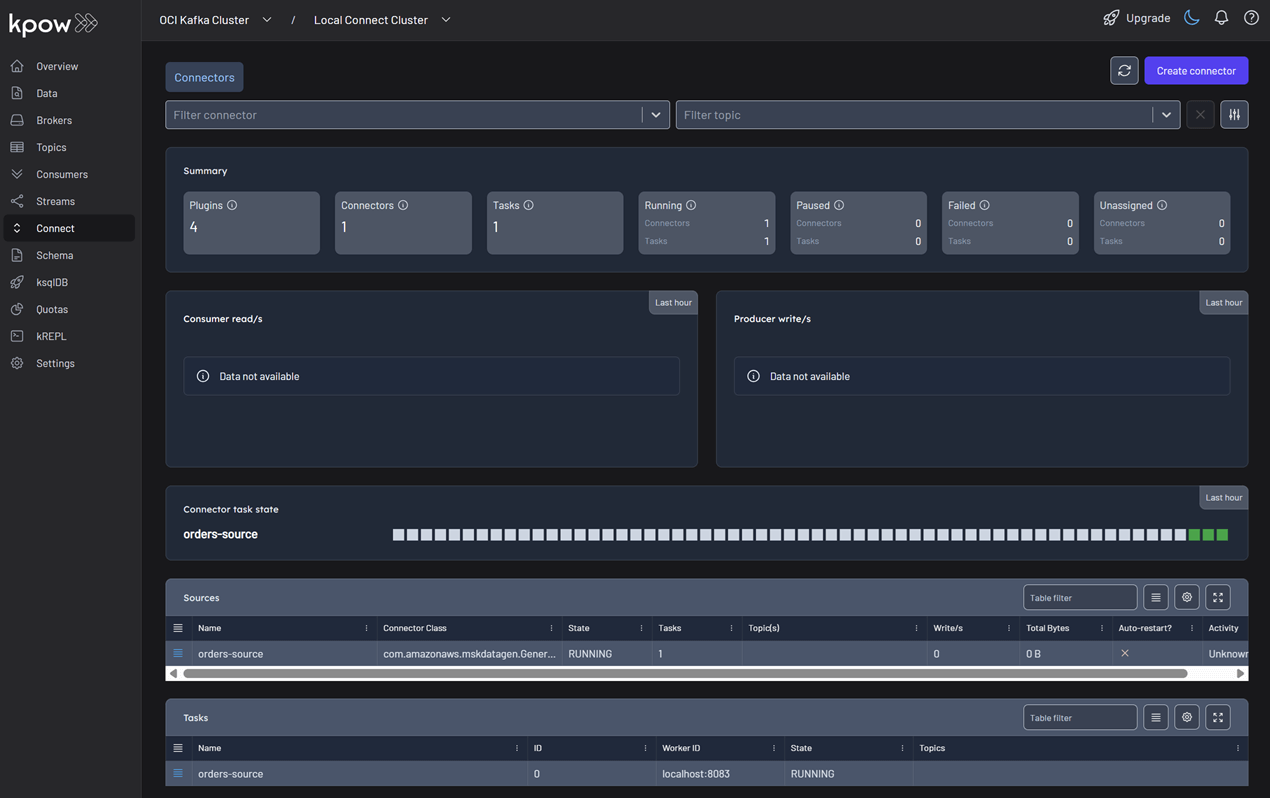
Once deployed, you can see the running connector and its task in the Kpow UI.
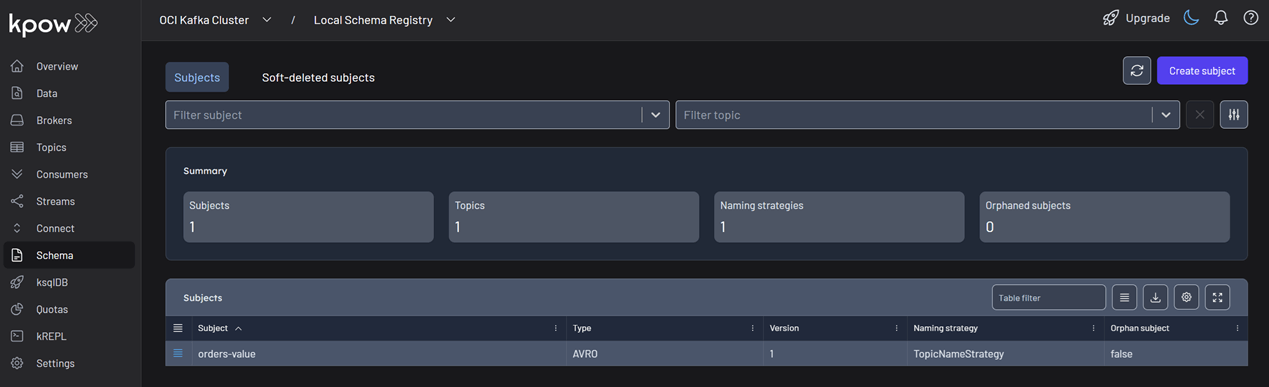
In the Schema menu, you can verify that a new value schema (orders-value) has been registered for the orders topic.
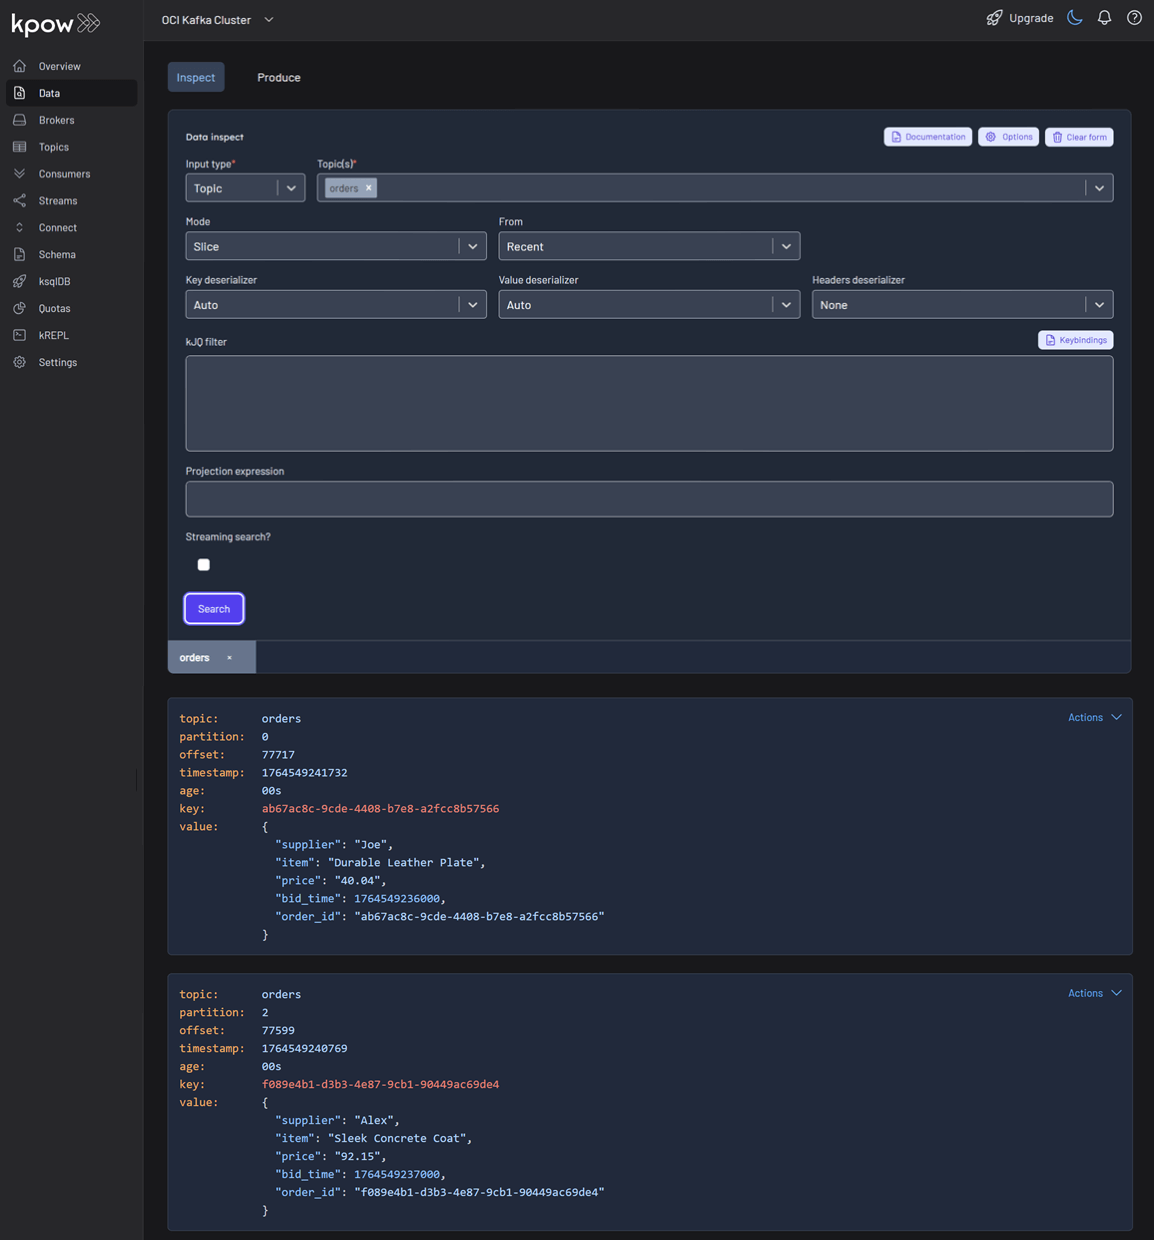
Finally, navigate to Data > Inspect, select the orders topic, and click Search to see the streaming data produced by your new connector.
Conclusion
You have now successfully integrated Kpow with OCI Streaming with Apache Kafka, providing a complete, self-hosted streaming stack on Oracle's powerful cloud infrastructure. By deploying Kafka Connect and Schema Registry alongside your cluster, you have a fully-featured, production-ready environment.
With Kpow, you have gained end-to-end visibility and control, from monitoring broker health and consumer lag to managing schemas, connectors, and inspecting live data streams. This empowers your team to develop, debug, and operate your Kafka-based applications with confidence.
Highlights
Case Study
xx min read
Heading 1
Heading 2
Heading 3
Heading 4
Heading 5
Heading 6
Lorem ipsum dolor sit amet, consectetur adipiscing elit, sed do eiusmod tempor incididunt ut labore et dolore magna aliqua. Ut enim ad minim veniam, quis nostrud exercitation ullamco laboris nisi ut aliquip ex ea commodo consequat. Duis aute irure dolor in reprehenderit in voluptate velit esse cillum dolore eu fugiat nulla pariatur.
Block quote
Ordered list
- Item 1
- Item 2
- Item 3
Unordered list
- Item A
- Item B
- Item C
Bold text
Emphasis
Superscript
Subscript
How-to
xx min read
Integrate Kpow with Oracle Compute Infrastructure (OCI) Streaming with Apache Kafka
Unlock the full potential of your dedicated OCI Streaming with Apache Kafka cluster. This guide shows you how to integrate Kpow with your OCI brokers and self-hosted Kafka Connect and Schema Registry, unifying them into a single, developer-ready toolkit for complete visibility and control over your entire Kafka ecosystem.
Overview
When working with real-time data on Oracle Cloud Infrastructure (OCI), you have two powerful, Kafka-compatible streaming services to choose from:
- OCI Streaming with Apache Kafka: A dedicated, managed service that gives you full control over your own Apache Kafka cluster.
- OCI Streaming: A serverless, Kafka-compatible platform designed for effortless, scalable data ingestion.
Choosing the dedicated OCI Streaming with Apache Kafka service gives you maximum control and the complete functionality of open-source Kafka. However, this control comes with a trade-off: unlike some other managed platforms, OCI does not provide managed Kafka Connect or Schema Registry services, recommending users provision them on custom instances.
This guide will walk you through integrating Kpow with your OCI Kafka cluster, alongside self-hosted instances of Kafka Connect and Schema Registry. The result is a complete, developer-ready environment that provides full visibility and control over your entire Kafka ecosystem.
❗ Note on the serverless OCI Streaming service: While you can connect Kpow to OCI's serverless offering, its functionality is limited because some Kafka APIs are yet to be implemented. Our OCI provider documentation explains how to connect, and you can review the specific API gaps in the official Oracle documentation.
💡 Explore our setup guides for other leading platforms like Confluent Cloud, Amazon MSK, and Google Cloud Kafka, or emerging solutions like Redpanda, BufStream, and the Instaclustr Platform.
About Factor House
Factor House is a leader in real-time data tooling, empowering engineers with innovative solutions for Apache Kafka® and Apache Flink®.
Our flagship product, Kpow for Apache Kafka, is the market-leading enterprise solution for Kafka management and monitoring.
Explore our live multi-cluster demo environment or grab a free Community license and dive into streaming tech on your laptop with Factor House Local.
Prerequisites
Before creating a Kafka cluster, you must set up the necessary network infrastructure within your OCI tenancy. The Kafka cluster itself is deployed directly into this network, and this setup is also what ensures that your client applications (like Kpow) can securely connect to the brokers.
As detailed in the official OCI documentation, you will need:
- A Virtual Cloud Network (VCN): The foundational network for your cloud resources.
- A Subnet: A subdivision of your VCN where you will launch the Kafka cluster and client VM.
- Security Rules: Ingress rules configured in a Security List or Network Security Group to allow traffic on the required ports. For this guide, which uses SASL/SCRAM, you must open port 9092. If you were using mTLS, you would open port 9093.
Create a Vault Secret
OCI Kafka leverages the OCI Vault service to securely manage the credentials used for SASL/SCRAM authentication.
First, create a Vault in your desired compartment. Inside that Vault, create a new Secret with the following JSON content, replacing the placeholder values with your desired username and a strong password.
{ "username": "<vault-username>", "password": "<value-password>" }Take note of the following details, as you will need them when creating the Kafka cluster:
- SASL SCRAM - Vault compartment:
<compartment-name> - SASL SCRAM - Vault:
<vault-name> - SASL SCRAM - Secret compartment:
<compartment-name> - SASL SCRAM - Secret:
<value-secret-name>
Create IAM Policies
To allow OCI to manage your Kafka cluster and its associated network resources, you must create several IAM policies. These policies grant permissions to both user groups (for administrative actions) and the Kafka service principal (for operational tasks).
The required policies are detailed in the "Required IAM Policies" section of the OCI Kafka documentation. Apply these policies in your tenancy's root compartment to ensure the Kafka service has the necessary permissions.
Create a Kafka Cluster
With the prerequisites in place, you can now create your Kafka cluster from the OCI console.
- Navigate to Developer Services > Application Integration > OCI Streaming with Apache Kafka.
- Click Create cluster and follow the wizard:
- Cluster settings: Provide a name, select your compartment, and choose a Kafka version (e.g., 3.7).
- Broker settings: Choose the number of brokers, the OCPU count per broker, and the block volume storage per broker.
- Cluster configuration: OCI creates a default configuration for the cluster. You can review and edit its properties here. For this guide, add
auto.create.topics.enable=trueto the default configuration. Note that after creation, the cluster's configuration can only be changed using the OCI CLI or SDK. - Security settings: This section is for configuring Mutual TLS (mTLS). Since this guide uses SASL/SCRAM, leave this section blank. We will configure security after the cluster is created.
- Networking: Choose the VCN and subnet you configured in the prerequisites.
- Review your settings and click Create. OCI will begin provisioning your dedicated Kafka cluster.
- Once the cluster's status becomes Active, select it from the cluster list page to view its details.
- From the details page, select the Actions menu and then select Update SASL SCRAM.
- In the Update SASL SCRAM panel, select the Vault and the Secret that contain your secure credentials.
- Select Update.
- After the update is complete, return to the Cluster Information section and copy the Bootstrap Servers endpoint for SASL-SCRAM. You will need this for the next steps.
Launch a Client VM
We need a virtual machine to host Kpow, Kafka Connect, and Schema Registry. This VM must have network access to the Kafka cluster.
- Create Instance & Save SSH Key: Navigate to Compute > Instances and begin to create a new compute instance.
- Select an Ubuntu image.
- In the "Add SSH keys" section, choose the option to "Generate a key pair for me" and click the "Save Private Key" button. This is your only chance to download this key, which is required for SSH access.
- Configure Networking: During the instance creation, configure the networking as follows:
- Placement: Assign the instance to the same VCN as your Kafka cluster, in a subnet that can reach your Kafka brokers.
- Kpow UI Access: Ensure the subnet's security rules allow inbound TCP traffic on port 3000. This opens the port for the Kpow web interface.
- Internet Access: The instance needs outbound access to pull the Kpow Docker image.
- Simple Setup: For development, place the instance in a public subnet with an Internet Gateway.
- Secure (Production): We recommend using a private subnet with a NAT Gateway. This allows outbound connections without exposing the instance to inbound internet traffic.
- Connect and Install Docker: Once the VM is in the "Running" state, use the private key you saved to SSH into its public or private IP address and install Docker.
Deploying Kpow with Supporting Instances
On your client VM, we will use Docker Compose to launch Kpow, Kafka Connect, and Schema Registry.
First, create a setup script to prepare the environment. This script downloads the MSK Data Generator (a useful source connector for creating sample data) and sets up the JAAS configuration files required for Schema Registry's basic authentication.
Save the following as setup.sh:
#!/usr/bin/env bash

SCRIPT_PATH="$(cd $(dirname "$0"); pwd)"
DEPS_PATH=$SCRIPT_PATH/deps

rm -rf $DEPS_PATH && mkdir $DEPS_PATH

echo "Set-up environment..."

echo "Downloading MSK data generator..."
mkdir -p $DEPS_PATH/connector/msk-datagen
curl --silent -L -o $DEPS_PATH/connector/msk-datagen/msk-data-generator.jar \
  https://github.com/awslabs/amazon-msk-data-generator/releases/download/v0.4.0/msk-data-generator-0.4-jar-with-dependencies.jar


echo "Create Schema Registry configs..."
mkdir -p $DEPS_PATH/schema
cat << 'EOF' > $DEPS_PATH/schema/schema_jaas.conf
schema {
         org.eclipse.jetty.jaas.spi.PropertyFileLoginModule required
         debug="true"
         file="/etc/schema/schema_realm.properties";
     };
EOF

cat << 'EOF' > $DEPS_PATH/schema/schema_realm.properties
admin: CRYPT:adpexzg3FUZAk,schema-admin
EOF

echo "Environment setup completed."
Next, create a `docker-compose.yml` file. This defines our three services. Be sure to replace the placeholder values (<BOOTSTRAP_SERVER_ADDRESS>, <VAULT_USERNAME>, <VAULT_PASSWORD>) with your specific OCI Kafka details.
services:
  kpow:
    image: factorhouse/kpow-ce:latest
    container_name: kpow
    pull_policy: always
    restart: always
    ports:
      - "3000:3000"
    networks:
      - factorhouse
    depends_on:
      connect:
        condition: service_healthy
    environment:
      ENVIRONMENT_NAME: "OCI Kafka Cluster"
      BOOTSTRAP: "<BOOTSTRAP_SERVER_ADDRESS>"
      SECURITY_PROTOCOL: "SASL_SSL"
      SASL_MECHANISM: "SCRAM-SHA-512"
      SASL_JAAS_CONFIG: 'org.apache.kafka.common.security.scram.ScramLoginModule required username="<VAULT_USERNAME>" password="<VAULT_PASSWORD>";'
      CONNECT_NAME: "Local Connect Cluster"
      CONNECT_REST_URL: "http://connect:8083"
      SCHEMA_REGISTRY_NAME: "Local Schema Registry"
      SCHEMA_REGISTRY_URL: "http://schema:8081"
      SCHEMA_REGISTRY_AUTH: "USER_INFO"
      SCHEMA_REGISTRY_USER: "admin"
      SCHEMA_REGISTRY_PASSWORD: "admin"
    env_file:
      - license.env

  schema:
    image: confluentinc/cp-schema-registry:7.8.0
    container_name: schema_registry
    ports:
      - "8081:8081"
    networks:
      - factorhouse
    environment:
      SCHEMA_REGISTRY_HOST_NAME: "schema"
      SCHEMA_REGISTRY_KAFKASTORE_BOOTSTRAP_SERVERS: "<BOOTSTRAP_SERVER_ADDRESS>"
      ## Authentication
      SCHEMA_REGISTRY_KAFKASTORE_SECURITY_PROTOCOL: "SASL_SSL"
      SCHEMA_REGISTRY_KAFKASTORE_SASL_MECHANISM: "SCRAM-SHA-512"
      SCHEMA_REGISTRY_KAFKASTORE_SASL_JAAS_CONFIG: 'org.apache.kafka.common.security.scram.ScramLoginModule required username="<VAULT_USERNAME>" password="<VAULT_PASSWORD>";'
      SCHEMA_REGISTRY_AUTHENTICATION_METHOD: BASIC
      SCHEMA_REGISTRY_AUTHENTICATION_REALM: schema
      SCHEMA_REGISTRY_AUTHENTICATION_ROLES: schema-admin
      SCHEMA_REGISTRY_OPTS: -Djava.security.auth.login.config=/etc/schema/schema_jaas.conf
    volumes:
      - ./deps/schema:/etc/schema

  connect:
    image: confluentinc/cp-kafka-connect:7.8.0
    container_name: connect
    restart: unless-stopped
    ports:
      - 8083:8083
    networks:
      - factorhouse
    environment:
      CONNECT_BOOTSTRAP_SERVERS: "<BOOTSTRAP_SERVER_ADDRESS>"
      CONNECT_REST_PORT: "8083"
      CONNECT_GROUP_ID: "oci-demo-connect"
      CONNECT_CONFIG_STORAGE_TOPIC: "oci-demo-connect-config"
      CONNECT_OFFSET_STORAGE_TOPIC: "oci-demo-connect-offsets"
      CONNECT_STATUS_STORAGE_TOPIC: "oci-demo-connect-status"
      ## Authentication
      CONNECT_SECURITY_PROTOCOL: "SASL_SSL"
      CONNECT_SASL_MECHANISM: "SCRAM-SHA-512"
      CONNECT_SASL_JAAS_CONFIG: 'org.apache.kafka.common.security.scram.ScramLoginModule required username="<VAULT_USERNAME>" password="<VAULT_PASSWORD>";'
      # Propagate auth settings to internal clients
      CONNECT_PRODUCER_SECURITY_PROTOCOL: "SASL_SSL"
      CONNECT_PRODUCER_SASL_MECHANISM: "SCRAM-SHA-512"
      CONNECT_PRODUCER_SASL_JAAS_CONFIG: 'org.apache.kafka.common.security.scram.ScramLoginModule required username="<VAULT_USERNAME>" password="<VAULT_PASSWORD>";'
      CONNECT_CONSUMER_SECURITY_PROTOCOL: "SASL_SSL"
      CONNECT_CONSUMER_SASL_MECHANISM: "SCRAM-SHA-512"
      CONNECT_CONSUMER_SASL_JAAS_CONFIG: 'org.apache.kafka.common.security.scram.ScramLoginModule required username="<VAULT_USERNAME>" password="<VAULT_PASSWORD>";'
      CONNECT_KEY_CONVERTER: "org.apache.kafka.connect.json.JsonConverter"
      CONNECT_VALUE_CONVERTER: "org.apache.kafka.connect.json.JsonConverter"
      CONNECT_INTERNAL_KEY_CONVERTER: "org.apache.kafka.connect.json.JsonConverter"
      CONNECT_INTERNAL_VALUE_CONVERTER: "org.apache.kafka.connect.json.JsonConverter"
      CONNECT_REST_ADVERTISED_HOST_NAME: "localhost"
      CONNECT_LOG4J_ROOT_LOGLEVEL: "INFO"
      CONNECT_PLUGIN_PATH: /usr/share/java/,/etc/kafka-connect/jars
    volumes:
      - ./deps/connector:/etc/kafka-connect/jars
    healthcheck:
      test: ["CMD-SHELL", "curl -f http://localhost:8083/ || exit 1"]
      interval: 5s
      timeout: 3s
      retries: 10
      start_period: 20s

networks:
  factorhouse:
    name: factorhouse
Finally, create a license.env file with your Kpow license details. Then, run the setup script and launch the services:
chmod +x setup.sh
bash setup.sh && docker-compose up -d
Kpow will now be accessible at http://<vm-ip-address>:3000. You will see an overview of your OCI Kafka cluster, including your self-hosted Kafka Connect and Schema Registry instances.
Deploy Kafka Connector
Now let's deploy a connector to generate some data.
In the Connect menu of the Kpow UI, click the Create connector button.
Among the available connectors, select GenerateSourceConnector, which is the source connector that generates fake order records.
Save the following configuration to a Json file, then import it and click Create. This configuration tells the connector to generate order data, use Avro for the value, and apply several Single Message Transforms (SMTs) to shape the final message.
{
  "name": "orders-source",
  "config": {
    "connector.class": "com.amazonaws.mskdatagen.GeneratorSourceConnector",
    "tasks.max": "1",

    "key.converter": "org.apache.kafka.connect.storage.StringConverter",
    "key.converter.schemas.enable": false,
    "value.converter": "io.confluent.connect.avro.AvroConverter",
    "value.converter.schemas.enable": true,
    "value.converter.schema.registry.url": "http://schema:8081",
    "value.converter.basic.auth.credentials.source": "USER_INFO",
    "value.converter.basic.auth.user.info": "admin:admin",

    "genv.orders.order_id.with": "#{Internet.uuid}",
    "genv.orders.bid_time.with": "#{date.past '5','SECONDS'}",
    "genv.orders.price.with": "#{number.random_double '2','1','150'}",
    "genv.orders.item.with": "#{Commerce.productName}",
    "genv.orders.supplier.with": "#{regexify '(Alice|Bob|Carol|Alex|Joe|James|Jane|Jack)'}",

    "transforms": "extractKey,flattenKey,convertBidTime",
    "transforms.extractKey.type": "org.apache.kafka.connect.transforms.ValueToKey",
    "transforms.extractKey.fields": "order_id",
    "transforms.flattenKey.type": "org.apache.kafka.connect.transforms.ExtractField$Key",
    "transforms.flattenKey.field": "order_id",
    "transforms.convertBidTime.type": "org.apache.kafka.connect.transforms.TimestampConverter$Value",
    "transforms.convertBidTime.field": "bid_time",
    "transforms.convertBidTime.target.type": "Timestamp",
    "transforms.convertBidTime.format": "EEE MMM dd HH:mm:ss zzz yyyy",

    "global.throttle.ms": "1000",
    "global.history.records.max": "1000"
  }
}
Once deployed, you can see the running connector and its task in the Kpow UI.
In the Schema menu, you can verify that a new value schema (orders-value) has been registered for the orders topic.
Finally, navigate to Data > Inspect, select the orders topic, and click Search to see the streaming data produced by your new connector.
Conclusion
You have now successfully integrated Kpow with OCI Streaming with Apache Kafka, providing a complete, self-hosted streaming stack on Oracle's powerful cloud infrastructure. By deploying Kafka Connect and Schema Registry alongside your cluster, you have a fully-featured, production-ready environment.
With Kpow, you have gained end-to-end visibility and control, from monitoring broker health and consumer lag to managing schemas, connectors, and inspecting live data streams. This empowers your team to develop, debug, and operate your Kafka-based applications with confidence.
Article
xx min read
Unified community license for Kpow and Flex
The unified Factor House Community License works with both Kpow Community Edition and Flex Community Edition, meaning one license will unlock both products. This makes it even simpler to explore modern data streaming tools, create proof-of-concepts, and evaluate our products.
The new unified Factor House Community License works with both Kpow Community Edition and Flex Community Edition, so you only need one license to unlock both products. This makes it even simpler to explore modern data streaming tools, create proof-of-concepts, and evaluate our products.
What's changing
Previously, we issued separate community licenses for Kpow and Flex, with different tiers for individuals and organisations. Now, there's just one single Community License that unlocks both products.
What's new:
- One license for both products
- Three environments for everyone - whether you're an individual developer or part of a team, you get three non-production installations per product
- Simplified management - access and renew your licenses through our new self-service portal at account.factorhouse.io
Our commitment to the engineering community
Since first launching Kpow CE at Current '22, thousands of engineers have used our community licenses to learn Kafka and Flink without jumping through enterprise procurement hoops. This unified license keeps that same philosophy: high-quality tools that are free for non-production use.
The Factor House Community License is free for individuals and organizations to use in non-production environments. It's perfect for:
- Learning and experimenting with Kafka and Flink
- Building prototypes and proof-of-concepts
- Testing integrations before production deployment
- Exploring sample projects like Factor House Local, Top-K Game Leaderboard, and theLook eCommerce dashboard
Getting started
New users: Head to account.factorhouse.io to grab your free Community license. You'll receive instant access via magic link authentication.
Existing users: Your legacy Kpow and Flex Community licenses will continue to work and are now visible in the portal. When your license renews (after 12 months), consider switching to the unified model for easier management.
What's included
Both Kpow CE and Flex CE include most enterprise features, optimized for learning and testing. Includes Kafka and Flink monitoring and management, fast multi-topic search, and Schema registry and Kafka Connect support.
- License duration: 12 months, renewable annually
- Installations: Up to 3 per product (Kpow CE: 1 Kafka cluster + 1 Schema Registry + 1 Connect cluster per installation; Flex CE: 1 Flink cluster per installation)
- Support: Self-service via Factor House Community Slack, documentation, and release notes
- Deployment: Docker, Docker Compose or Kubernetes
Ready for production? Start a 30-day free trial of our Enterprise editions directly from the portal to unlock RBAC, Kafka Streams monitoring, custom SerDes, and dedicated support.
What about legacy licenses?
If you're currently using a Kpow Individual, Kpow Organization, or Flex Community license, nothing changes immediately. Your existing licenses will continue to work with their respective products and are now accessible in the portal. When your license expires at the end of its 12-month term, you can easily switch to the new unified license for simpler management.
Get your free Community license at account.factorhouse.io
Questions? Reach out to hello@factorhouse.io or join us in the Factor House Community Slack.
Case Study
xx min read
Heading 1
Heading 2
Heading 3
Heading 4
Heading 5
Heading 6
Lorem ipsum dolor sit amet, consectetur adipiscing elit, sed do eiusmod tempor incididunt ut labore et dolore magna aliqua. Ut enim ad minim veniam, quis nostrud exercitation ullamco laboris nisi ut aliquip ex ea commodo consequat. Duis aute irure dolor in reprehenderit in voluptate velit esse cillum dolore eu fugiat nulla pariatur.
Block quote
Ordered list
- Item 1
- Item 2
- Item 3
Unordered list
- Item A
- Item B
- Item C
Bold text
Emphasis
Superscript
Subscript
Release
xx min read
Release 95.1: A unified experience across product, web, docs and licensing
95.1 delivers a cohesive experience across Factor House products, licensing, and brand. This release introduces our new license portal, refreshed company-wide branding, a unified Community License for Kpow and Flex, and a series of performance, accessibility, and schema-related improvements.
Upgrading to 95.1
If you are using Kpow with a Google Managed Service for Apache Kafka (Google MSAK) cluster, you will now need to use eitherkpow-java17-gcp-standalone.jaror the95.1-temurin-ubitag of the factorhouse/kpow Docker image.
New Factor House brand: unified look across web, product, and docs
We've refreshed the Factor House brand across our website, documentation, the new license portal, and products to reflect where we are today: a company trusted by engineers running some of the world's most demanding data pipelines. Following our seed funding earlier this year, we've been scaling the team and product offerings to match the quality and value we deliver to enterprise engineers. The new brand brings our external presence in line with what we've built. You'll see updated logos in Kpow and Flex, refreshed styling across docs and the license portal, and a completely redesigned website with clearer navigation and information architecture. Your workflows stay exactly the same, and the result is better consistency across all touchpoints, making it easier for new users to evaluate our tools and for existing users to find what they need.
New license portal: self-service access for all users
We've rolled out our new license portal at account.factorhouse.io, to streamline license management for everyone. New users can instantly grab a Community or Trial license with just their email address, and existing users will see their migrated licenses when they log in. The portal lets you manage multiple licenses from one account, all through a clean, modern interface with magic link authentication. This could be upgrading from Community to a Trial, renewing your annual Community License, or requesting a trial extension. For installation and configuration guidance, check our Kpow and Flex docs.
Visit account.factorhouse.io to provision a community or trial license.
Unified community license for Kpow and Flex
We've consolidated our Community licensing into a single unified license that works with both Kpow Community Edition and Flex Community Edition. Your Community license allows you to run Kpow and Flex in up to three non-production environments each, making it easier to learn, test, and build with Kafka and Flink. The new licence streamlines management, providing a single key for both products and annual renewal via the licence portal. Perfect for exploring projects like Factor House Local or building your own data pipelines. Existing legacy licenses will continue to work and will also be accessible in the license portal.
Read more about the unified community licenses and inclusions.
Performance improvements
This release brings in a number of performance improvements to Kpow, Flex and Factor Platform. The work to compute and materialize views and insights about your Kafka or Flink resources has now been decreased by an order of magnitude. For our top-end customers we have observed a 70% performance increase in Kpow’s materialization.
Data Inspect enhancements
Confluent Data Rules support: Data inspect now supports Confluent Schema Registry Data Rules, including CEL, CEL_FIELD, and JSONata rule types. If you're using Data Contracts in Confluent Cloud, Data Inspect now accurately identifies rule failures and lets you filter them with kJQ.
Support for Avro Primitive Types: We’ve added support for Avro schemas that consist of a plain primitive type, including string, number, and boolean.
Schema Registry & navigation improvements
General Schema Registry improvements (from 94.6): In 94.6, we introduced improvements to Schema Registry performance and updated the observation engine. This release continues that work, with additional refinements based on real-world usage.
Karapace compatibility fix: We identified and fixed a regression in the new observation engine that affected Karapace users.
Redpanda Schema Registry note: The new observation engine is not compatible with Redpanda’s Schema Registry. Customers using Redpanda should set `OBSERVATION_VERSION=1` until full support is available.
Navigation improvements: Filters on the Schema Overview pages now persist when navigating into a subject and back.
Chart accessibility & UX improvements
This release brings a meaningful accessibility improvement to Kpow & Flex: Keyboard navigation for line charts. Users can now focus a line chart and use the left and right arrow keys to view data point tooltips. We plan to expand accessibility for charts to include bar charts and tree maps in the near future, bringing us closer to full WCAG 2.1 Level AA compliance as reported in our Voluntary Product Accessibility Template (VPAT).
We’ve also improved the UX of comparing adjacent line charts: Each series is now consistently coloured across different line charts on a page, making it easier to identify trends across a series, e.g., a particular topic’s producer write/s vs. consumer read/s.
These changes benefit everyone: developers using assistive technology, teams with accessibility requirements, and anyone who prefers keyboard navigation. Accessibility isn't an afterthought, it's a baseline expectation for enterprise-grade tooling, and we're committed to leading by example in the Kafka and Flink ecosystem.
View our VPAT documentation for 95.1.
All Resources
Thank you! Your submission has been received!
Oops! Something went wrong while submitting the form.
Case Study
xx min read
Heading 1
Heading 2
Heading 3
Heading 4
Heading 5
Heading 6
Lorem ipsum dolor sit amet, consectetur adipiscing elit, sed do eiusmod tempor incididunt ut labore et dolore magna aliqua. Ut enim ad minim veniam, quis nostrud exercitation ullamco laboris nisi ut aliquip ex ea commodo consequat. Duis aute irure dolor in reprehenderit in voluptate velit esse cillum dolore eu fugiat nulla pariatur.
Block quote
Ordered list
- Item 1
- Item 2
- Item 3
Unordered list
- Item A
- Item B
- Item C
Bold text
Emphasis
Superscript
Subscript
.webp)
How-to
xx min read
Set Up Kpow with Instaclustr Platform
This guide demonstrates how to set up Kpow with Instaclustr using a practical example. We deploy a Kafka cluster with the Karapace Schema Registry add-on and a Kafka Connect cluster, then use Kpow to deploy custom connectors and manage an end-to-end data pipeline.
Overview
Instaclustr provides a robust, managed platform for Apache Kafka, handling the complex operational overhead of running a distributed streaming ecosystem. While the platform ensures reliability and scalability, developers and operators still need a powerful tool for monitoring, managing, and interacting with their Kafka resources. This is where Kpow, the all-in-one toolkit for Kafka, shines.
In this guide, we will walk through the complete process of setting up Kpow to connect to and manage a Kafka environment hosted on Instaclustr. We will begin by provisioning a Kafka cluster with Karapace Schema registry and Kafka Connect cluster. Then, we will configure and launch a local Kpow instance, detailing how to gather the correct connection information from the Instaclustr console. To put this integration into practice, we will use Kpow's interface to deploy a full data pipeline, demonstrating how to manage custom connectors, inspect topic data, and view schemas in real-time. By the end of this tutorial, we will have a fully operational Kpow instance providing a comprehensive view and powerful control over our managed Instaclustr environment.
</> The source code and configuration files used in this tutorial can be found in the integrations/instaclustr-getting-started directory of the examples GitHub repository.examples GitHub repository. GitHub repository.💡 Kpow can be integrated with a wide range of managed Kafka services. See the following guides for more details.
- Set Up Kpow with Confluent Cloud
- Set Up Kpow with Amazon Managed Streaming for Apache Kafka
- Set Up Kpow with Google Cloud Managed Service for Apache Kafka
- Integrate Kpow with Bufstream
About Factor House
Factor House is a leader in real-time data tooling, empowering engineers with innovative solutions for Apache Kafka® and Apache Flink®.
Our flagship product, Kpow for Apache Kafka, is the market-leading enterprise solution for Kafka management and monitoring.
Explore our live multi-cluster demo environment or grab a free Community license and dive into streaming tech on your laptop with Factor House Local.

Preparing deployment of custom Kafka connectors
Deploying S3 buckets and create an IAM user
To begin, we'll provision the necessary AWS resources using a CloudFormation template. This template will create two S3 buckets and an IAM user with the appropriate permissions.
AWSTemplateFormatVersion: "2010-09-09"

Parameters:
  ResourceNamePrefixParameter:
    Type: String
    Default: fh-instaclustr
    AllowedPattern: "[a-z0-9\\-]+"
    Description: Custom connector AWS storage resources name prefix

Resources:
  InstaclustrKafkaConnectCustomConnectorsBucket:
    Type: AWS::S3::Bucket
    Properties:
      BucketName: !Sub "${ResourceNamePrefixParameter}-custom-connector"

  InstaclustrKafkaConnectSinkBucket:
    Type: AWS::S3::Bucket
    Properties:
      BucketName: !Sub "${ResourceNamePrefixParameter}-sink"

  InstaclustrCustomConnectorPullUser:
    Type: AWS::IAM::User
    Properties:
      UserName: !Sub "${ResourceNamePrefixParameter}-user"

  InstaclustrCustomConnectorUserAccessPolicy:
    Type: AWS::IAM::Policy
    Properties:
      PolicyName: !Sub "${ResourceNamePrefixParameter}-policy"
      PolicyDocument:
        Version: "2012-10-17"
        Statement:
          - Effect: Allow
            Action:
              - s3:ListBucket
              - s3:GetBucketLocation
            Resource:
              - !GetAtt InstaclustrKafkaConnectCustomConnectorsBucket.Arn
              - !GetAtt InstaclustrKafkaConnectSinkBucket.Arn

          - Effect: Allow
            Action:
              - s3:GetObject
            Resource: !Sub "${InstaclustrKafkaConnectCustomConnectorsBucket.Arn}/*"

          - Effect: Allow
            Action:
              - s3:PutObject
              - s3:GetObject
              - s3:AbortMultipartUpload
              - s3:DeleteObject
              - s3:ListMultipartUploadParts
            Resource: !Sub "${InstaclustrKafkaConnectSinkBucket.Arn}/*"
      Users:
        - !Ref InstaclustrCustomConnectorPullUser

Outputs:
  CustomConnectorS3BucketName:
    Value: !Ref InstaclustrKafkaConnectCustomConnectorsBucket
    Description: Name of S3 bucket to hold custom connector JARs

  SinkS3BucketName:
    Value: !Ref InstaclustrKafkaConnectSinkBucket
    Description: Name of S3 bucket for the S3 sink connector to write data to
The CloudFormation stack will create the following resources:
<prefix>-custom-connector: An S3 bucket designated for uploading our custom Kafka connector artifacts. The default name isfh-instaclustr-custom-connector.<prefix>-sink: A second S3 bucket that will serve as the destination for records from our Kafka topic. The default name isfh-instaclustr-sink.<prefix>-user: An IAM user with read access to the connector source bucket and read/write permissions for the sink S3 bucket. The default username isfh-instaclustr-user.
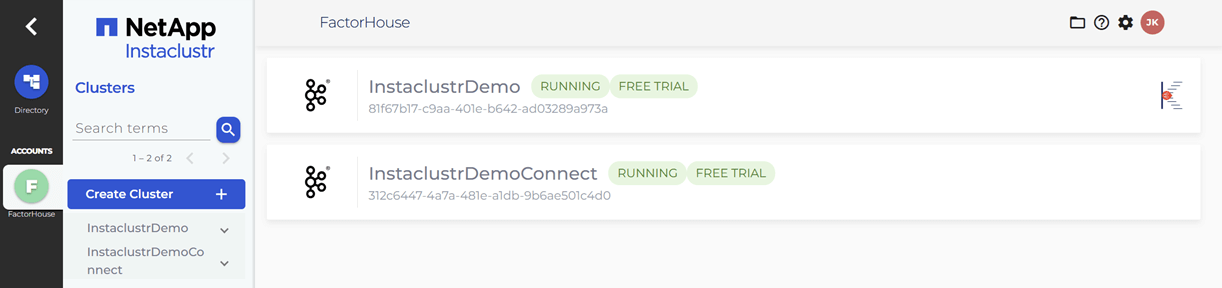
Create Kafka and Kafka Connect clusters
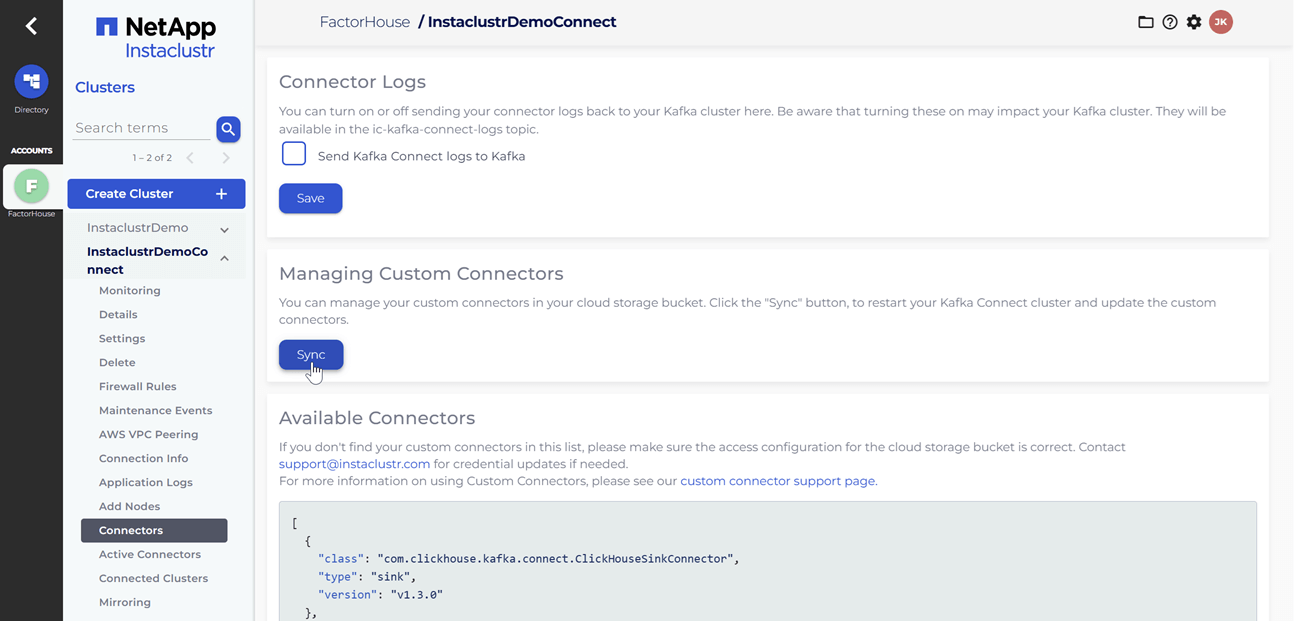
Within the Instaclustr console, we will create a Kafka cluster. For this demonstration, we will include the Karapace schema registry as an enterprise add-on. When creating the Kafka Connect cluster, we must ensure that we select the previously created Kafka cluster as the target. It is also crucial that we enable the Use custom connectors option. This will present a configuration form where we can provide the name of the S3 bucket containing our connector artifacts and the necessary AWS credentials. For more detailed instructions, please refer to the official Instaclustr documentation.
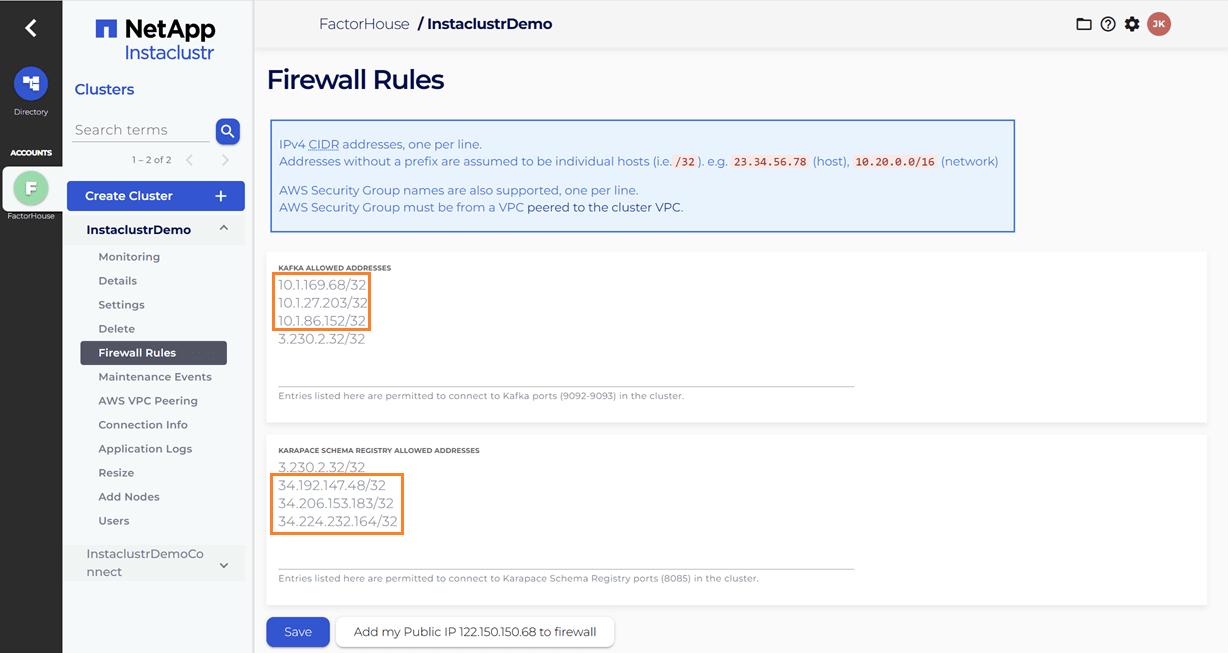
Update firewall rules
When we link the Kafka Connect cluster to the target Kafka cluster, the firewall rules for the Kafka cluster are automatically updated to include the IP addresses of the Kafka Connect cluster. However, the firewall rules for the Karapace schema registry are not automatically adjusted. We will need to manually add the public IP addresses of the Kafka Connect cluster to the Karapace schema registry's allowed addresses. It appears that the connection from the Kafka Connect cluster to the schema registry is established over public IPs.
Upload Kafka connect artifacts to S3
Next, we will upload two custom Kafka connectors to the newly created S3 bucket. A shell script is provided to streamline this process.
./integrations/instaclustr-getting-started/connector/upload-connectors.sh <bucket-name>

# ▶️  Downloading and syncing Kafka connector artifacts to s3://<bucket-name>/
# ⏳ Progress : [##################################################] 100%✅ Sync complete!
#
# ✅ Download complete in 0m 29s!
After the artifacts are uploaded to the S3 bucket, we will navigate to our Kafka Connect cluster in the Instaclustr console and click the Sync button. This action triggers the download of the connector artifacts to the Connect cluster.
Deploy Kpow instance
Once our Kafka and Kafka Connect clusters are running, we can initiate a Kpow instance using Docker. The configuration details required for Kpow to connect to our Instaclustr-managed Kafka environment are outlined below.
The setup.env file is crucial for establishing the connection between Kpow and our Kafka ecosystem on Instaclustr. Here's a detailed guide on how we can populate this file with the correct information sourced from the Instaclustr console:
- Kafka Cluster: The bootstrap server addresses, which are the public IP addresses of our Kafka brokers, can be found on the Connection Info page of our Kafka cluster. This page also provides the necessary username and password. These values should be assigned to the
BOOTSTRAPandSASL_JAAS_CONFIGvariables, respectively. - Schema Registry: For the Schema Registry connection, we will need the URL that is secured with a CA-signed certificate. This URL, along with the required username and password, is also available on the Connection Info page for our Schema Registry service.
- Kafka Connect Cluster: The configuration for our Kafka Connect cluster requires its public IP address for the
CONNECT_REST_URL. The credentials (username and password) for the Connect cluster can be found on its respective Connection Info page and should be used in the connection configuration.
💡 To enable a connection from our local machine to the Kafka resources, it is essential to add our IP address to the Firewall Rules within the Instaclustr console for our cluster.
## Kafka environments
ENVIRONMENT_NAME=Instaclustr Demo
BOOTSTRAP=<KAFKA-IP1>:9092,<KAFKA-IP2>:9092,<KAFKA-IP3>:9092
SECURITY_PROTOCOL=SASL_PLAINTEXT
SASL_MECHANISM=SCRAM-SHA-256
SASL_JAAS_CONFIG=org.apache.kafka.common.security.scram.ScramLoginModule required username="<KAFKA_USERNAME>" password="<KAFKA_PASSWORD>";
CONNECT_NAME=Instaclustr Demo Cluster
CONNECT_REST_URL=https://<KAFKA-CONNECT-IP1>:8083
CONNECT_PERMISSIVE_SSL=true
CONNECT_AUTH=BASIC
CONNECT_BASIC_AUTH_USER=<KAFKA_CONNECT_USERNAME>
CONNECT_BASIC_AUTH_PASS=<KAFKA_CONNECT_PASSWORD>
SCHEMA_REGISTRY_NAME=Instaclustr Demo Registry
SCHEMA_REGISTRY_URL=https://<REGISTRY_URL_WITH_AN_ASSOCIATED_CA_SIGNED_CERTIFICATE>:8085
SCHEMA_REGISTRY_AUTH=USER_INFO
SCHEMA_REGISTRY_USER=<SCHEMA_REGISTRY_USERNAME>
SCHEMA_REGISTRY_PASSWORD=<SCHEMA_REGISTRY_PASSWORD>
To launch Kpow, we execute the following Docker command. Ensure that a valid Kpow license file is located at ./kpow/config/license.env.
docker run -d -p 3000:3000 --name kpow \
--env-file=./kpow/config/setup.env \
--env-file=./kpow/config/license.env \
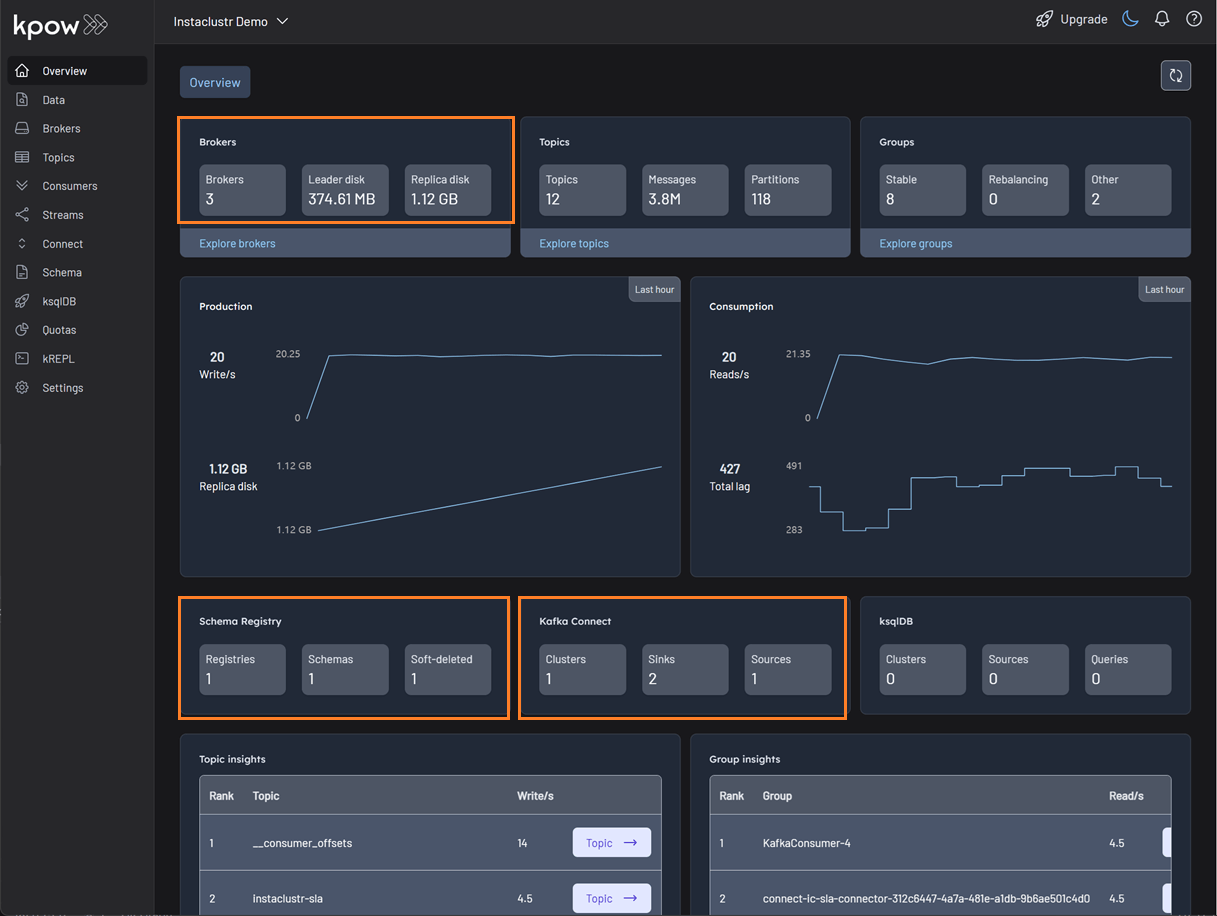
factorhouse/kpow-ce:latestOnce running, Kpow will be accessible at http://<ip-address>:3000. The user interface should confirm the successful discovery of our three Kafka brokers, the Schema Registry, and the Kafka Connect cluster.
Deploying Kafka connectors
We are now ready to deploy our connectors using Kpow's interface. We will start with the source connector to generate data and then deploy the sink connector to write that data to S3.
Deploying the source connector (MSK data generator)
From the Connect menu in the Kpow UI, click the Create connector button.
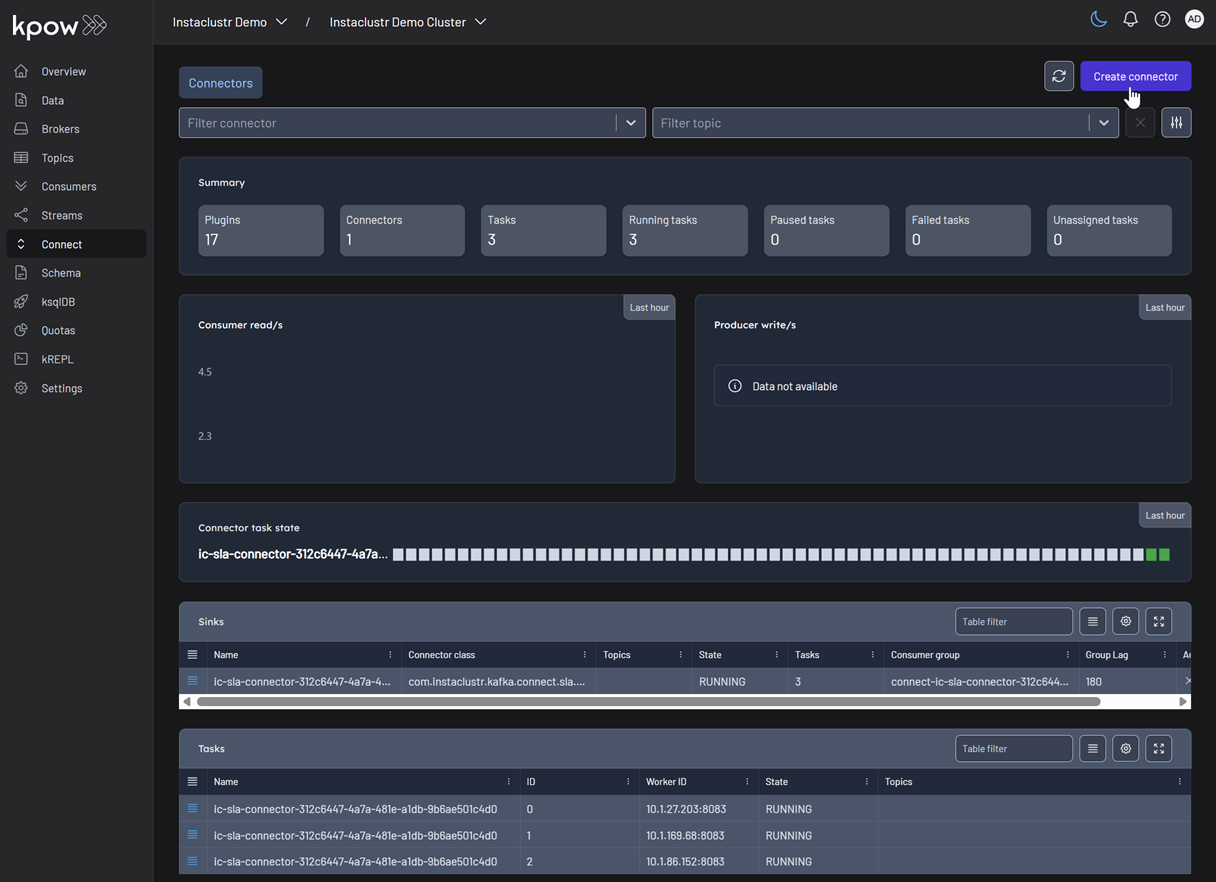
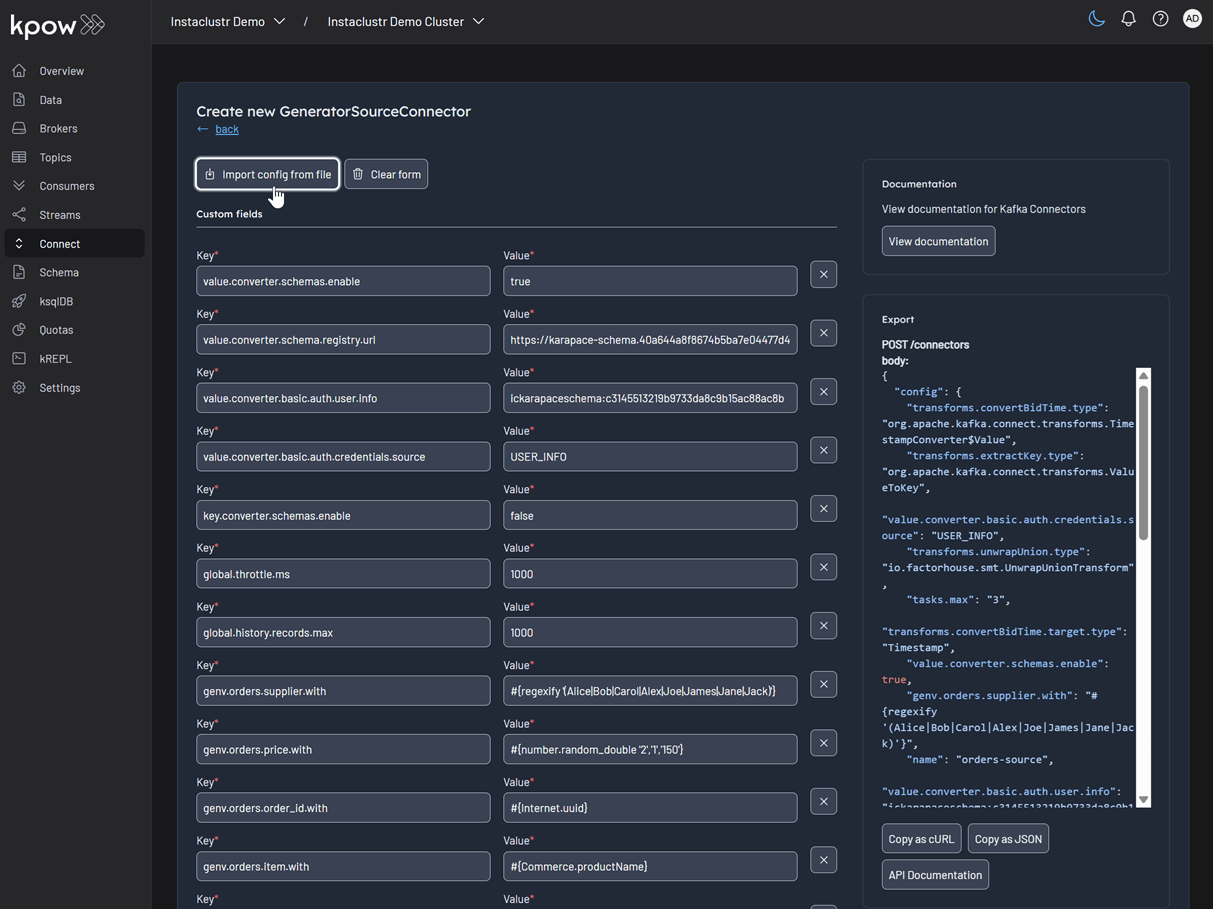
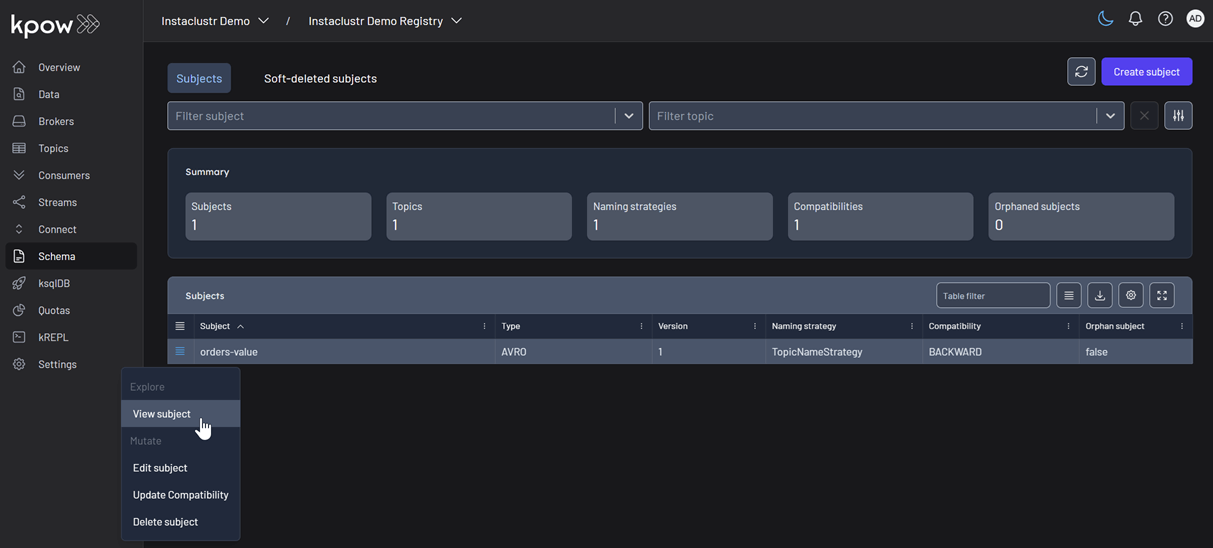
This will display a list of available connectors, which includes both the pre-built connectors provided by Instaclustr and the custom ones we uploaded. For this demonstration, we will select our custom GeneratorSourceConnector.

After selecting the connector, we can either input the configuration values manually or import a configuration file. We will import the JSON configuration file located at integrations/instaclustr-getting-started/connector/connector-source.json. We need to ensure that the schema registry URL and credentials in the file are updated with the correct values from our Instaclustr cluster.
Inspect the topic and schema
Once the source connector is deployed, we can verify that the orders topic has been created by navigating to the Topics menu. To view the messages being produced, we can go to Data > Inspect, select the orders topic, and click Search.

We can also inspect the Avro schema associated with our topic by navigating to the Schema menu.
Deploying the S3 sink connector
Similar to the source connector, we will now deploy the S3 sink connector to export the topic records to the S3 bucket we created earlier. We'll use the configuration file found at integrations/instaclustr-getting-started/connector/connector-sink.json. As before, we must ensure the schema registry connection details are correct, and we also need to provide the S3 bucket name and AWS credentials.
After the sink connector is deployed, we can verify that the topic records are being ingested as JSON files into our designated S3 bucket.

Conclusion
In this guide, we have successfully set up and integrated Kpow with a managed Apache Kafka environment on Instaclustr. We have seen how the connection details provided by the Instaclustr console can be seamlessly translated into a Kpow configuration, bringing our entire streaming ecosystem under a single, powerful user interface.
By walking through the practical example of deploying a data pipeline, we have demonstrated that this combination is more than just a monitoring solution. We used Kpow for active management of tasks: deploying a source connector, inspecting the live data flowing into our topics, viewing the associated schema in the registry, and finally deploying a sink connector to complete the pipeline. This highlights the core benefit of this integration: Instaclustr handles the difficult work of managing the infrastructure, while Kpow provides the intuitive, feature-rich toolkit needed for day-to-day development and operational tasks. With Kpow connected to your Instaclustr environment, you are empowered to manage your data pipelines with greater visibility, confidence, and efficiency.
How-to / Set Up Kpow with Instaclustr Platform
All
Case Study
xx min read
Heading 1
Heading 2
Heading 3
Heading 4
Heading 5
Heading 6
Lorem ipsum dolor sit amet, consectetur adipiscing elit, sed do eiusmod tempor incididunt ut labore et dolore magna aliqua. Ut enim ad minim veniam, quis nostrud exercitation ullamco laboris nisi ut aliquip ex ea commodo consequat. Duis aute irure dolor in reprehenderit in voluptate velit esse cillum dolore eu fugiat nulla pariatur.
Block quote
Ordered list
- Item 1
- Item 2
- Item 3
Unordered list
- Item A
- Item B
- Item C
Bold text
Emphasis
Superscript
Subscript
.webp)
How-to
xx min read
Introducing Webhook Support in Kpow
This guide demonstrates how to enhance Kafka monitoring and data governance by integrating Kpow's audit logs with external systems. We provide a step-by-step walkthrough for configuring webhooks to send real-time user activity alerts from your Kafka environment directly into collaboration platforms like Slack and Microsoft Teams, streamlining your operational awareness and response.
Overview
Kpow is an enterprise-grade toolkit for managing and monitoring Apache Kafka. A central feature for maintaining data governance is its audit log, which records all user actions. To enhance real-time monitoring and integration, Kpow can forward these audit log records to external systems via webhooks.
Kpow has long supported sending these notifications to Slack, and now also supports Microsoft Teams and any generic HTTP webhook server. This makes it possible to receive immediate alerts in your collaboration tools or integrate with custom monitoring systems that accept HTTP POST requests.
This guide provides a step-by-step walkthrough for configuring webhook integrations in Kpow for Slack, Microsoft Teams, and generic webhook servers. By the end, you’ll be able to stream real-time Kafka activity notifications directly into the platform of your choice.
💡 If you're interested in setting up monitoring and configuring alerts to stay on top of system performance, take a look at our earlier post: Kafka Alerting with Kpow, Prometheus, and Alertmanager.
About Factor House
Factor House is a leader in real-time data tooling, empowering engineers with innovative solutions for Apache Kafka® and Apache Flink®.
Our flagship product, Kpow for Apache Kafka, is the market-leading enterprise solution for Kafka management and monitoring.
Explore our live multi-cluster demo environment or grab a free Community license and dive into streaming tech on your laptop with Factor House Local.
Prerequisites
Webhook integration is an Enterprise feature of Kpow. To follow this guide, you will need an Enterprise license. If you do not have one, you can request a trial license from Factor House to explore this functionality.
Configure webhooks
Kpow has long supported sending webhook notifications to Slack, and now also supports Microsoft Teams and any generic HTTP webhook server. Configuration is handled via environment variables:
| Variable |
Required
|
Description |
|---|---|---|
| 'WEBHOOK_PROVIDER' |
Yes
|
The target provider: slack, teams, or generic
|
| 'WEBHOOK_URL' |
Yes
|
The endpoint that will receive webhook events via POST
|
| 'WEBHOOK_VERBOSITY' | No |
Event types to send: MUTATIONS, QUERIES, or ALL (default: MUTATIONS)
|
Before starting your Kafka environment, ensure that webhook URLs are created in your chosen platform (Slack, Teams, or generic endpoint).
Slack
To integrate Kpow with Slack, you need to create a Slack App and generate an incoming webhook URL.
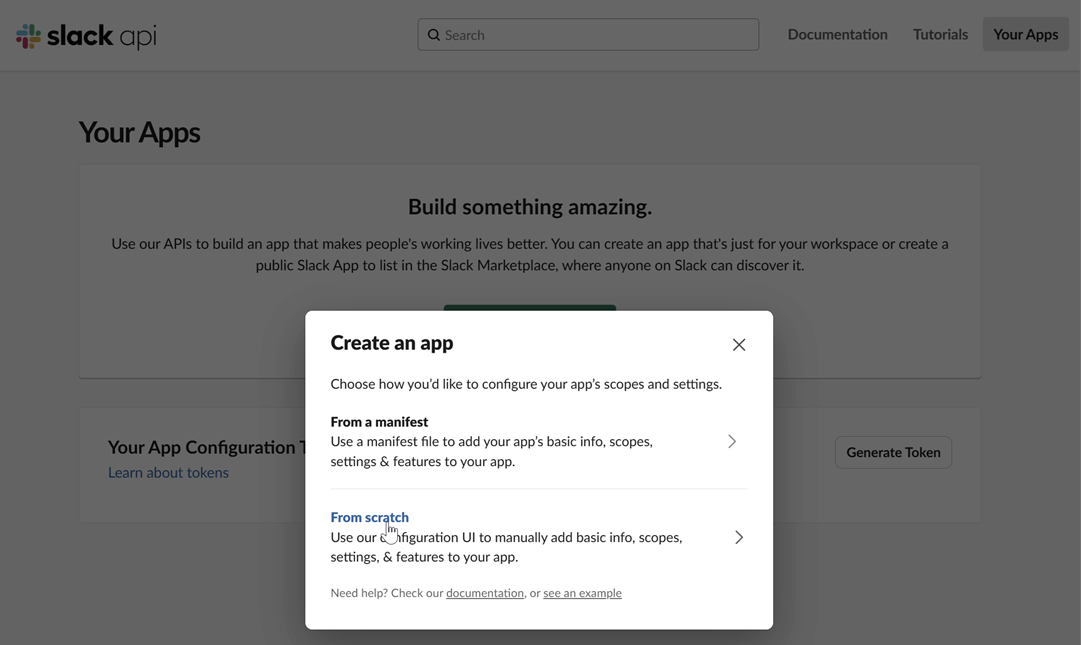
Create a Slack app: Navigate to the Slack API website and click on "Create New App". Choose to create it "From scratch".
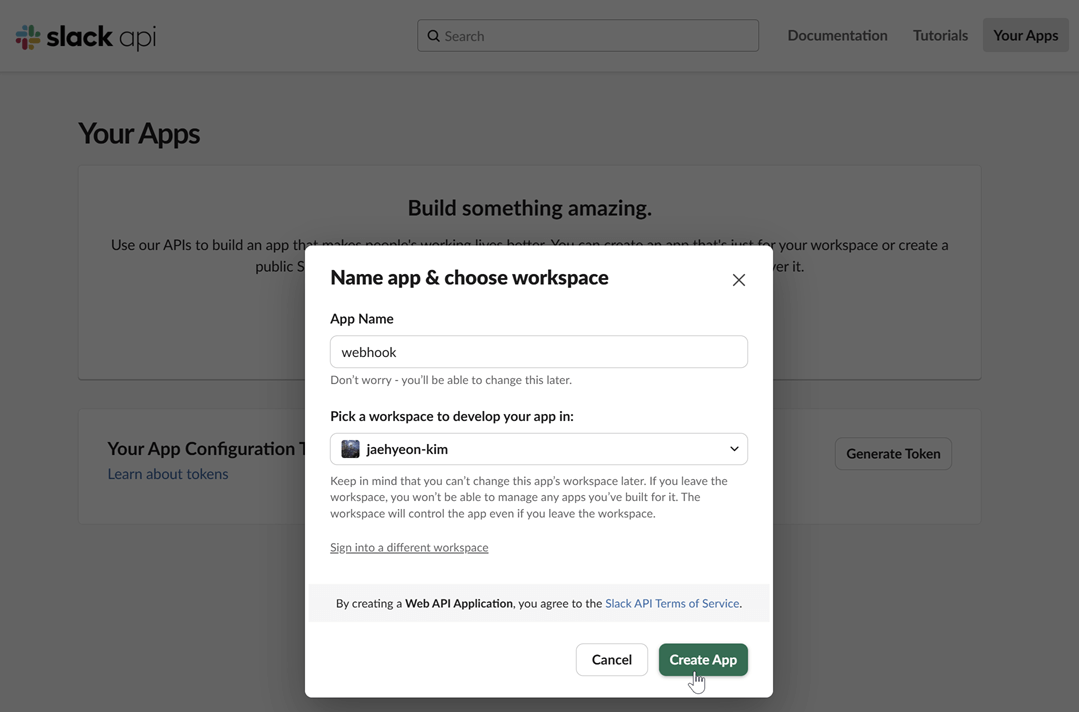
Name your app and choose a workspace: Provide a name for your application and select the Slack workspace you want to post messages to.
Enable incoming webhooks: In your app's settings page, go to "Incoming Webhooks" under the "Features" section. Toggle the feature on and then click "Add New Webhook to Workspace".
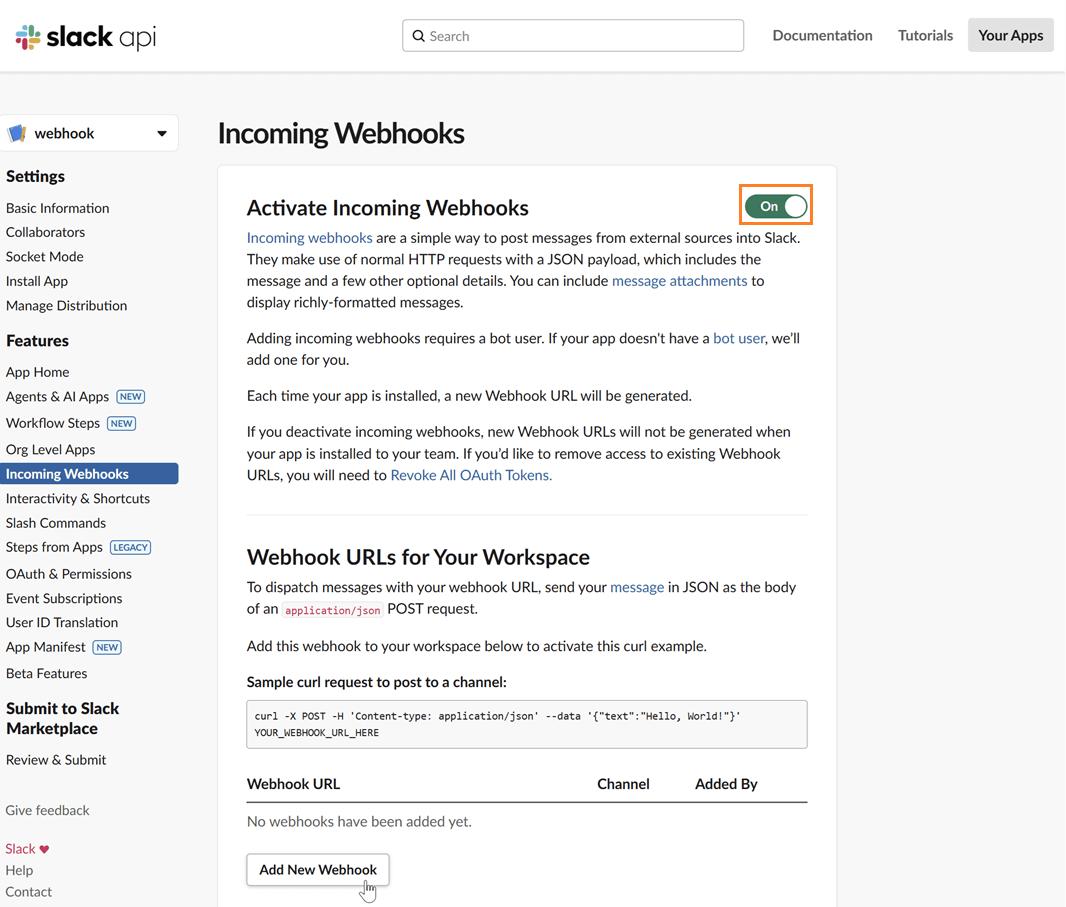
Select a channel: Choose the channel where you want the Kpow notifications to be posted and click "Allow".
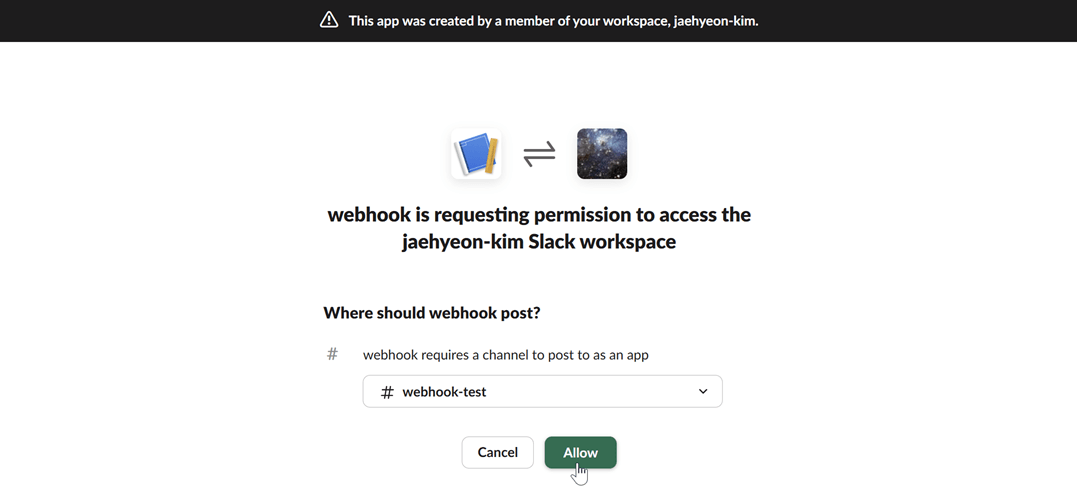
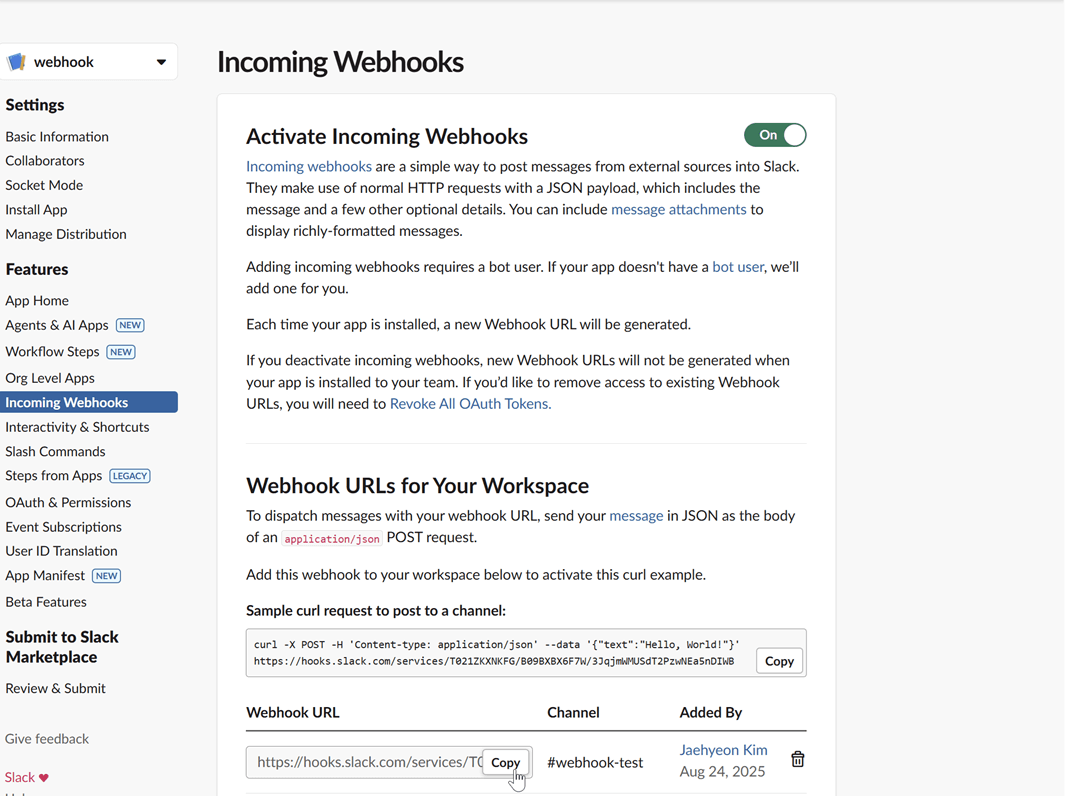
Copy the webhook URL: After authorizing, you will be redirected back to the webhook configuration page. Copy the newly generated webhook URL. This URL is what you will use to configure Kpow.
Microsoft Teams
For Microsoft Teams, integration can be set up through workflows by creating a flow that listens for an HTTP request.
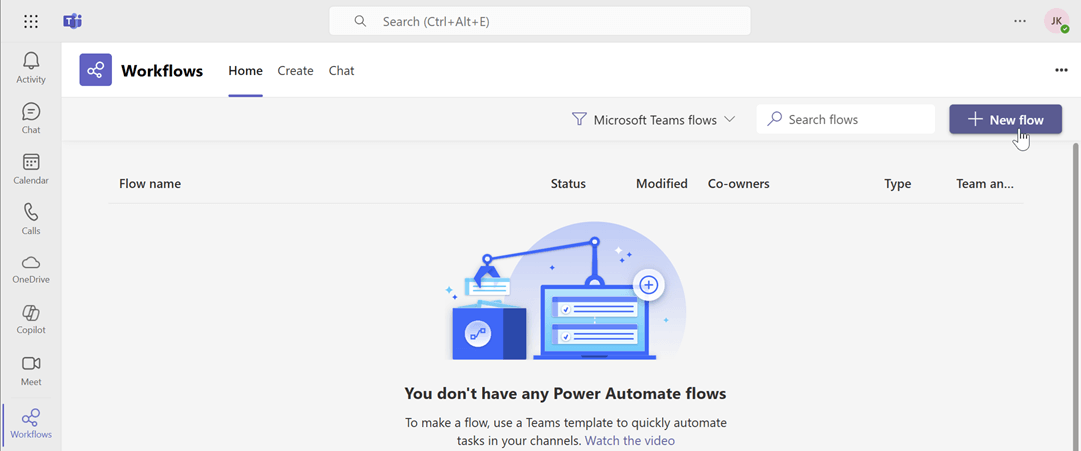
Create a new flow: Navigate to workflows and start creating a new flow.
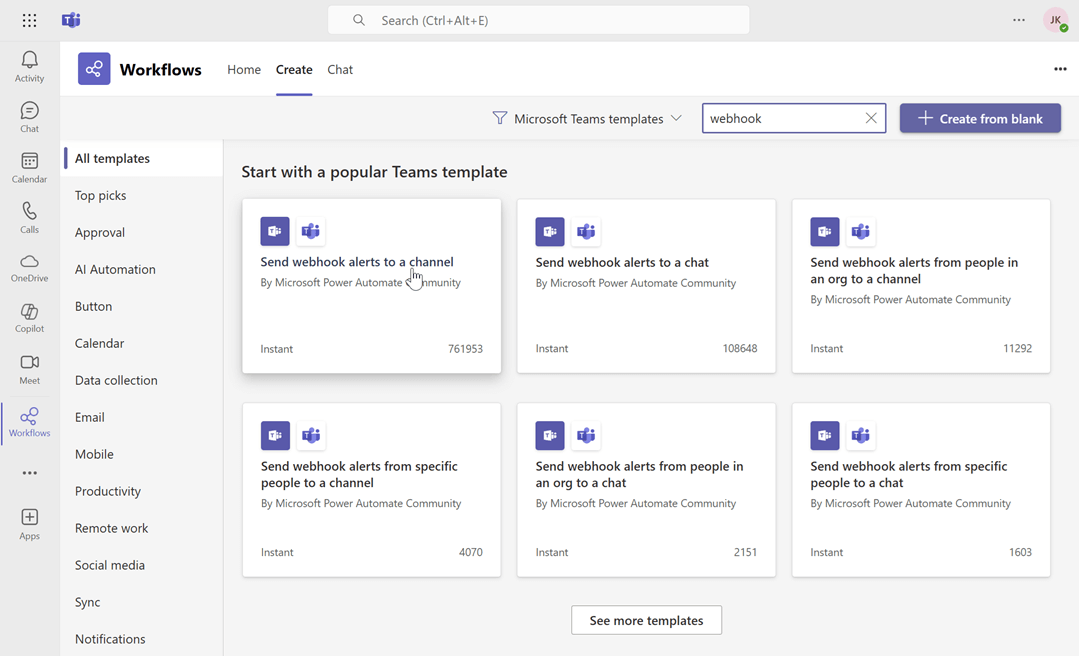
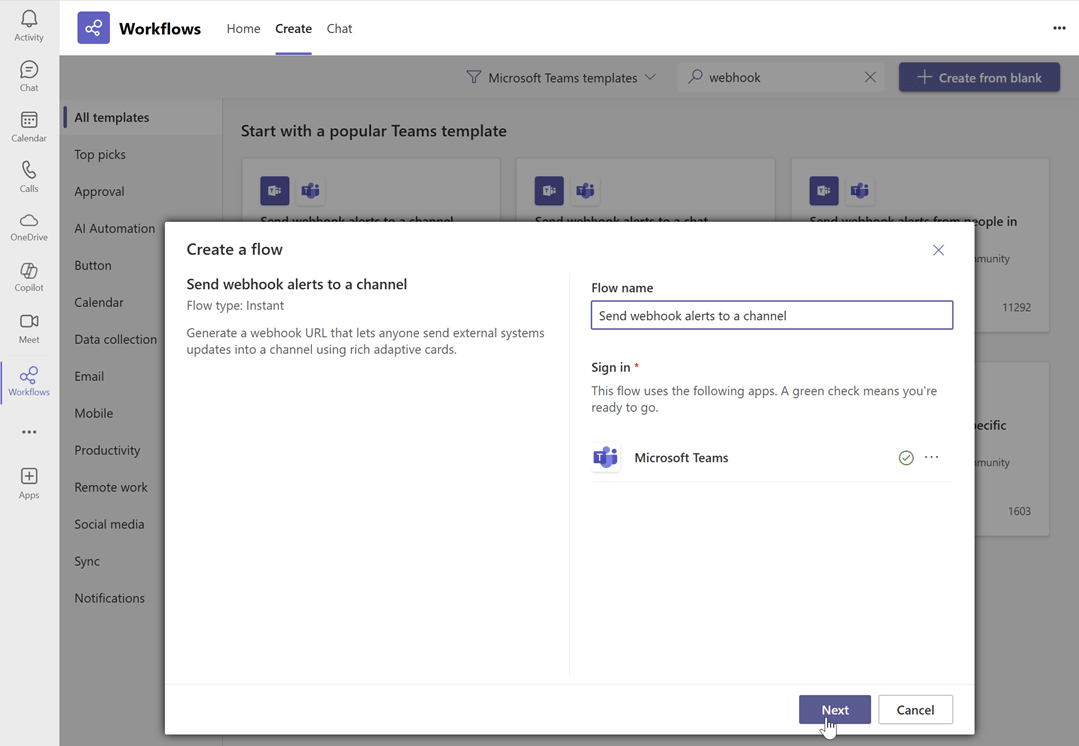
Search for the webhook template: In the flow creation interface, search for the keyword "webhook" to find relevant templates. Select the "Send webhook alterts to a channel" template.
Name the flow and click next: Enter a name for your flow, then click Next.
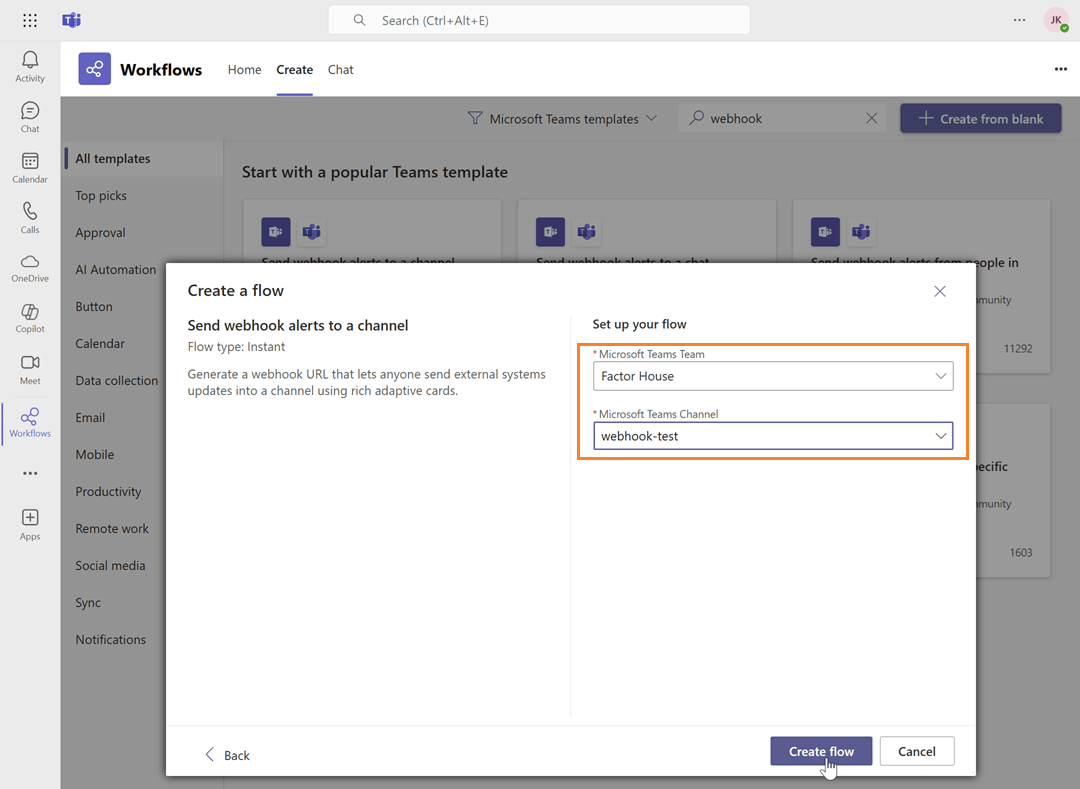
Select the team and channel Name: Choose the Microsoft Teams team and channel name, then click Create flow.
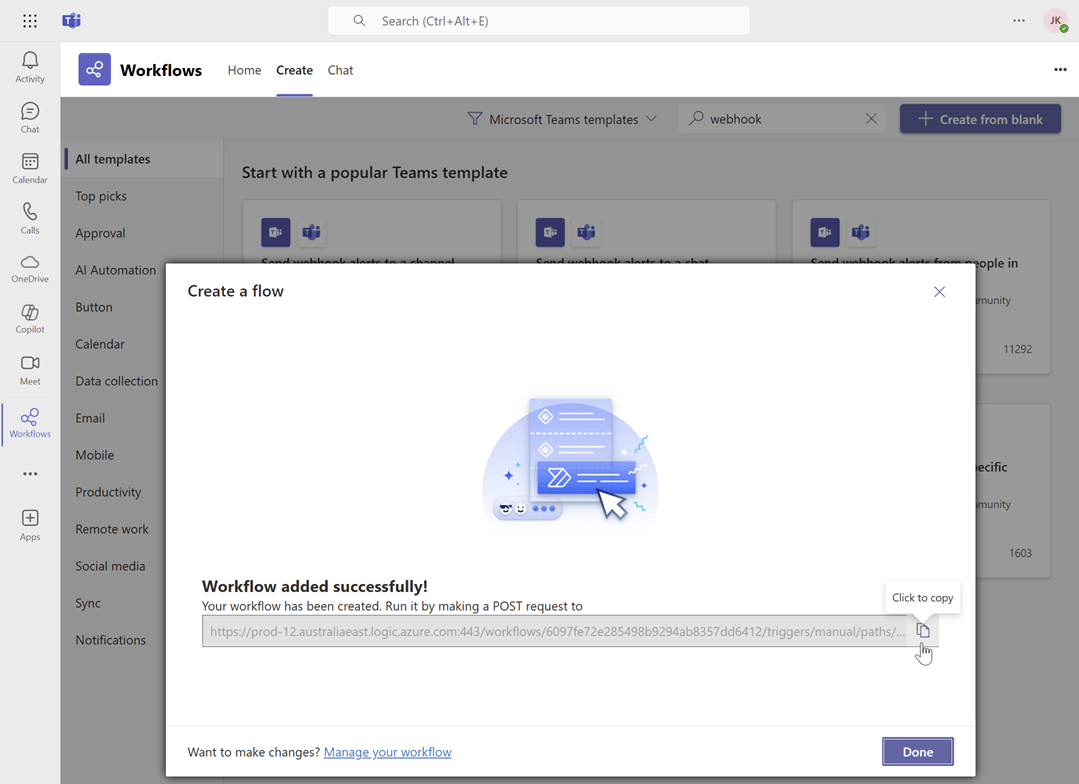
Copy the webhook URL: Copy the newly generated webhook URL. This URL is what you will use to configure Kpow.
Generic webhook server
A generic webhook allows you to send Kpow's audit log events to any custom application or third-party service that can receive HTTP POST requests. This is useful for integrating with systems that are not officially supported out-of-the-box or for building custom automation workflows. The payload is sent in JSON format, allowing for easy parsing and processing.
For this guide, we will be using a simple web server developed using Python Flask.
Launch Kafka environment
To test the webhook functionality, use the webhook-demo in the features folder of the Factor House examples repository on GitHub. This demo spins up three Kpow instances, each configured to send audit log messages to a different destination: Slack, Microsoft Teams, and a generic web server running on ports 3000, 4000, and 5000.
# Clone the examples repository
git clone https://github.com/factorhouse/examples.git

# Move to the web
cd features/webhook-demo

# Start Kafka environment with multiple Kpow instances that target different webhook backends
# Replace the placeholder values with your actual license and webhook URLs
export KPOW_LICENSE="<path-to-license-file>"
export SLACK_WEBHOOK_URL="<slack-webhook-url>"
export TEAMS_WEBHOOK_URL="<teams-webhook-url>"
export GENERIC_WEBHOOK_URL="http://webhook-server:9000"

docker compose up
Verify Slack webhook messages
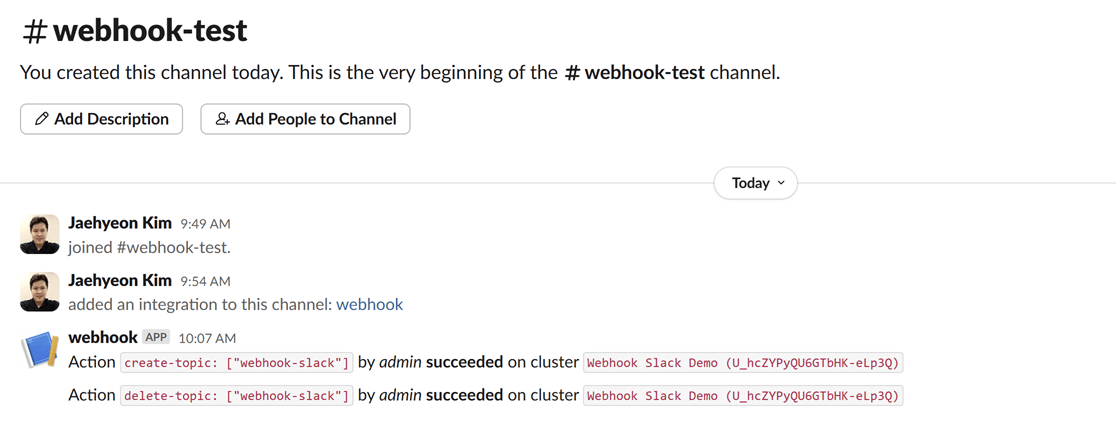
To test the Slack integration, perform an action in Kpow that generates an audit event, such as creating and then deleting a topic. You can access the Kpow UI at http://localhost:3000.
Create a topic
The example below shows how to create a new topic in Kpow.

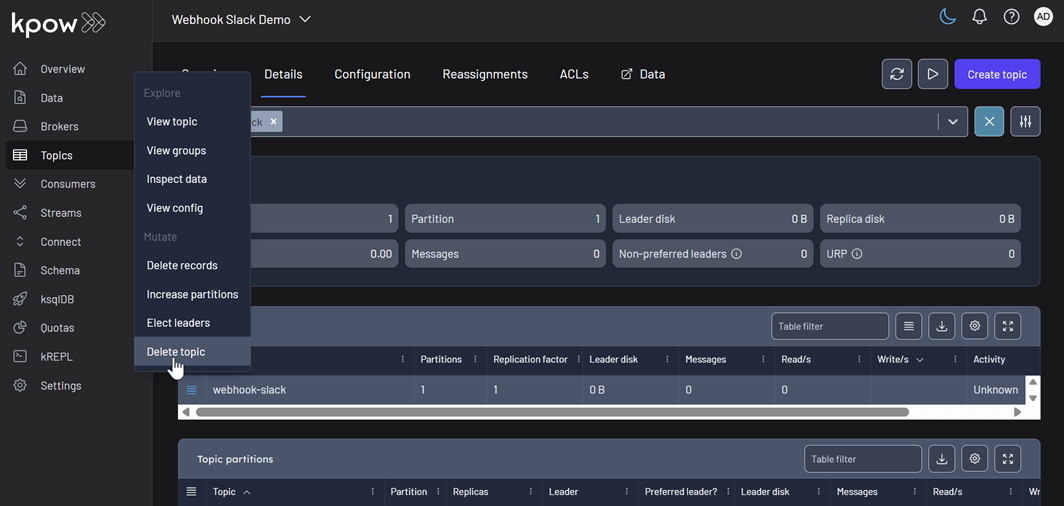
Delete a topic
Similarly, you can delete a topic in Kpow as shown here.
View audit logs
After performing these actions, you can verify they have been logged by navigating to Settings > Audit log in the Kpow UI.

On the Slack channel, you should see messages detailing the actions. Each message includes information such as the user who performed the action, the type of action (e.g., create-topic), and the cluster environment name.
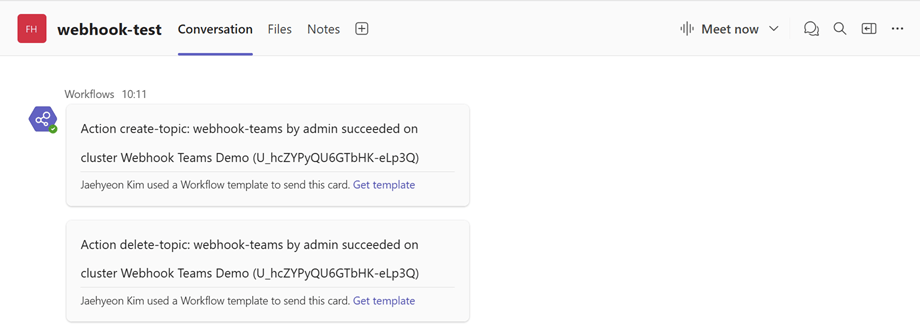
Verify Teams webhook messages
The process to verify messages in Microsoft Teams is the same. After creating and deleting a topic in the Kpow UI (accessible at http://localhost:4000), your Power Automate flow will trigger, and you will see the corresponding formatted message in your designated Teams channel.
Verify generic webhook messages
For the generic webhook, inspect the logs of the webhook server container by running docker logs webhook-server. The logs display the raw JSON payloads that Kpow sends for topic creation and deletion events, giving you insight into the data structure you can leverage for custom integrations.

Conclusion
Kpow's webhook integration is a powerful feature for enhancing the monitoring and security of your Apache Kafka environment. By sending real-time audit log notifications to platforms like Slack and Microsoft Teams, or to any custom endpoint via a generic webhook, you can ensure that your team is immediately aware of important events and changes. This capability not only improves transparency and collaboration but also allows for the creation of custom automation and integration with other operational tools, making your Kafka management more proactive and efficient.
How-to / Introducing Webhook Support in Kpow
All
Case Study
xx min read
Heading 1
Heading 2
Heading 3
Heading 4
Heading 5
Heading 6
Lorem ipsum dolor sit amet, consectetur adipiscing elit, sed do eiusmod tempor incididunt ut labore et dolore magna aliqua. Ut enim ad minim veniam, quis nostrud exercitation ullamco laboris nisi ut aliquip ex ea commodo consequat. Duis aute irure dolor in reprehenderit in voluptate velit esse cillum dolore eu fugiat nulla pariatur.
Block quote
Ordered list
- Item 1
- Item 2
- Item 3
Unordered list
- Item A
- Item B
- Item C
Bold text
Emphasis
Superscript
Subscript

Release
xx min read
Release 94.5: New Factor House docs, enhanced data inspection and URP & KRaft improvements
This release introduces a new unified documentation hub - Factor House Docs. It also introduces major data inspection enhancements, including comma-separated kJQ Projection expressions, in-browser search, and over 15 new kJQ transforms and functions. Further improvements include more reliable cluster monitoring with improved Under-Replicated Partition (URP) detection, support for KRaft improvements, the flexibility to configure custom serializers per-cluster, and a resolution for a key consumer group offset reset issue.
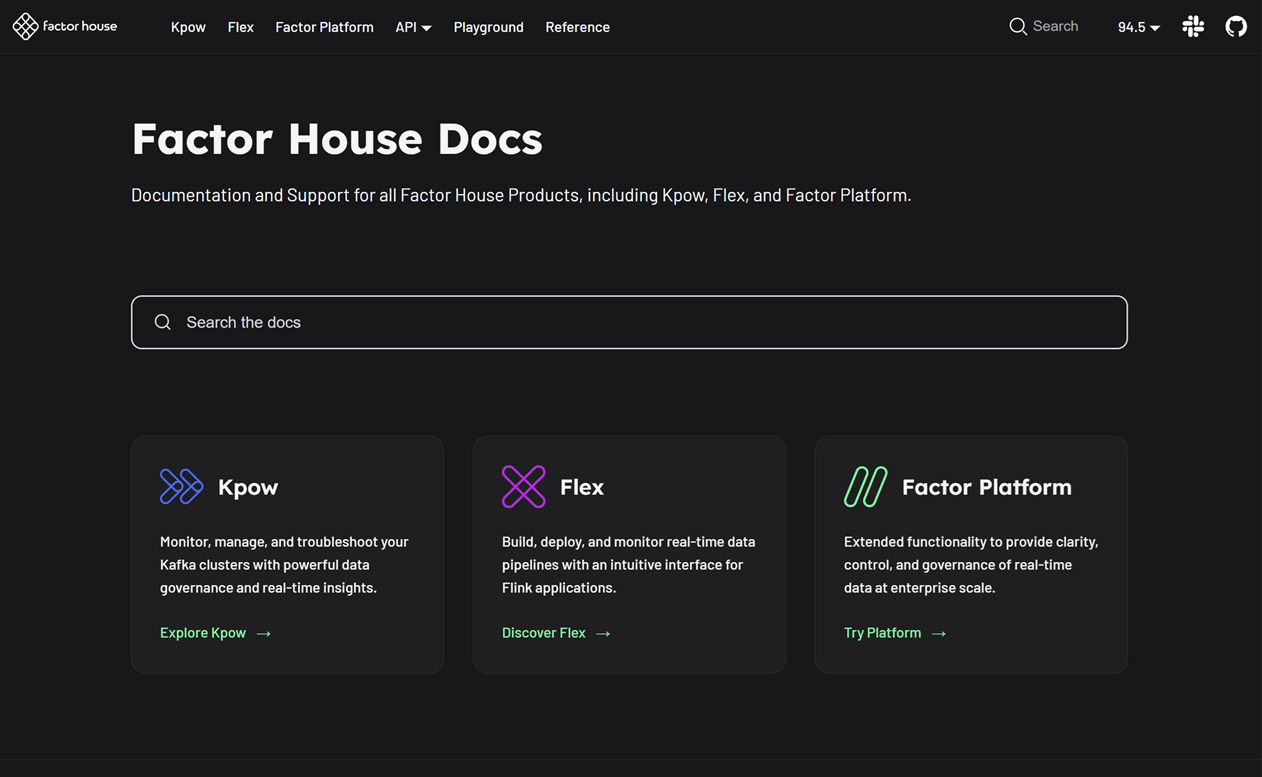
Introducing our new docs site
Announcement post: Introduction to Factor House docs v2.0.
All Factor House product documentation has been migrated to a new, unified site. This new hub, Factor House Docs, provides a single, streamlined resource for all users.
Key improvements you'll find on the new site include:
- Unified product content: All documentation is now in one place with a simplified structure, consolidating what was previously separate community and enterprise docs.
- Clear feature availability:
COMMUNITY,TEAM, andENTERPRISEbadges have been added to clearly indicate which features are available in each edition. - Improved organization: Content is now grouped into more relevant sections, making it easier to find the information you need.
- Powerful search, instant answers: Instantly find any configuration, example, or guide with our new Algolia-powered, site-wide search.
- Hands-on playground: A new section featuring interactive labs and projects to help you explore product capabilities.
- Ready for the future: The documentation for the new Factor Platform will be added and expanded upon release, ensuring this hub remains the most up-to-date resource for all product information.
The documentation has been updated and is live at https://docs.factorhouse.io.
Data inspect enhancements
Feature post: Data inspect enhancements in Kpow 94.5.
Kpow 94.5 builds upon the foundation of previous releases to deliver a more powerful and user-friendly data inspection experience.
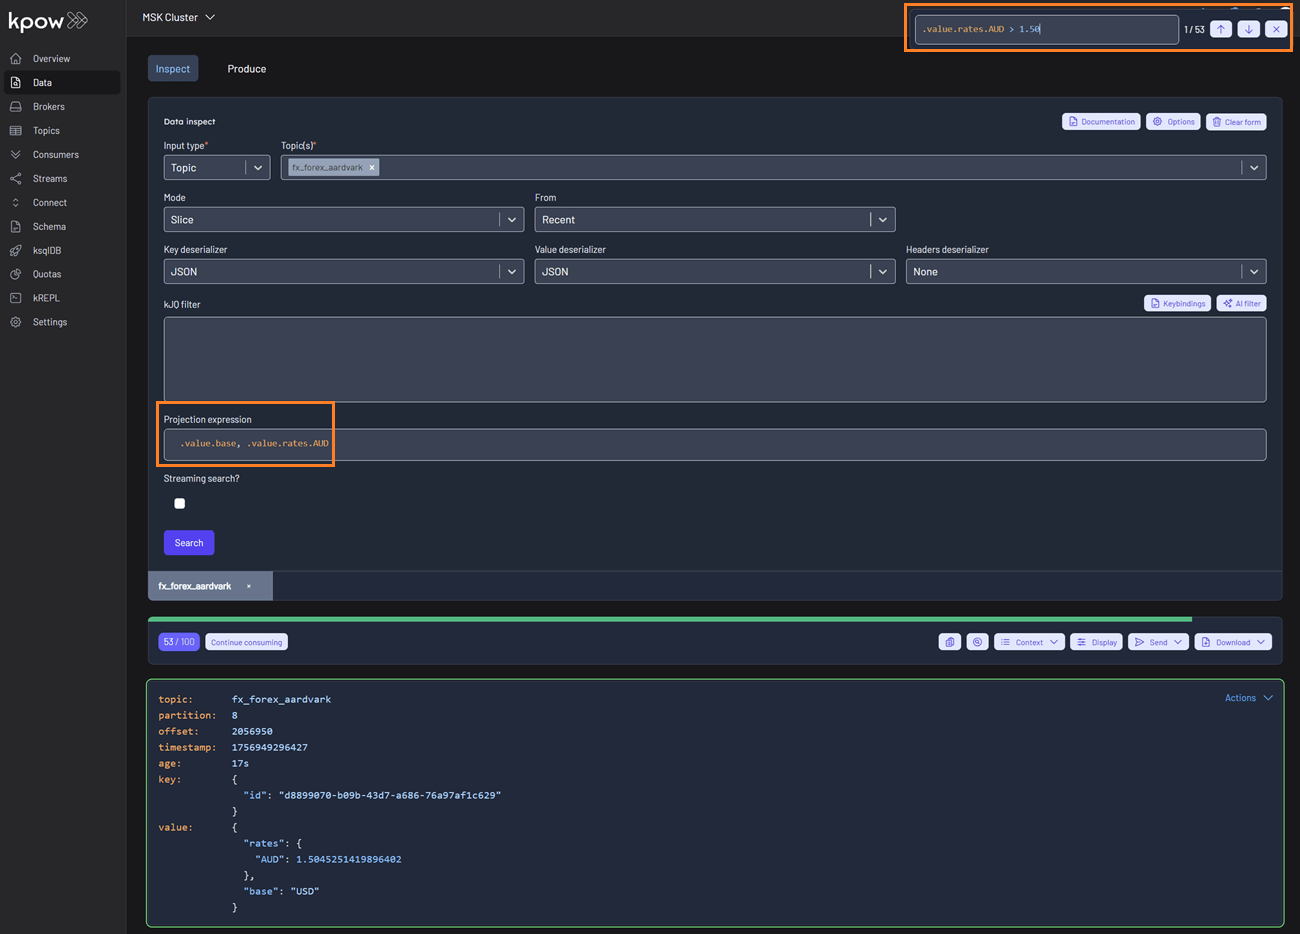
kJQ Projection expressions & search
- Comma-Separated kJQ Projection expressions: We've added support for comma-separated projection expressions (e.g.,
.value.base, .value.rates). This allows you to extract multiple fields from Kafka records in a single query, providing targeted data views without cluttering your output. This works for both key and value sub-paths. - In-Browser Search (Ctrl + F): You can now use in-browser search (Ctrl + F) with kJQ filters to quickly find records by JSON path or value without re-running queries. The results component is now fully keyboard-friendly and follows the Listbox pattern, making it easier for everyone to navigate. Screen reader users can understand the list structure, and keyboard users can move through and select items smoothly and predictably.
Schema & deserialization insights
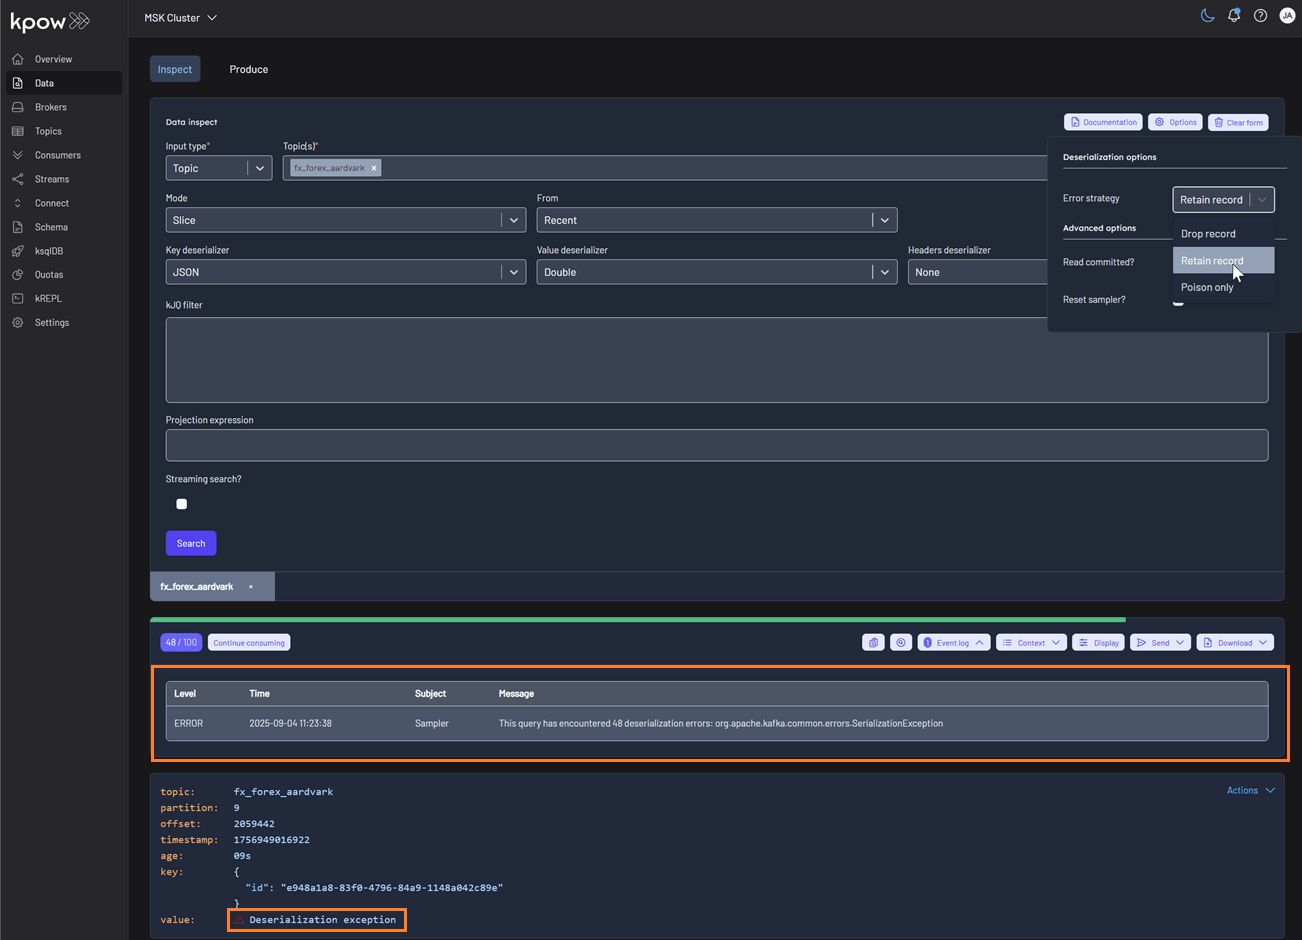
Data Inspect now provides detailed schema metadata for each message, including schema IDs and deserializer types. It also identifies misaligned schemas and poison messages, offering the following deserialization options:
- Drop record (default): Ignores erroneous records and displays only well-formatted records.
- Retain record: Includes both well-formatted and erroneous records. Instead of displaying the raw, poisonous value for problematic records, the system flags them with the message 'Deserialization exception'.
- Poison only: Displays only erroneous records, where the value is recorded as 'Deserialization exception'.
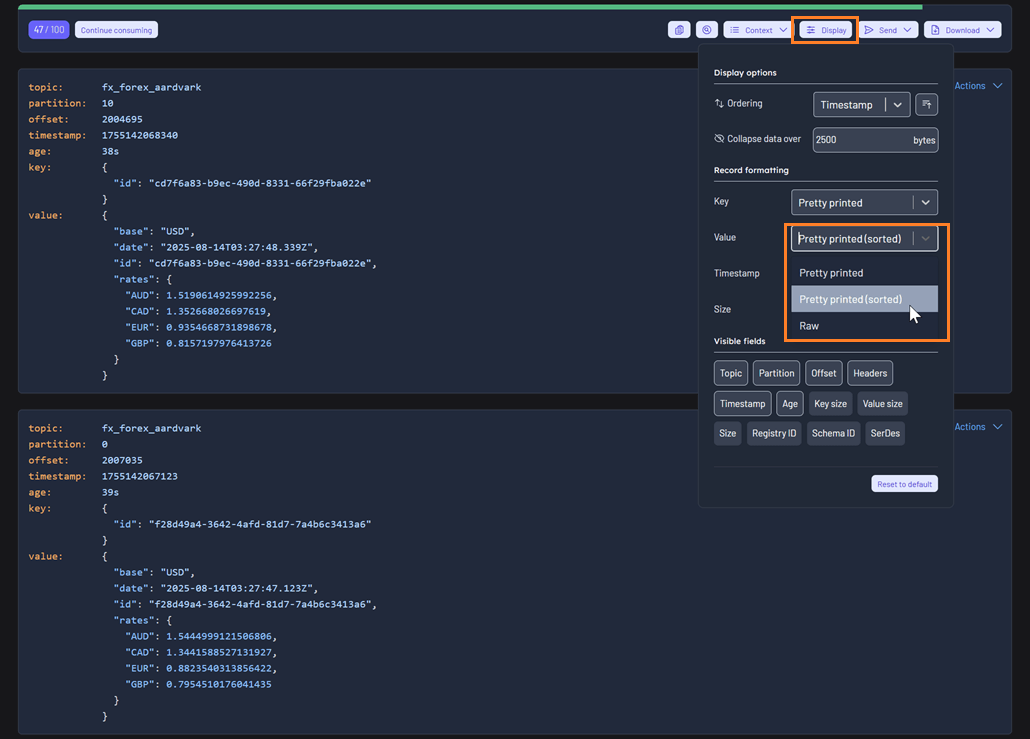
Sorting by Attribute
Selecting the 'Pretty printed (sorted)' display option sorts the attributes of the key or value alphabetically by name, improving readability and consistency during inspection.
High-performance streaming
Data Inspect can stream over 500,000 records smoothly without UI lag, enabling efficient analysis of large datasets.
kJQ improvements
Expanded kJQ capabilities with new transforms including parse-json, floor, ceil, upper-case, lower-case, trim, ltrim, rtrim, reverse, sort, unique, first, last, keys, values, is-empty, and flatten.
Also added new functions: within, split, and join, enabling richer data manipulation directly within kJQ queries.
For more details on these new features, please refer to the updated kJQ manual. Also, be sure to visit the new interactive examples page on our new Factor House docs site—it's a great way to quickly verify your kJQ queries.
Consumer group management
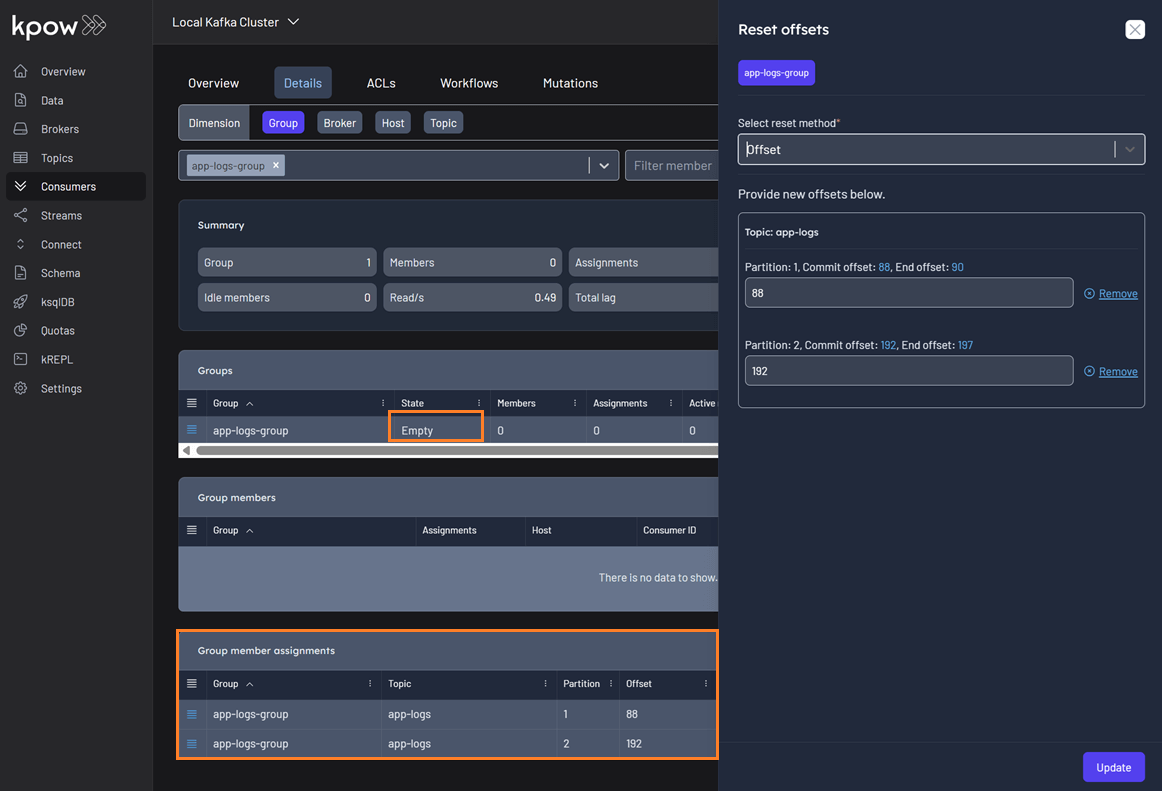
Empty group member assignments
Previously, EMPTY consumer groups showed no offset information in the reset offset UI, preventing customers from resetting their offsets. This was a critical issue when a poison message caused an entire consumer group to go offline. The fix now fetches offsets directly from the AdminClient instead of relying on the snapshot, ensuring offsets can be reset in these scenarios.
Cluster & platform enhancements
Improved Under-Replicated Partition (URP) Detection
Feature post: Enhanced URP detection in Kpow 94.5.
We've enhanced our calculation for under-replicated partitions to provide more accurate health monitoring for your Kafka clusters. The system now correctly detects partitions with fewer in-sync replicas than the configured replication factor, even when brokers are offline and not reported by the AdminClient.
You can find URP details on the Brokers and Topics pages. The summary statistics will display the total number of under-replicated partitions. If this count is greater than zero, a new table will appear with details on all applicable topics.
Brokers

Topics

To further strengthen monitoring and alerting, new Prometheus metrics have been introduced to track under-replicated partitions. These metrics integrate seamlessly with your existing observability stack and provide more granular insights:
- broker_urp: The number of under-replicated topic partitions on this broker.
- topic_urp: The number of under-replicated partitions for this specific topic.
- topic_urp_total: The total number of under-replicated partitions across all topics in the Kafka cluster.
KRaft improvements and fixes
The following improvements and bug fixes have been made to KRaft:
- Polished KRaft tables with improved sorting and corrected display of the End Offset (now showing timestamps instead of offsets).
- Fixed an issue where the controller broker was incorrectly displayed in broker details.
- Added new KRaft-related metrics to Prometheus for enhanced observability.
- Introduced new KRaft-specific Prometheus metrics to strengthen observability:
- kraft_high_watermark: The high watermark of the metadata log in the KRaft cluster, indicating the highest committed offset.
- kraft_leader_epoch: The current leader epoch in the KRaft cluster, incremented each time a new leader is elected.
- kraft_leader_id: The broker ID of the current leader in the KRaft cluster responsible for handling metadata operations.
- kraft_observer_count: The number of observer replicas in the KRaft cluster. Observers replicate the metadata log but do not participate in leader election.
- kraft_replicas_count: The total number of replicas (voters + observers) in the KRaft cluster responsible for maintaining the metadata log.
- kraft_voter_count: The number of voting replicas in the KRaft cluster. Voters participate in leader election and maintain the metadata log.
Custom SerDes per cluster
Feature post: Per-cluster custom serdes configuration guide.
Kpow supports to configure custom SerDes on a per-cluster basis, providing the flexibility to handle different data formats and compatibility requirements across your Kafka environments. This approach ensures smoother integration with diverse data pipelines, reduces serialization errors, and improves overall system reliability.
Here is an example of a per-cluster custom SerDes configuration:
serdes:
  - name: "PROTO 1"
    format: "json"
    isKey: true
    config:
      bootstrap: "some-value"
      limit: 22
      display: another-value
      abc: $SOME_ENV
  - name: "PROTO 2"
    cluster: "Trade Book (Staging)" # THIS IS A NEW KEY
    format: "json"
    isKey: false
    config:
      bootstrap: "some-value"
      limit: "100"
      display: another-value
      abc: $ANOTHER_ENV
Bug fixes
This release addresses several key issues improving UI stability, integrations, and navigation consistency across the platform.
- Resolved an edge case in the temporary policy UI display
- Fixed Microsoft Teams webhook integration
- Fixed a buggy textarea inside the Data Masking Playground.
- Fixed regression affecting ordering of ksqlDB, Schema Registry, and Connect resources in navigation dropdown
- Fixed ordering of Kafka resources. Examples:
CONNECT_RESOURCE_IDS=QA1,DEV1,DEV2→ showing in order:QA1,DEV1,DEV2SCHEMA_REGISTRY_RESOURCE_IDS=QA1,DEV1,DEV2→ showing in order:QA1,DEV1,DEV2KSQLDB_RESOURCE_IDS=QA1,DEV1,DEV2→ showing in order:QA1,DEV1,DEV2
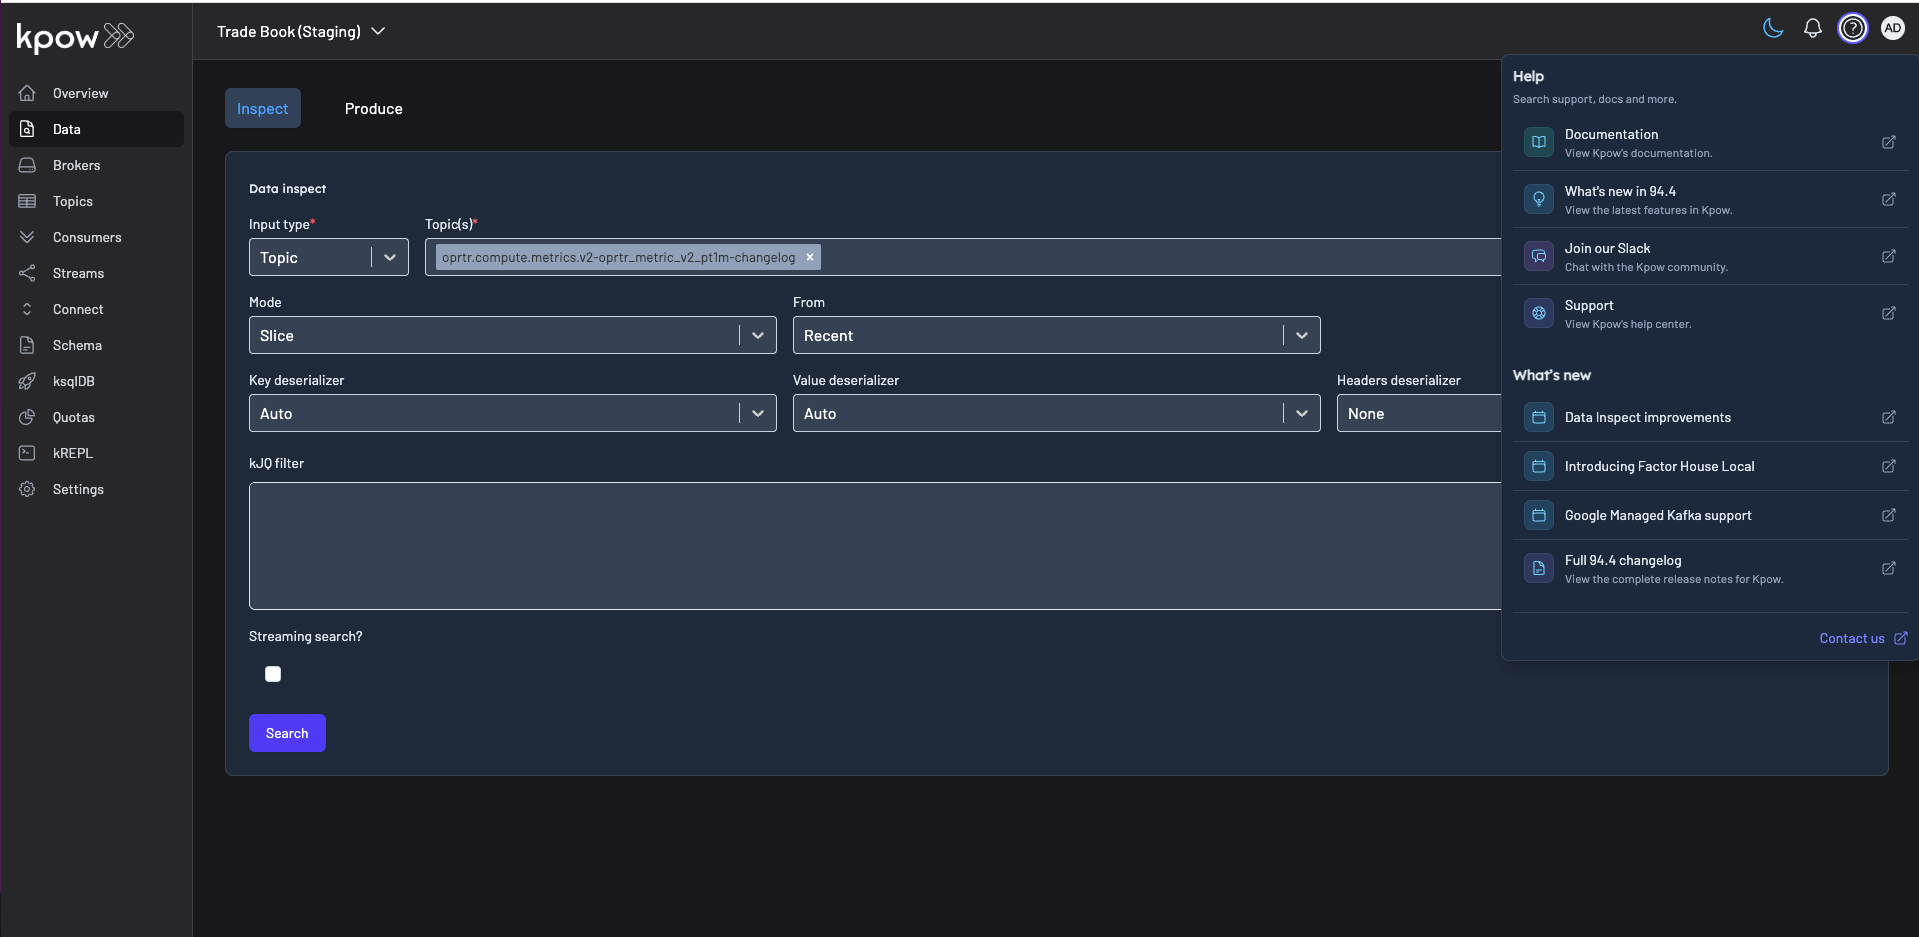
Updated Help menu
Introduced a redesigned Help menu featuring an improved What's New section for quick access to the latest product updates. The menu also now includes direct links to join our Slack community, making it easier to connect with other users, share feedback, and get support right from within the product.
Release 94.5: New Factor House docs, enhanced data inspection and URP & KRaft improvements
All
.webp)
Article
xx min read
Enhanced Under-Replicated Partition Detection in Kpow
Kpow now offers enhanced under-replicated partition (URP) detection for more accurate Kafka health monitoring. Our improved calculation correctly identifies URPs even when brokers are offline, providing a true, real-time view of your cluster's fault tolerance. This helps you proactively mitigate risks and ensure data durability.
Overview
In a distributed system like Apache Kafka, data is partitioned and replicated across multiple brokers to ensure high availability and fault tolerance. A partition is considered an under-replicated partition (URP) when the number of in-sync replicas (ISRs) falls below the configured replication factor. This scenario can arise from various issues, including broker failures, network partitions, or high load on specific brokers.
The presence of URPs is a significant concern as it indicates a degradation in your topics' fault tolerance. If another broker fails before the cluster recovers, you risk permanent data loss. A key challenge in Kafka management is accurately detecting these URPs in real-time, especially during common operational events like a broker failure. Standard monitoring methods can sometimes lag, creating a temporary but dangerous blind spot where a cluster appears healthy even though its resilience has been compromised.
This is precisely the challenge that Kpow's enhanced URP detection is designed to solve. By providing a more accurate and immediate assessment of your cluster's true fault tolerance, this feature delivers significant benefits. It gives you the confidence to act quickly on reliable data, the ability to proactively mitigate risks before they escalate, and ultimately, the power to ensure the resilience and durability of your critical data pipelines.
💡 Enhancement of URP detection is implemented in Release 94.5. For an overview of all the changes, check out the release note: Release 94.5: New Factor House docs, enhanced data inspection, and URP & KRaft improvements.
About Factor House
Factor House is a leader in real-time data tooling, empowering engineers with innovative solutions for Apache Kafka® and Apache Flink®.
Our flagship product, Kpow for Apache Kafka, is the market-leading enterprise solution for Kafka management and monitoring.
Explore our live multi-cluster demo environment or grab a free Community license and dive into streaming tech on your laptop with Factor House Local.
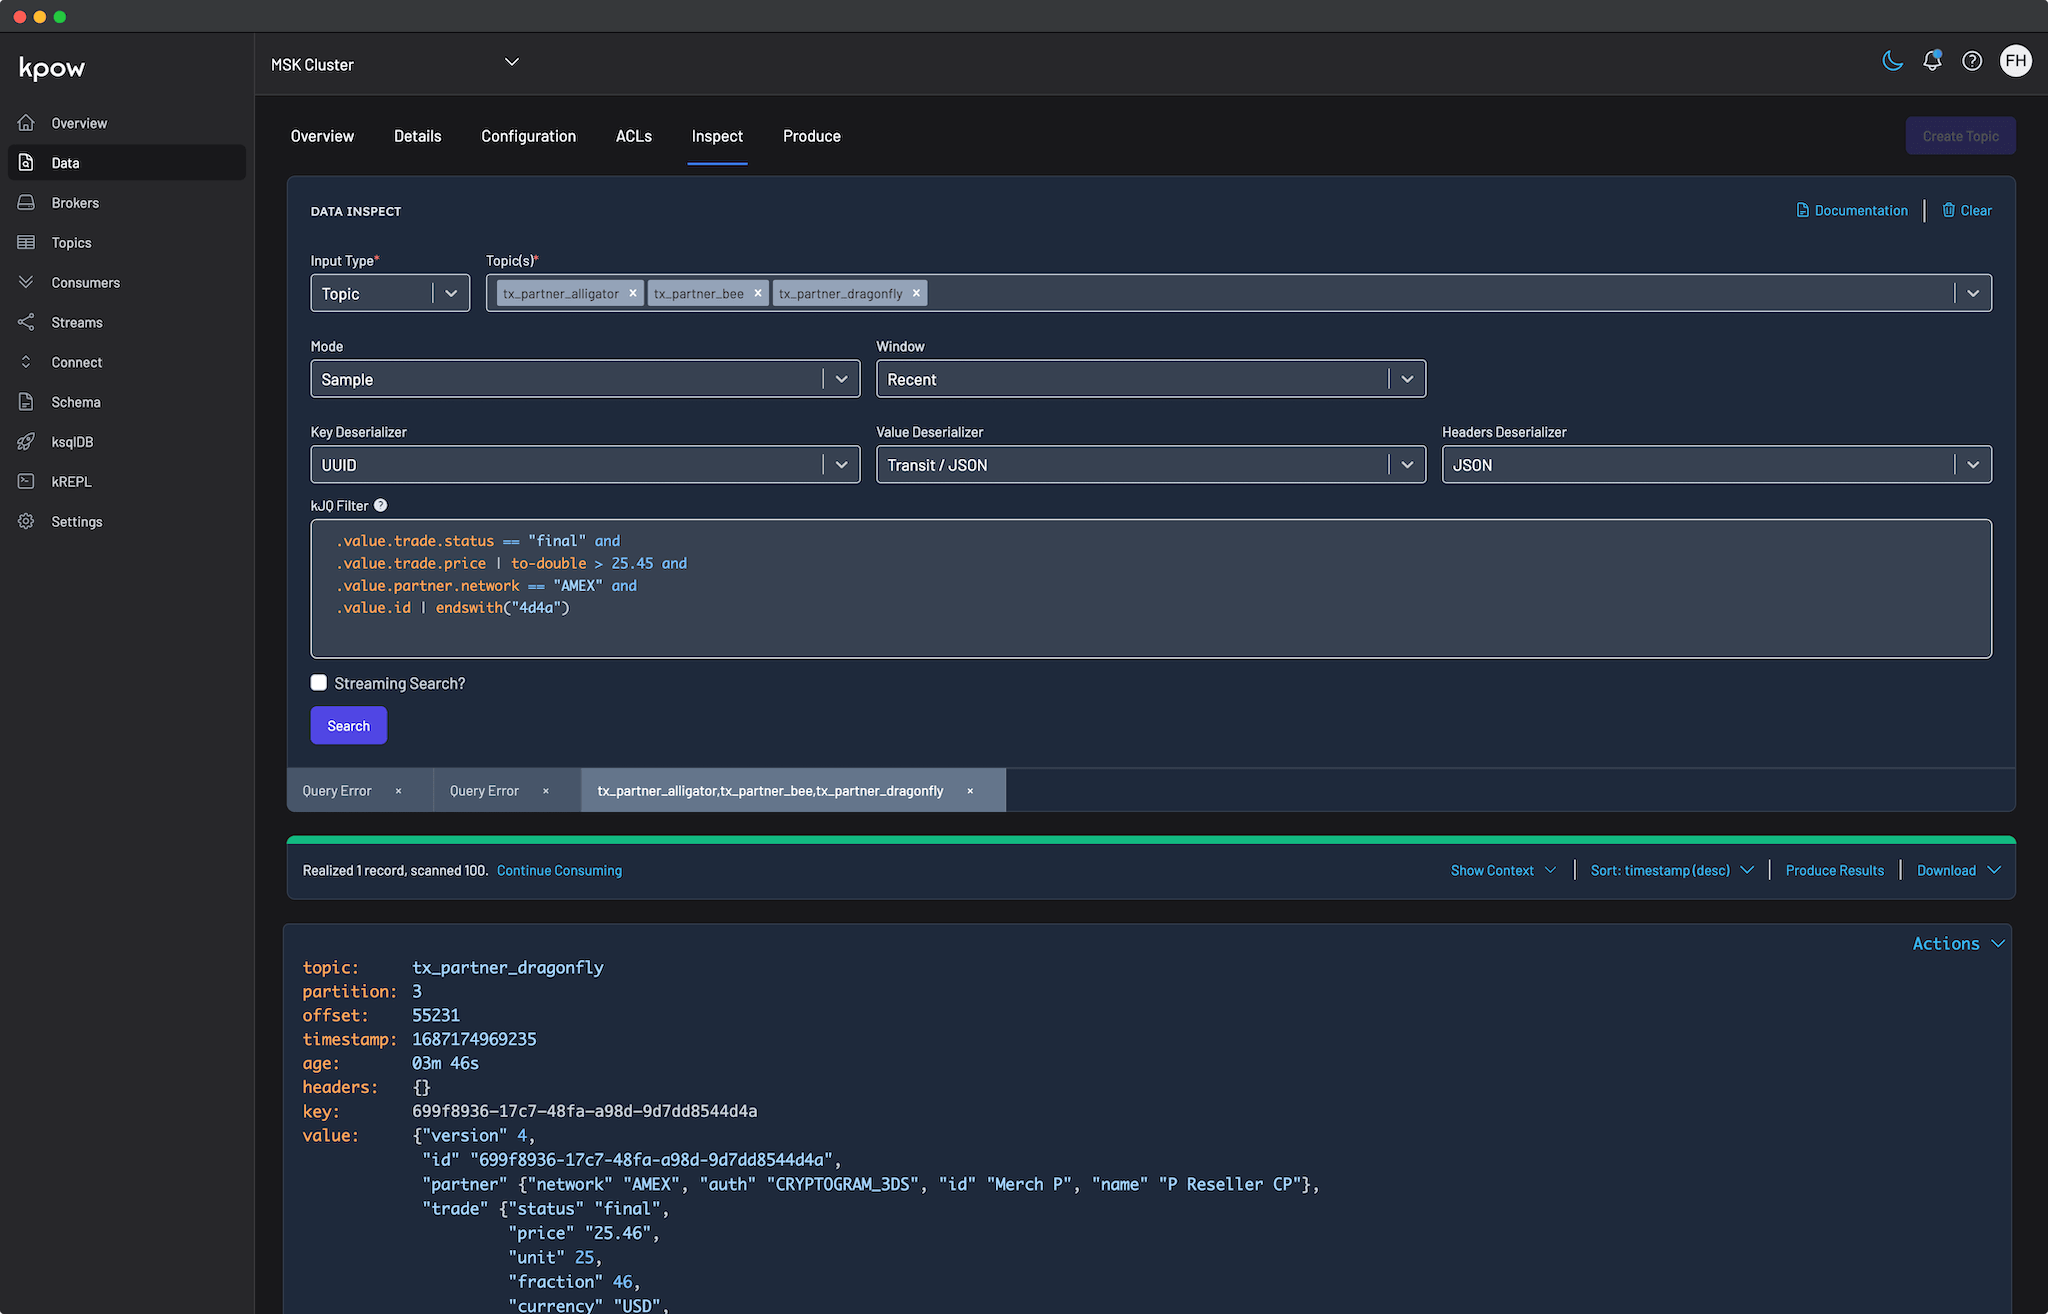
Enhanced calculation for more accurate health monitoring
Ensuring the fault tolerance of your Kafka clusters requires a precise and accurate count of under-replicated partitions. A challenging but common operational scenario can arise where a broker becomes unavailable, yet the overall cluster health status does not immediately reflect this change. This can mask a critical degradation in data durability, leading operations teams to believe their cluster is healthier than it actually is. Making decisions based on this incomplete information can delay necessary interventions.
To provide a more reliable and trustworthy view, Kpow has enhanced its calculation for under-replicated partitions. Instead of calculating replication status by iterating through each broker—a method that can be incomplete if a broker is offline and unreachable—our new calculation iterates directly through every topic-partition defined in the cluster.
This partition-centric approach provides a more comprehensive and authoritative view of the cluster's state. It is precisely this change that allows the system to correctly detect partitions with fewer in-sync replicas than the configured replication factor, even when brokers are offline and not reported by the AdminClient.
This enhancement ensures that Kpow's health monitoring is a precise reflection of your cluster's real-time condition. It gives you the confidence to trust the metrics you see and act decisively to investigate and resolve replication issues, thereby maintaining a resilient and robust system.
Surfacing URP details in Kpow
This vital health information, now powered by our more accurate calculation, continues to be clearly presented on both the Brokers and Topics pages of the user interface. We've retained this dual perspective as it remains essential for diagnosing problems from different angles—whether you're investigating a single problematic broker or assessing the health of a critical application's topic.
On both pages, summary statistics displays the total number of under-replicated partitions. If this count is greater than zero, it serves as an immediate visual alert. A detailed table automatically appears, listing all affected topics along with their specific URPs. This allows you to quickly identify which topics are at risk and gather the necessary context to restore full replication.
On the Brokers Page:
On the Topics Page:
To further strengthen monitoring and alerting capabilities, new Prometheus metrics have been introduced to track under-replicated partitions. These metrics integrate seamlessly with your existing observability stack and provide more granular insights for automated alerting and historical trend analysis:
- broker_urp: The total number of under replicated topic partitions belonging to this broker.
- topic_urp: The total number of under replicated partitions belonging to this topic.
- topic_urp_total: The total number of under replicated partitions of all topics in the Kafka cluster.
Conclusion
Accurate and timely detection of under-replicated partitions (URPs) is fundamental to maintaining a resilient and reliable Apache Kafka cluster. With its enhanced calculation, Kpow provides a more precise and immediate understanding of your cluster's health by correctly identifying replication issues, particularly in scenarios involving broker failures. This enhanced detection, combined with detailed visibility in the Kpow UI and new Prometheus metrics for automated alerting, empowers you to proactively address replication issues, mitigate the risk of data loss, and ensure the continuous high performance of your real-time data pipelines. This feature update reaffirms Kpow's commitment to providing comprehensive and intuitive tooling for Kafka management and monitoring.
Case Study
xx min read
Heading 1
Heading 2
Heading 3
Heading 4
Heading 5
Heading 6
Lorem ipsum dolor sit amet, consectetur adipiscing elit, sed do eiusmod tempor incididunt ut labore et dolore magna aliqua. Ut enim ad minim veniam, quis nostrud exercitation ullamco laboris nisi ut aliquip ex ea commodo consequat. Duis aute irure dolor in reprehenderit in voluptate velit esse cillum dolore eu fugiat nulla pariatur.
Block quote
Ordered list
- Item 1
- Item 2
- Item 3
Unordered list
- Item A
- Item B
- Item C
Bold text
Emphasis
Superscript
Subscript
Blog Post / Enhanced Under-Replicated Partition Detection in Kpow
All
.webp)
Article
xx min read
Introducing Factor House Docs
We're excited to launch the new Factor House Docs, a unified hub for all our product documentation. Discover key improvements like a completely new task-based structure, interactive kJQ examples, and powerful search, all designed to help you find the information you need, faster than ever. Explore the new home for all things Kpow, Flex, Factor Platform and more.
Overview
We are excited to announce the launch of our new, unified documentation site: Factor House Docs. This new hub brings all our product documentation together into a single, streamlined resource, making it easier than ever to find the information you need.
Previously, our documentation was split between community and enterprise editions. Now, with Factor House Docs, all of that content is in one place with a simplified structure. This move is designed to provide a more cohesive and user-friendly experience for everyone.

About Factor House
Factor House is a leader in real-time data tooling, empowering engineers with innovative solutions for Apache Kafka® and Apache Flink®.
Our flagship product, Kpow for Apache Kafka, is the market-leading enterprise solution for Kafka management and monitoring.
Explore our live multi-cluster demo environment or grab a free Community license and dive into streaming tech on your laptop with Factor House Local.
Key hightlights
Unified product content
No more switching between different sites for community and enterprise documentation. All documentation for Kpow, Flex, and the upcoming Factor Platform is now in one centralized location. This consolidation simplifies the user experience by providing a single source of truth for all product-related information, regardless of your edition.
Clear feature availability
To help you quickly identify which features are available in your edition, we've introduced clear COMMUNITY, TEAM, and ENTERPRISE badges throughout the documentation. This makes it easy to understand the capabilities of your current plan and see what additional features are available if you choose to upgrade.
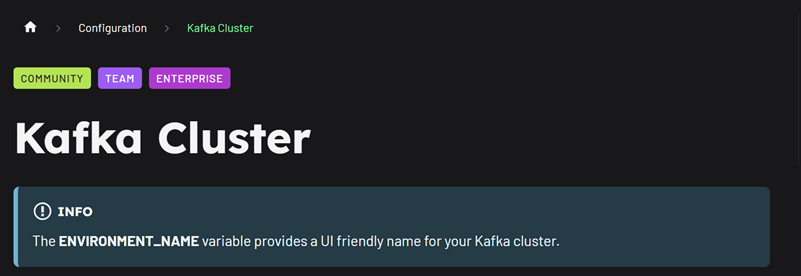
Improved organization
One of the most impactful changes in the new Factor House Docs is the move from a dense, reference-style list to a clear, task-oriented structure. This isn't just a redesign; it's a fundamental improvement in how you find and use our documentation.
A good example of this is how we've consolidated administrative features.
In the previous documentation, getting a complete view of your administrative capabilities required you to hunt through completely different sections. Core admin controls like Staged mutations and Temporary policies were buried under the User authorisation section. Meanwhile, other powerful administrative tools like Bulk actions and Data governance were located in the general Features list, mixed in with dozens of other unrelated items. To perform your duties, you had to already know which features we considered part of "authorization" and which were just "features."
The new documentation eliminates this guesswork by introducing a single, dedicated Administrative workflows section.
Content is now organized to reflect a natural user journey:
- A clear onboarding path: Instead of a jumble of topics, you are now greeted with a clear, sequential path: Getting started, followed by dedicated Installation and Configuration sections. This guides you logically from initial setup to a fully running instance.
- Topic-based grouping: The monolithic "Features" section is gone. Related capabilities are now grouped into intuitive, high-level categories. For instance, powerful data tools are now consolidated under the Query languages & Data management section. This creates a focused hub for anyone responsible for the data itself, bringing together everything from querying with kJQ to inspecting topics.
- Enhanced discoverability: This new structure makes it much easier to discover the full range of Kpow's capabilities. By browsing top-level sections like Integration & Kafka management, you can quickly get a sense of the available tools without having to read through a long, unstructured list.
This streamlined layout is designed to get you to your answers faster, reducing search time and making the entire platform more accessible and easier to master.
Powerful search, instant answers
Finding the exact information you need is now faster and easier than ever. Using Algolia DocSearch, our documentation site delivers instant, relevant results across all sections. No more navigating multiple pages to locate a specific configuration property or function.
Whether you’re looking for an environment variable, a kJQ example, or details on Role-Based Access Control, the global search guides you directly to the content you need. This improvement ensures you spend less time searching and more time building.
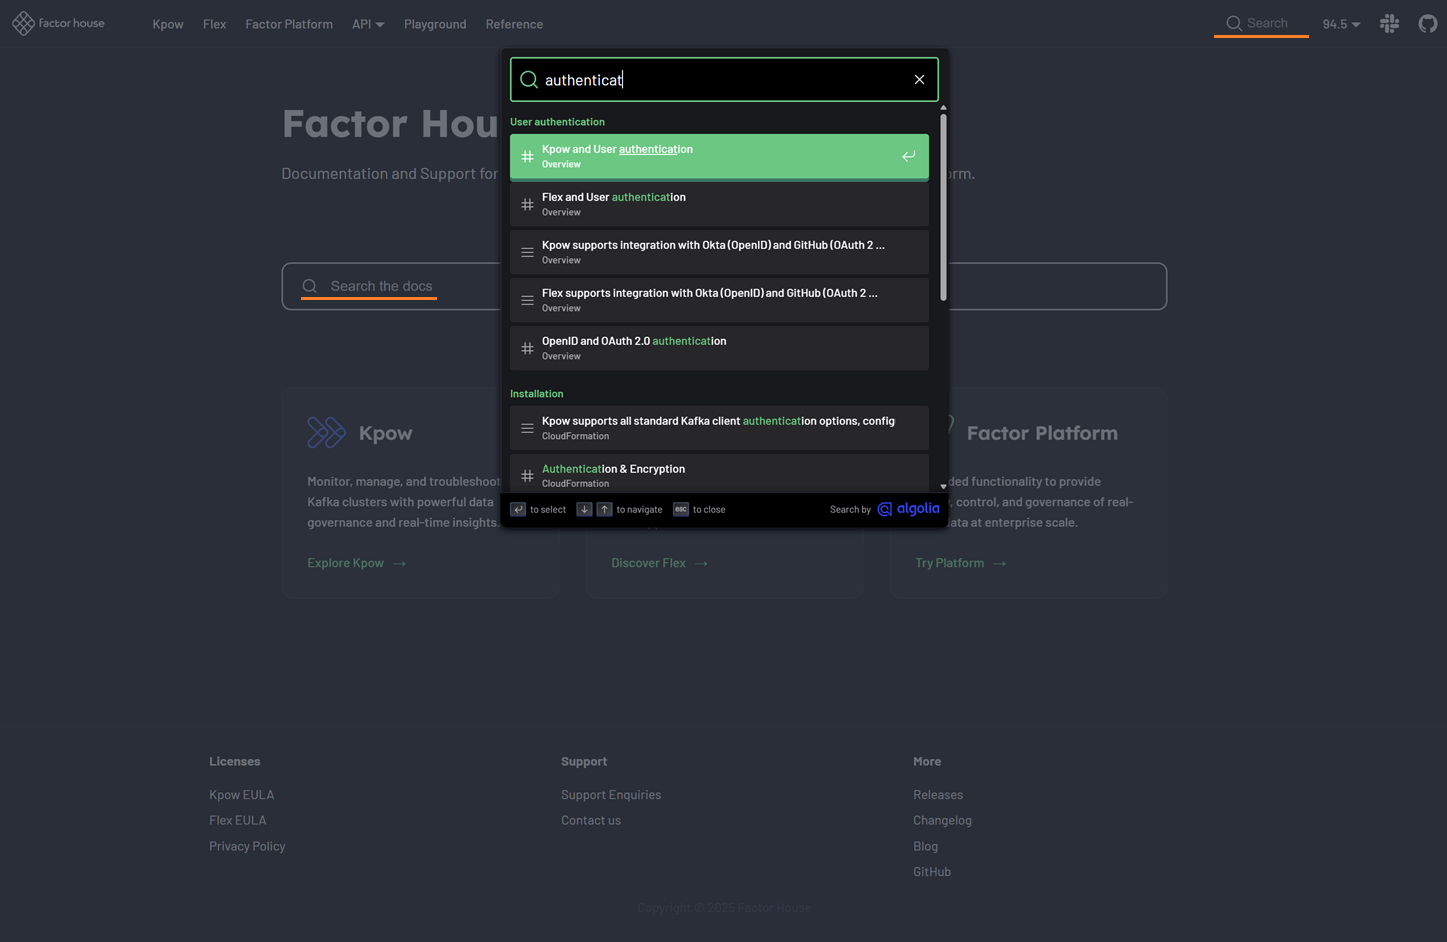
Interactive kJQ examples
Our new documentation includes a dedicated section for fully interactive kJQ examples. You can now modify both the kJQ filter and the JSON data in real-time to see how different filters work and experiment with the syntax. This hands-on approach allows you to test everything from basic filters and function calls to complex, nested logic right in your browser.
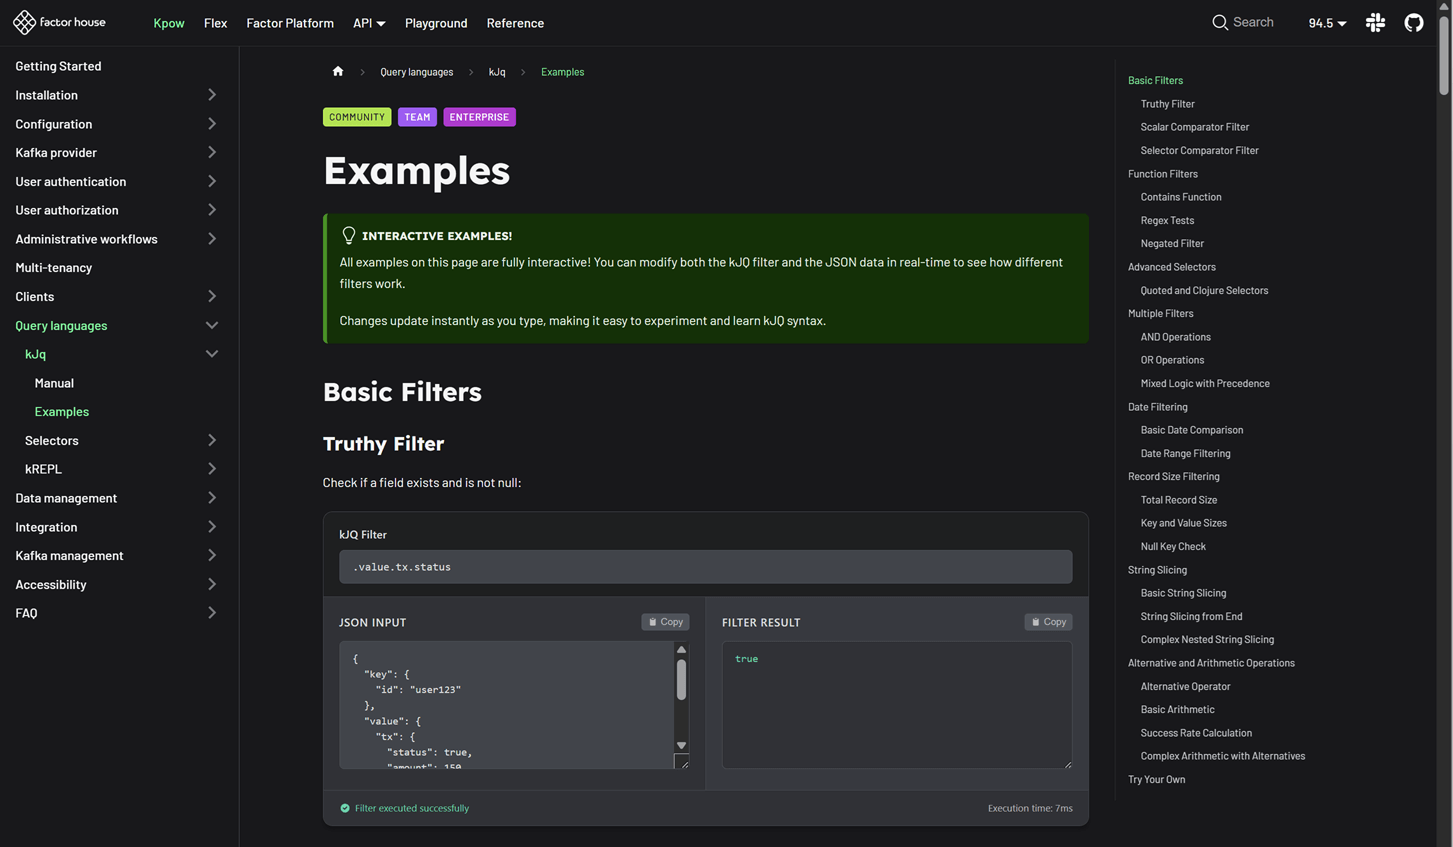
Hands-on playground
To further enhance your learning experience, we've added a new "Playground" section. This area features a collection of labs and projects designed to help you explore the full range of product capabilities in a hands-on environment.

Ready for the future
The new Factor House Docs site is built to be a long-lasting resource. The documentation for the new Factor Platform will be added and expanded upon its release, ensuring that this hub will remain the most up-to-date and comprehensive resource for all product information now and in the future.
Conclusion
We are confident that the new Factor House Docs will be a valuable resource for our users. We encourage you to explore the new site and update your bookmarks. The previous documentation site will be retired.
Case Study
xx min read
Heading 1
Heading 2
Heading 3
Heading 4
Heading 5
Heading 6
Lorem ipsum dolor sit amet, consectetur adipiscing elit, sed do eiusmod tempor incididunt ut labore et dolore magna aliqua. Ut enim ad minim veniam, quis nostrud exercitation ullamco laboris nisi ut aliquip ex ea commodo consequat. Duis aute irure dolor in reprehenderit in voluptate velit esse cillum dolore eu fugiat nulla pariatur.
Block quote
Ordered list
- Item 1
- Item 2
- Item 3
Unordered list
- Item A
- Item B
- Item C
Bold text
Emphasis
Superscript
Subscript
Blog Post / Introducing Factor House Docs
All
.webp)
Article
xx min read
Data Inspect Enhancements in Kpow 94.5
Kpow 94.5 enhances data inspection with comma-separated kJQ Projection expressions, in-browser search, and flexible deserialization options. This release also adds high-performance streaming for large datasets and expands kJQ with new transforms and functions—testable on our new interactive examples page. These updates provide deeper insights and more granular control over your Kafka data streams.
Overview
Following our recent improvements in Kpow release 94.3, which introduced AI-powered filtering and automatic deserialization, release 94.5 continues to enhance the data inspect experience. This latest version introduces several key additions, including comma-separated kJQ Projection expressions, in-browser search, multiple deserialization options, and attribute sorting. It also features a significant optimization with high-performance streaming and an enhancement to our query language with expanded kJQ capabilities. You can try out the new transforms and functions on the new interactive examples page on our Factor House docs. These updates provide more granular control and deeper insights into your Kafka topics, empowering developers to navigate and analyze their data with greater efficiency and precision.
About Factor House
Factor House is a leader in real-time data tooling, empowering engineers with innovative solutions for Apache Kafka® and Apache Flink®.
Our flagship product, Kpow for Apache Kafka, is the market-leading enterprise solution for Kafka management and monitoring.
Explore our live multi-cluster demo environment or grab a free Community license and dive into streaming tech on your laptop with Factor House Local.
Targeted data views with comma-separated kJQ Projection expressions
Kpow 94.5 introduces support for comma-separated projection expressions in kJQ, such as .value.base, .value.rates. This powerful feature allows you to extract multiple fields from Kafka records in a single query. Now you can create targeted data views without unnecessary information, streamlining your workflow and keeping your output clean. This functionality is available for both key and value sub-paths, offering greater flexibility in how you inspect your data.

Faster navigation with in-browser search
You can now use your browser's native search functionality (Ctrl + F) to quickly find records by JSON path or value when using kJQ filters. This eliminates the need to re-run queries, saving you time and effort. The results component is fully keyboard-friendly, adhering to the Listbox pattern for improved accessibility. This ensures a smoother and more predictable navigation experience for all users, including those who rely on screen readers.
Deeper insights into schemas and deserialization
Data Inspect now offers detailed schema metadata for each message, including schema IDs and deserializer types. This makes it easier to identify misaligned schemas and poison messages. To handle these problematic records, Kpow 94.5 provides several deserialization options:
- Drop record (default): This option ignores erroneous records, displaying only the well-formatted ones.
- Retain record: This includes both well-formatted and erroneous records. Problematic records are flagged with a 'Deserialization exception' message instead of displaying the raw, poisonous value.
- Poison only: This option displays only the erroneous records, with the value recorded as 'Deserialization exception'.
Improved readability with attribute sorting
When you select the 'Pretty printed (sorted)' display option, the attributes of the key or value are now sorted alphabetically by name. This improves the readability and consistency of your data during inspection, making it easier to compare records and identify specific fields.
High-performance streaming for large datasets
Kpow 94.5 is optimized for performance, allowing you to stream over 500,000 records without any UI lag. This enables the efficient analysis of large datasets, so you can work with high-volume topics without compromising on speed or responsiveness.
Expanded kJQ capabilities with new transforms and functions
The kJQ language has been significantly expanded with a host of new transforms, including parse-json, floor, ceil, upper-case, lower-case, trim, ltrim, rtrim, reverse, sort, unique, first, last, keys, values, is-empty, and flatten. Additionally, new functions such as within, split, and join have been added to enable more complex data manipulation directly within your kJQ queries.
For more details on these new features, please refer to the updated kJQ manual. Also, be sure to visit the new interactive examples page on our new Factor House docs site—it's a great way to quickly verify your kJQ queries.
Conclusion
Kpow 94.5 builds upon the foundation of previous releases to deliver a more powerful and user-friendly data inspection experience. The latest additions—including kJQ Projection expressions, in-browser search, and flexible deserialization options—provide more granular control over your data. Together with high-performance streaming and expanded kJQ capabilities, these enhancements solidify Kpow as an essential tool for any developer working with Apache Kafka. Be sure to test out the new kJQ features on the interactive examples page on our Factor House docs. Ultimately, this release is designed to streamline your workflows, reduce debugging time, and empower you to unlock the full potential of your data.
Case Study
xx min read
Heading 1
Heading 2
Heading 3
Heading 4
Heading 5
Heading 6
Lorem ipsum dolor sit amet, consectetur adipiscing elit, sed do eiusmod tempor incididunt ut labore et dolore magna aliqua. Ut enim ad minim veniam, quis nostrud exercitation ullamco laboris nisi ut aliquip ex ea commodo consequat. Duis aute irure dolor in reprehenderit in voluptate velit esse cillum dolore eu fugiat nulla pariatur.
Block quote
Ordered list
- Item 1
- Item 2
- Item 3
Unordered list
- Item A
- Item B
- Item C
Bold text
Emphasis
Superscript
Subscript
Blog Post / Data Inspect Enhancements in Kpow 94.5
All
Events & Webinars
Stay plugged in with the Factor House team and our community.

27 November 2025
[MELBOURNE, AUS] Apache Kafka and Apache Flink Meetup, 27 November
Melbourne, we’re making it a double feature. Workshop by day, meetup by night - same location, each with valuable content for data and software engineers, or those working with Data Streaming technologies. Build the backbone your apps deserve, then roll straight into the evening meetup.

Event
26 November 2025
[SYDNEY, AUS] Apache Kafka and Apache Flink Meetup, 26 November
Sydney, we’re making it a double feature. Workshop by day, meetup by night - same location, each with valuable content for data and software engineers, or those working with Data Streaming technologies. Build the backbone your apps deserve, then roll straight into the evening meetup.
Join the Factor Community
We’re building more than products, we’re building a community. Whether you're getting started or pushing the limits of what's possible with Kafka and Flink, we invite you to connect, share, and learn with others.


